Streaming MySQL to Snowflake with Snowpipe Streaming and Dynamic Tables to Save Money
Ricky Thomas
May 3, 2024
TL;DR
• Stream MySQL to Snowflake with sub-second latency and reduce ETL costs by up to 90%. • Use Streamkap, Snowpipe Streaming, and Dynamic Tables for real-time dashboards and ML model training. • This guide includes code examples for enabling logical replication and configuring parameter groups.
Introduction
This hands-on guide is for data teams who wish to ingest data from MySQL to a Snowflake data warehouse with sub-second latency and save on ETL costs.
Data warehousing has traditionally used slow batch processes but Streamkap utilises the database source transaction log file using change data capture methods for data replication to read the data in real-time without any load being put upon the database.
The data is then streamed into the data warehouses or data lakes using real-time inserts with an option to transform data before the insertion. The entire pipeline latency is usually sub-second at a lower cost than current ETL methods.
This guide is for data engineers but will benefit anyone interested in:
-
Reduce their ETL costs by up to 90% by switching from traditional ETL vendors.
-
Build real-time dashboards and customer-facing experiences.
-
Enable data science use cases such as training machine learning models.
-
Support analytical workloads for time-sensitive decisions.
-
Share data in real-time with customers.
The guide includes code examples, screenshots, and step-by-step instructions so that it’s easy to follow.
To replicate the source data, we will be utilising Streamkap, Snowpipe Streaming and Snowflake Dynamic Tables.
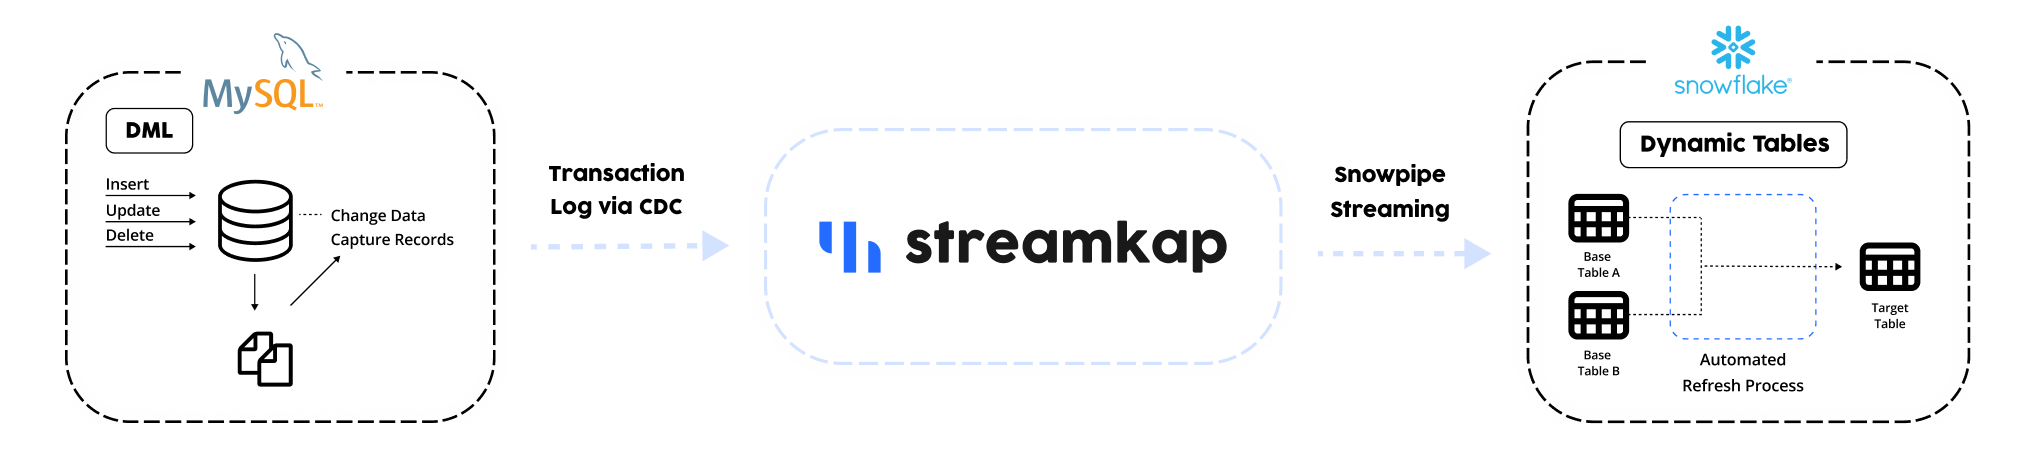
Setup MySQL
For this blog, we will be using MySQL RDS on AWS but if you require guides for other platforms, visit our docs here - MySQL Change Data Capture Setup Docs.
Enabling Logical Replication
To stream data in real-time from MySQL we will be taking advantage of the MySQL transaction log using Change Data Capture. Learn more at Change Data Capture for Streaming ETL.
Your database may have Change Data Capture enabled already.
-
Choose the parameter group used by the DB instance you want to modify
-
You can’t modify a default parameter group. If the DB instance is using a default parameter group, create a new parameter group and associate it with the DB instance
-
From Parameter group actions, choose Edit
-
Set the binlog_format parameter to the binary logging format of ROW
-
Set the binlog_row_image parameter to Full
-
Save changes
Connect to MySQL
Log in to a MySQL console (such as a SQL workbench) as a superuser. Superusers have the rds_superuser role.
Set binary log retention period
-
View current settings with
-
If less than 24 hours or null run
Rotate logs daily (For low volume write databases)
It is possible in low write databases; such as development or test databases; that log files will not fill up to rotate before the log retention setting. This will break the pipeline. For these databases, please execute the following to rotate the logs every 24 hours.
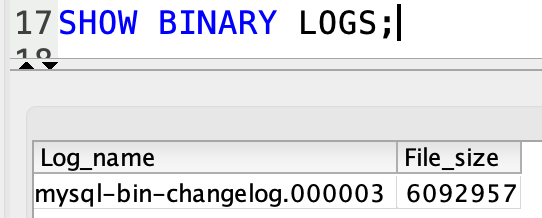
Verify binary logs are enabled
You can check either
-
Check the parameter group for the DB instance and that log_bin parameter is ON
-
Run
This statement should return the log file name and it’s current size.
Setup Permissions
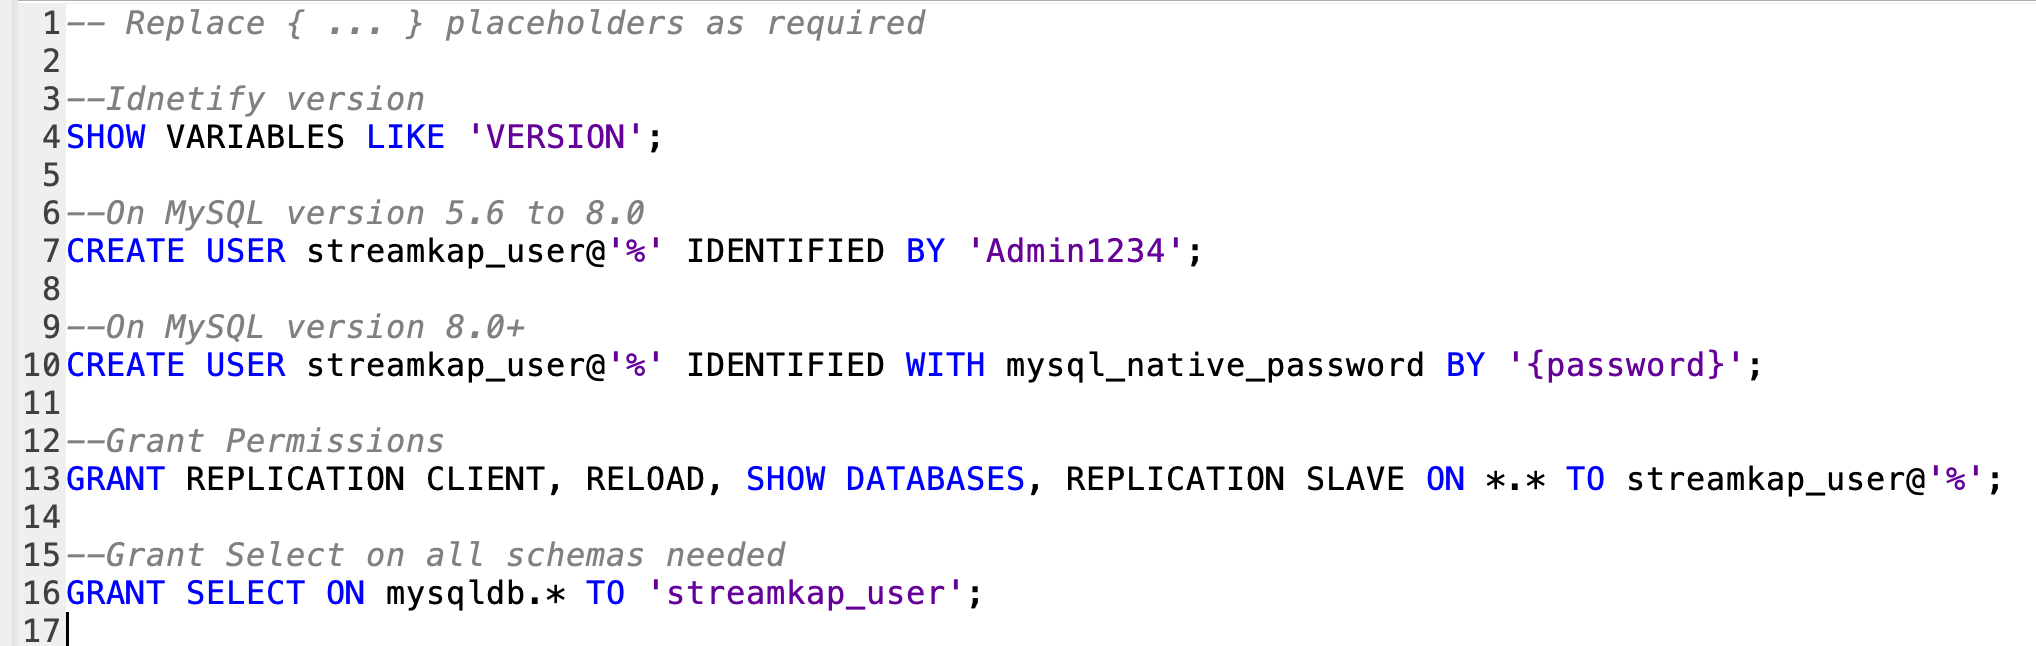
Enable Snapshots (If GTID not enabled)
Streamkap can carry out snapshots/backfills on the data. The preferred method is to use GTID. If GTID is not enabled on your database however, we will need to create a snapshot table to track progress of snapshot/backfills
Monitoring
It is important to monitor your MySQL binlog and the disk space it utilises. When a pipeline is active, this will remain small in size but if there is any disconnect in the pipeline, it can grow very quickly until the pipeline is resumed. It’s important here to provide ample space with auto growth and monitor using datadog for example.
Consider Access Restrictions
It is likely that your MySQL database is behind a firewall. It is possible to connect via IP whitelisting, SSH tunnels, VPN or AWS Private Link. Visit Connection Options to decide which is best for you.
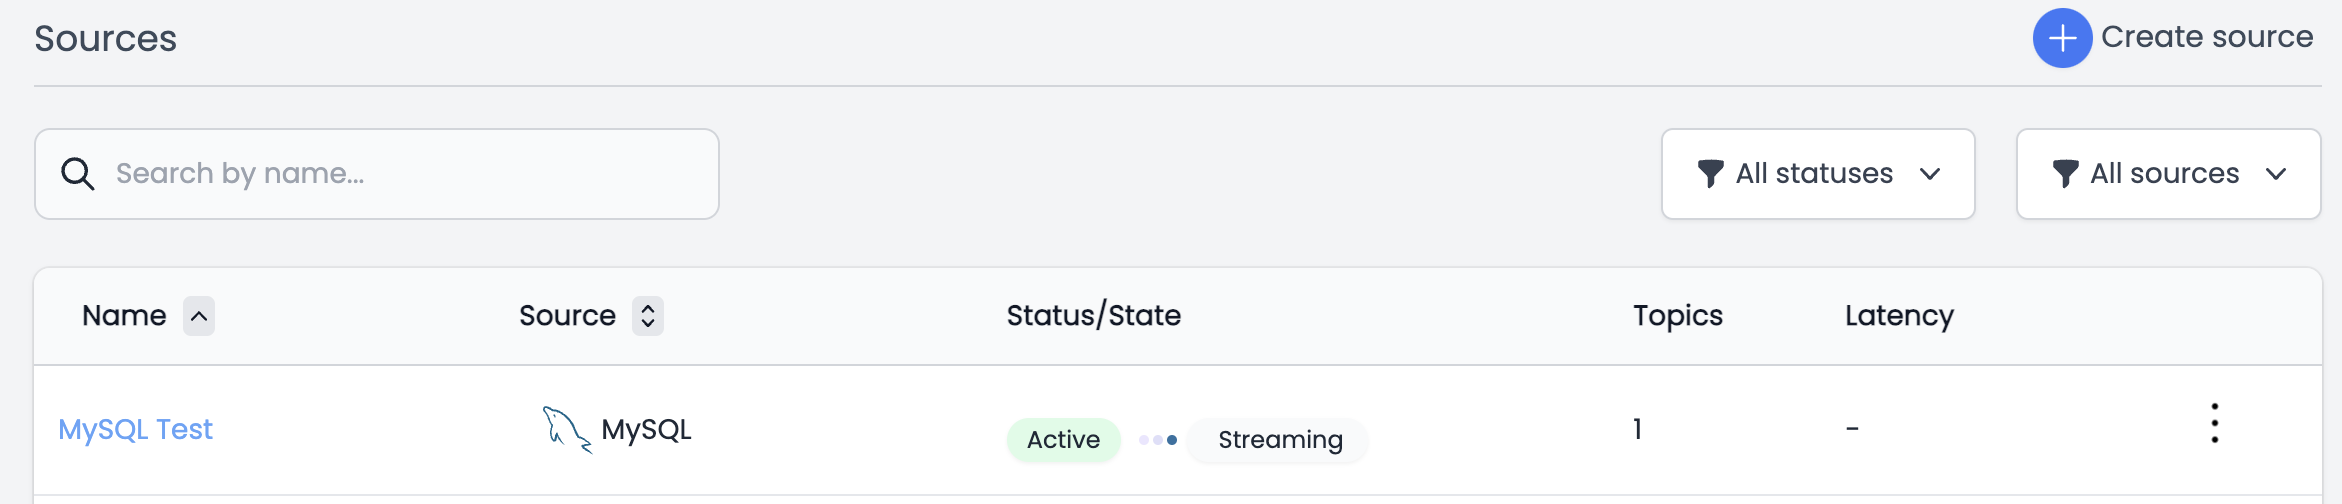
Setup MySQL Connector in Streamkap
-
Go to Sources, click New and Choose MySQL
-
Input:
- Name for your Connector
- Hostname
- Port (Default 3306)
- Username (Username you chose earlier, our scripts use streamkap_user)
- Password
- Database Name
- Add Schemas/Tables. The entire data set can be replicated or choose a subset of source tables.
- Click Save
You have now added your source database
Backfilling/Snapshots
As soon as MySQL has been added to Streamkap, the default behaviour is to take a snapshot/backfill of the existing data.
The rate can vary but as a guide you can expect approximately 500m rows of data per 24 hours on the lowest setting. You can adjust this up in the app to approx 10x faster taking you to approx 5bn rows per 24 hours and if you need to go beyond that, Streamkap support can increase it further.

Setup Snowflake Snowpipe Streaming
Using Snowsight, let’s start setting the parameters for the scripts. Replace the parameters accordingly such as the database to be used
Create a warehouse for minimal DDL work, i.e. table creation. The warehouse should be x-small, no scaling and auto-suspend on 1 minute
Create a database and schema for Streamkap
Create a Snowflake role with privileges for the Streamkap connector
Grant privileges on the warehouse
Grant privileges on the database
Grant privileges on the database schema
Create a user for Streamkap
Grant the custom role to the Streamkap user
Set the custom role as the default role for the Streamkap user. If you encounter an ‘Insufficient privileges’ error, verify the ‘$securityadmin_role’ has OWNERSHIP privilege on the ‘$user_name’.
Allow the Streamkap user access to the Snowflake account.
Latest IP addresses can be found at Streamkap IP Addresses
Key Pair Authentication
Snowpipe Streaming uses an RSA key pair for authentication. The instructions below will work on both mac or windows but for windows, you will need something like OpenSSH for Windows installed.
Generate an encrypted RSA private key. You’ll be asked to enter a passphrase which the connector needs.
Generates the public key, referencing the private key
You will now have two files (the key pair) named streamkap_key.p8 and streamkap_key.pub in the directory you ran the above commands.
Copy the public key contents to the clipboard after removing the comments.
The public key needs to be assigned to the Snowflake database user created for Streamkap earlier. Replace {public key} with the contents of your public key.
Setup Snowflake Connector in Streamkap
-
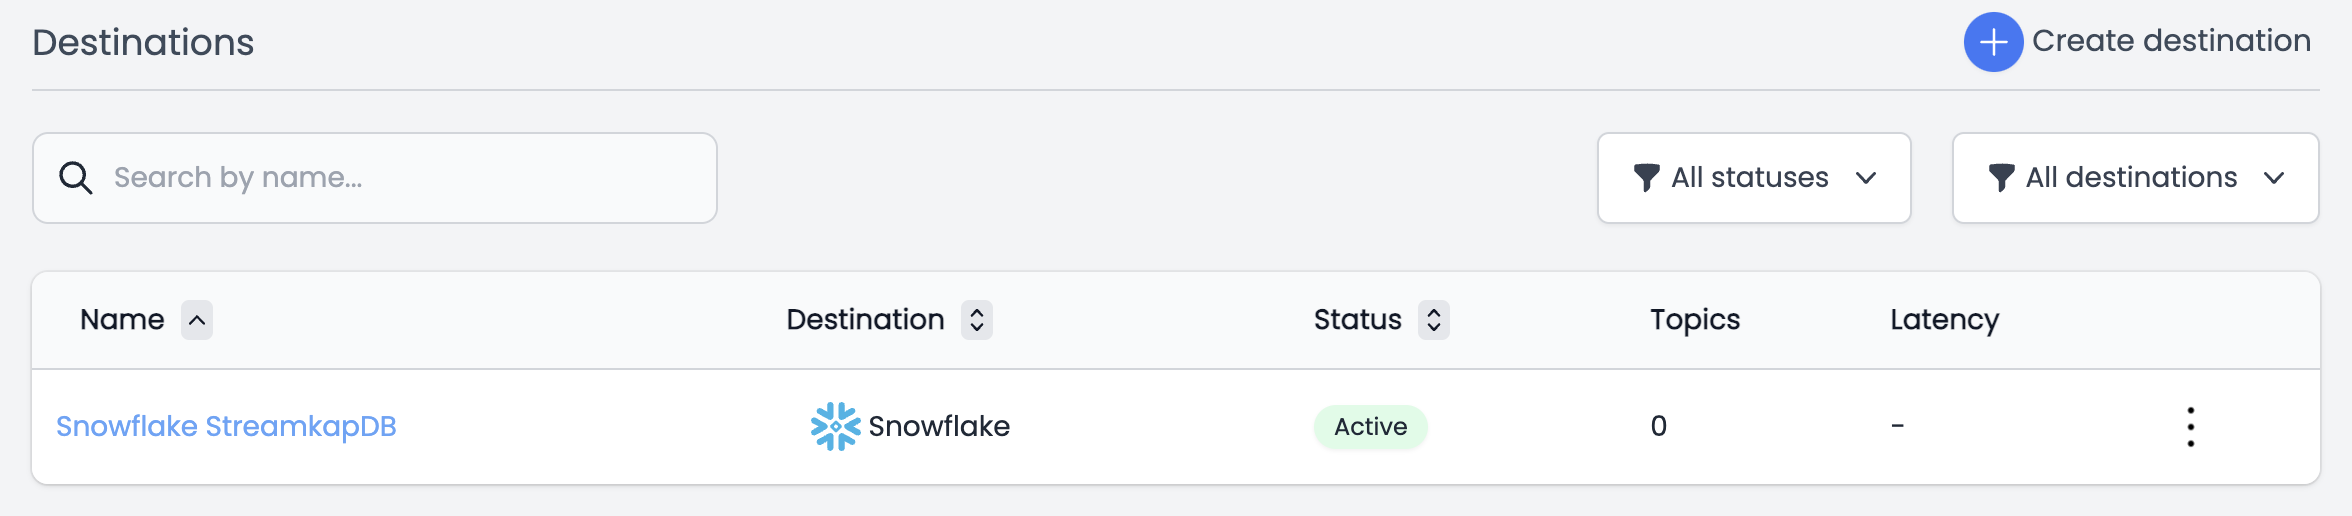
Go to Destinations, click New and Choose Snowflake
-
Input:
- Name
- URL
- Key (Paste the contents of your private key - streamkap_key.p8)
- Passphrase (the passphrase you set when creating the key pair)
- Database Name
- Schema Name
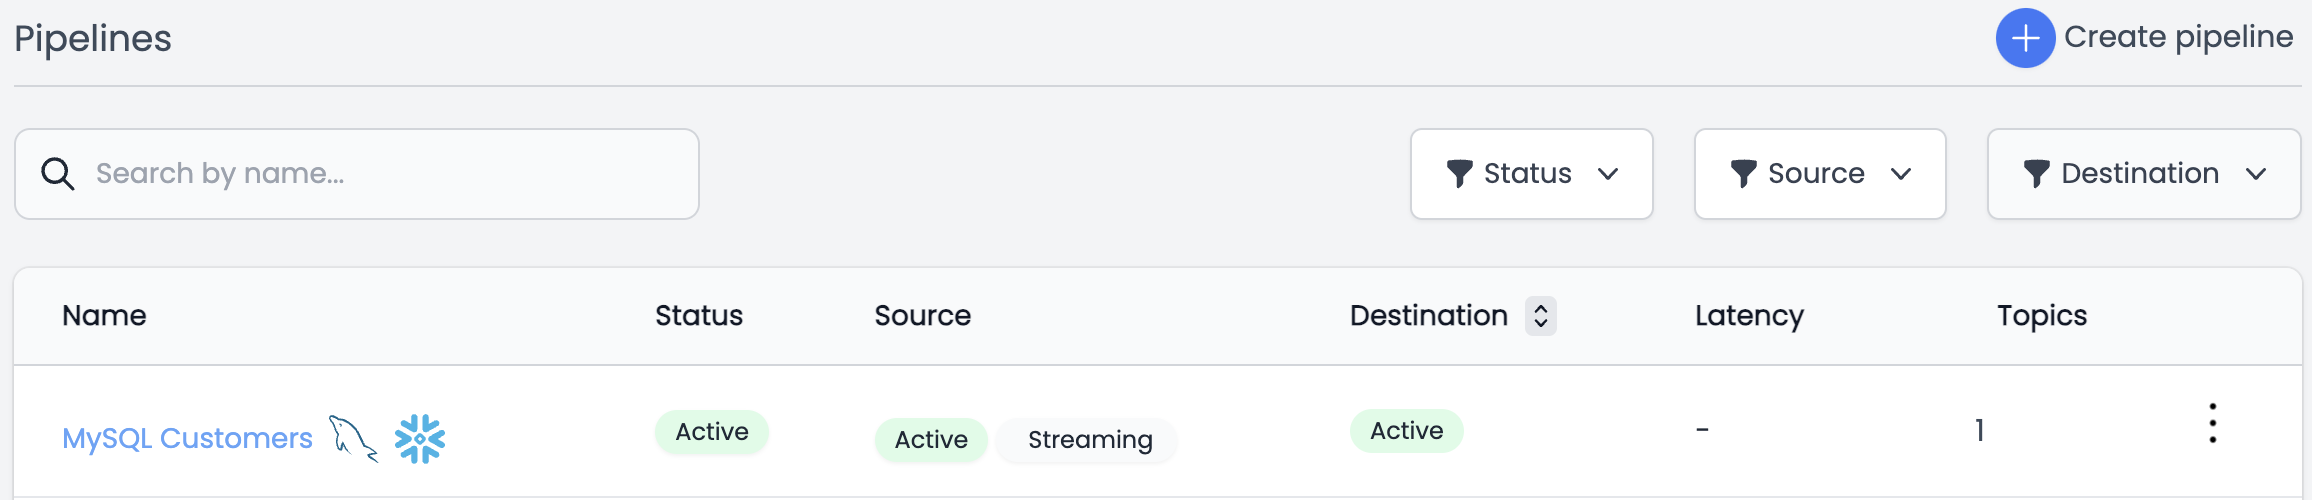
Replicate Data with a Pipeline
A pipeline links a source to a destination
-
Go to Pipelines, click New
-
Choose the MySQL Source
-
Choose the Snowflake Destination
-
Choose to sync all data or selectively choose
-
Save
The pipeline will now begin extracting data from the source and sending it to Snowflake. As you can see in the screenshot below, the pipeline shows a 349 millisecond latency for the entire pipeline.
Verify Data has arrived in Snowflake
We can see our mock new data has arrived in Snowflake.
As you can see, there are a few additional columns of data added to the ingested data.
- RECORD_METADATA - The metadata contains useful information in the event of diagnosing any issues
- _STREAMKAP_SOURCE_TS_MS - The timestamp in milliseconds the source record was created/modified/deleted
- _STREAMKAP_TS_MS - The timestamp in milliseconds when Streamkap processed the message
- __DELETED - True or False whether the record has been deleted at source.
_STREAMKAP_OFFSET - This is a unique ID of the record.
If you would like to query the streamkap date/time fields, they can be converted from milliseconds to something more readable by using the following:
Schema Drift with Snowflake Streaming
Schema drift is essential for production pipelines. Streamkap supports the handling of schema drift on all data sources and ensures these schema changes are evolved in Snowflake. More details are available in the Streamkap documentation.
Snowflake Dynamic Tables
Now the data is in Snowflake, you can use various solutions such as DBT to work with the data.
Dynamic Tables are a new way to model your data. Dynamic Tables are tables that are created from the results of a query. This means that you can define a dynamic table without having to create a separate target table or write code to transform and update the data. Instead, you can simply specify the SQL statement that performs the transformation, and Snowflake will automatically update the materialized results through regular (and often incremental) refreshes.

When to use Dynamic Tables?
Dynamic Tables are a good choice for cases where:
-
You want the fastest and most efficient way to model data streamed into Snowflake, for most cases
-
You need to materialize the results of a query on one or more base tables while being able to use functions such as window functions.
-
You would like data to refresh and to track data dependencies without writing code.
-
You would like the data to be fresh when it’s available rather than having to implement fine-grained control over the refresh schedule.
Using Dynamic Tables with Snowflake Streaming
Snowpipe Streaming currently supports inserts as append-only, which is pretty normal in data streaming. Many companies prefer this since it keeps a tracked version of all changes for a period of time of your choosing.
However, you will still need some final state tables which return only the most recent records. With Dynamic Tables, we can utilise the window function to create materialized tables with a lag of just 10 seconds.
As a result of updates to a source table, you will insert modified data. Here is the mock data for such a set of changes.

Here is the code to create a dynamic table on top of our mock Customer data, which has a target lag of 10 seconds.
The resulting query on the new dynamic table now looks like this

Dynamic Tables have their own heading under the schema.

Some queries will prevent the table refreshing incrementally and will force a background full refresh. See Table Refreshes and Monitoring Dynamic Tables for more detail.
Data Ingestion Costs
Traditionally, streaming data was viewed as a special case where businesses had to truly justify spending because of higher costs and complexity. We hope we have shown you that the complexity is now comprable to using batch ETL processes. With the stack described here we now find that streaming is also less expensive than batch processing. See below for any analysis of the components.
Snowpipe Streaming
Snowpipe streaming is very cost effective for ingesting data. The cost is made up from two charges which are an insertion cost as well as a background process cost. You can expect to be billed somewhere between 10 to 18 Snowflake credits per 1 TB of data ingested. To help give context, 1 TB of data could equate to approximately 5 billion rows of data and therefore if we assume a Snowflake credit is $2, then we are looking at a cost of up to $36 per month to ingest 5 billion rows of data.
Dynamic Tables Costs
Dynamic Tables use a warehouse like other operations within Snowflake and are billed the same. Key points:
-
You can utilise existing or new warehouses
-
The cost is dependent on complexity and target lag for each Dynamic Table
-
The ability to reach the target lag may depend on the power of your warehouse
Streamkap Costs
Streamkap charges per GB volume processed, with costs of $1.5GB per GB for a typical deployment.
Streaming Data with Streamkap and Snowflake
Streaming data has traditionally been expensive and difficult to manage. However, with the combination of Streamkap and Snowflake, these challenges are no longer a problem.
Streamkap is a drop-in replacement for the vendors and methods you currently use to sync data from databases. It is easy to use and can be deployed in minutes.
I hope this summary blog has convinced you of the benefits of using Streamkap and Snowflake for streaming data.
If you are interested in a free trial, sign up at Streamkap.
Ricky Thomas
LinkedInAuthor Bio
Ricky has 20+ years experience in data, devops, databases and startups.
Published
May 3, 2024
TL;DR
• Stream MySQL to Snowflake with sub-second latency and reduce ETL costs by up to 90%. • Use Streamkap, Snowpipe Streaming, and Dynamic Tables for real-time dashboards and ML model training. • This guide includes code examples for enabling logical replication and configuring parameter groups.
Related blog posts
.png)
Why Apache Iceberg? A Guide to Real-Time Data Lakes in 2025
Apache Iceberg brings SQL tables to cloud storage with ACID transactions and time travel. Learn why it's essential for 2025.
AWS RDS PostgreSQL Set Up
AWS RDS PostgreSQL stands out as one of the most widely used production databases. Its global adoption and everyday usage have prompted Amazon to make it exceptionally user-friendly. New users can set up an RDS PostgreSQL instance from scratch in just a few minutes.
Databricks Warehouse Set Up
Getting started with Databricks is a breeze, regardless of your experience level. This guide provides clear instructions on how to create a new account or use your existing credentials, ensuring a smooth and efficient streaming process.