How to Stream MongoDB to ClickHouse for Real-Time Analytics
Paul Dudley
June 17, 2025
TL;DR
• Stream MongoDB e-commerce data to ClickHouse for real-time customized discounts and order management. • Build a high-performance analytics system that processes large volumes of orders and cart activity with minimal latency. • This guide covers MongoDB configuration, ClickHouse setup, and Streamkap pipeline creation.
Table of Contents
Configuring an Existing MongoDB Database Configuring MongoDB Network for Streamkap Compatibility Fetching MongoDB Connection String for Streamkap Setting up a New ClickHouse Warehouse Fetching Credentials from Existing ClickHouse Warehouse Configuring Streamkap Connectors and Pipeline Validating the Streamkap Pipeline IntegrationIntroduction
Data-driven decision-making is only as effective as the systems that power it. Unfortunately, many traditional architectures can’t keep pace with today’s e-commerce velocity. Say goodbye to slow data pipelines. Streamkap makes it effortless to move your e-commerce data from MongoDB to ClickHouse in real-time, so your decisions are powered by now, not yesterday.
With this guide, businesses can build a real-time e-commerce order management streaming pipeline from MongoDB to ClickHouse to enable real-time customized discounts with a few clicks. By creating a direct pipeline between MongoDB’s transactional data and ClickHouse’s analytical engine, engineering teams can build a high-performance analytics system that swiftly processes large volumes of e-commerce orders and cart activity with minimal latency.
Guide Sections:
| Prerequisites | You will need MongoDB, ClickHouse, and Streamkap accounts. |
|---|---|
| Configuring an Existing MongoDB | For an existing MongoDB setup, you must adjust its configuration to ensure compatibility with Streamkap. |
| Creating a New ClickHouse Warehouse | This step will help you set up a ClickHouse account, an internal data warehouse, and a Streamkap role. |
| Fetching credentials from existing ClickHouse Destination | For your existing ClickHouse data warehouse, you’ll need to fetch credentials to enable Streamkap to write data. |
| Streamkap Setup | Configuring MongoDB as the source, setting ClickHouse as the destination, and linking them through a data pipeline. |
Are you ready to capitalize on your data? Join us!
Prerequisites
Make sure you have the following ready so you can follow this guide:
- StreamkapAccount: To get started, make sure you have an active Streamkap account with admin or data admin permissions. Don’t have one yet? No worries—you can sign up here in just a few clicks.
- ClickHouse Account: Additionally, before you dive in, make sure you’ve got an active ClickHouse account with admin access. If you haven’t set one up yet, you can easily create an account here.
- MongoDB Account: Finally, to create, modify, or manage databases and tables in MongoDB, you’ll need an active MongoDB account. If you don’t have one yet, you can sign up here to get started.
MongoDB Set Up
MongoDB is a popular NoSQL database recognized for its scalability, high availability, and low latency performance. Its user-friendly design and flexibility make it a preferred choice for managing large datasets in production. Getting a MongoDB instance up and running is fast and easy, enabling new users to begin within minutes.
If you already have a MongoDB instance, integrating it with Streamkap is a breeze. In this section, we’ll guide you through setting up and configuring MongoDB to ensure seamless compatibility with Streamkap, delivering reliable and optimized real-time performance.
Configuring an Existing MongoDB Database
Step 1: Create a Streamkap User in the Existing Database to Access Data
- Login to MongoDB Console.

- Once logged in, you’ll be in your Dashboard.
- In the left-hand navigation menu, go to “Security > Database Access”.

- Click Add New Database User.

-
Choose “Password” for the authentication method.
-
Enter the username and password for the new Streamkap user.

- Scroll down to the “Database User Privileges” section. On the drop-down menu, select “Specific Privileges”.
- Under “Specific Privileges”, add the following roles/privileges
- readAnyDatabase
- read on your MongoDB database that you want to stream. (Here, we are streaming an electronic store’s order inventory data.)
- Then, click “Add User”.

- You’ll be redirected to the Database Access page, where your Streamkap user will be listed.

Step 2: Enable Snapshots through MongoDB
To ensure reliable and consistent change data capture (CDC), Streamkap requires an initial snapshot of your MongoDB database. This process captures the baseline state of the data before CDC begins. As part of this setup, a dedicated collection should be created to facilitate snapshot tracking and integrity.
To proceed, create the streamkap_signal collection (make sure to use the same collection name).
- Navigate to your MongoDB dashboard and select the “Clusters” tab. You’ll see a list of all available clusters.
- As outlined in this guide, you should have a cluster that contains all the collections and documents associated with your e-commerce or any application.
- Navigate to the one with your data, then click “Browse Collections”.

- You will be directed to the “Collections” page.
- Navigate to the “Collections” section and select the “+” icon next to your database name to create a new collection.

- Name the collection as lowercase streamkap_signal (mandatory naming convention expected from streamkap).

Step 3: Snapshot Permissions to Streamkap User
The streamkap user created in “Step 1” would require readWrite privileges on the streamkap_signal collection. This permission is necessary to achieve change data capture (CDC). To make the configuration changes follow the below steps:
- Go to your “Dashboard” and select “Database Access”.
- Under “Database Users”, click on “Edit” for the streamkap_user created in Step 1.

-
Scroll down to the “Database User Privileges” drop-down menu, and select “Specific Privileges”.
-
Under Specific Privileges, add the following role/privilege:
-
readWrite@.streamkap_signal

Configuring MongoDB Network for Streamkap Compatibility
MongoDB automatically whitelists your current IP, however we need to manually whitelist IP addresses of Streamkap. This section outlines how to configure access rules to allow connectivity from both Streamkap IP addresses and other trusted sources, ensuring seamless integration and communication.
- On your MongoDB dashboard navigate to “Network Access” on the left pane and click “+Add IP Address”.

- If this is a demo project select “Allow Access from Anywhere” and proceed to next steps.
- For production grade projects we recommend explicitly whitelisting IPs vs allowing access from anywhere.
- To add “Streamkap’s IP”, see the table on Streamkap dedicated IP addresses, and then add the IP address corresponding to your region as “Access List Entry”.

Streamkap dedicated IP addresses
| Service | IPs |
|---|---|
| Oregon (us-west-2) | 52.32.238.100 |
| North Virginia (us-east-1) | 44.214.80.49 |
| Europe Ireland (eu-west-1) | 34.242.118.75 |
| Asia Pacific - Sydney (ap-southeast-2) | 52.62.60.121 |
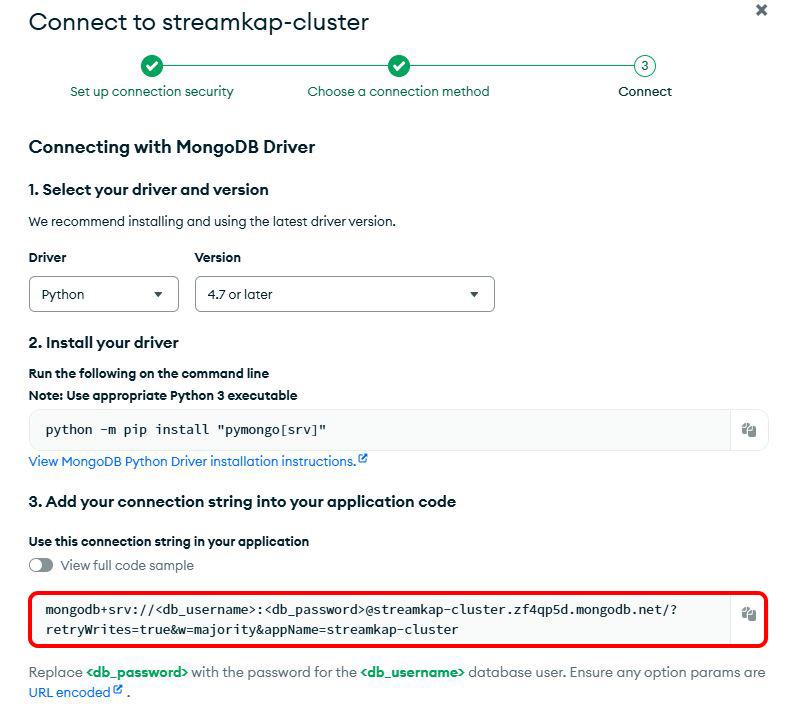
Fetching MongoDB Connection String for Streamkap
To establish a connection between Streamkap and MongoDB, a valid connection string is required. You can obtain this connection string by following the steps outlined below.
- On your MongoDB dashboard select “Clusters” on the left panel.
- Underneath your cluster, click on the “Connect” button.

- Copy the connection string and store it securely. We will plugin this string in Streamkap when we configure the pipeline.
ClickHouse Set Up
Among all data warehouse options, ClickHouse is quickly becoming a top choice. It is a highly performent, open-source columnar database management system built for online analytical processing (OLAP). Renowned for its speed and scalability, it is commonly used in data-heavy applications that demand real-time analytics on large datasets. It enables users to store, process, and analyze massive amounts of (un)structured data with speed and efficiency.
This section guides you through setting up and configuring ClickHouse for Streamkap streaming, ensuring seamless integration and optimized data flow.
Setting up a New ClickHouse Warehouse
Step 1: Creating a New ClickHouse account
-
Navigate to your ClickHouse account.
-
On the signup page, enter the name of your data warehouse (e.g. streamkap_datawarehouse).
-
Choose a cloud provider of your choice (e.g. “AWS”), along with an appropriate region, and instance type (e.g. Mini 8 GB). The region choice will depend on the choice of cloud provider.
-
Click on “Create Service”.

- Please wait for the service to be provisioned. This process will take a few seconds.
Step 2: Create a ClickHouse Warehouse
- You can skip the “Tell us a bit about your case” prompt.
- You’ll get a dashboard as shown below. Click “Getting Started” on the left navigation panel.
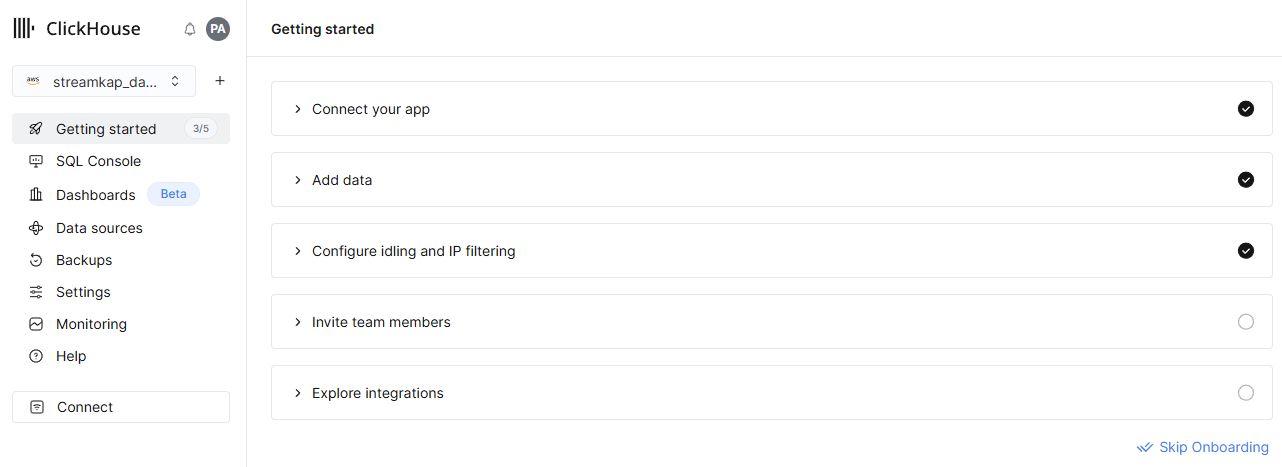
- Click “Connect Your App” section, copy the highlighted “hostname”, and then securely store it in a safe location.

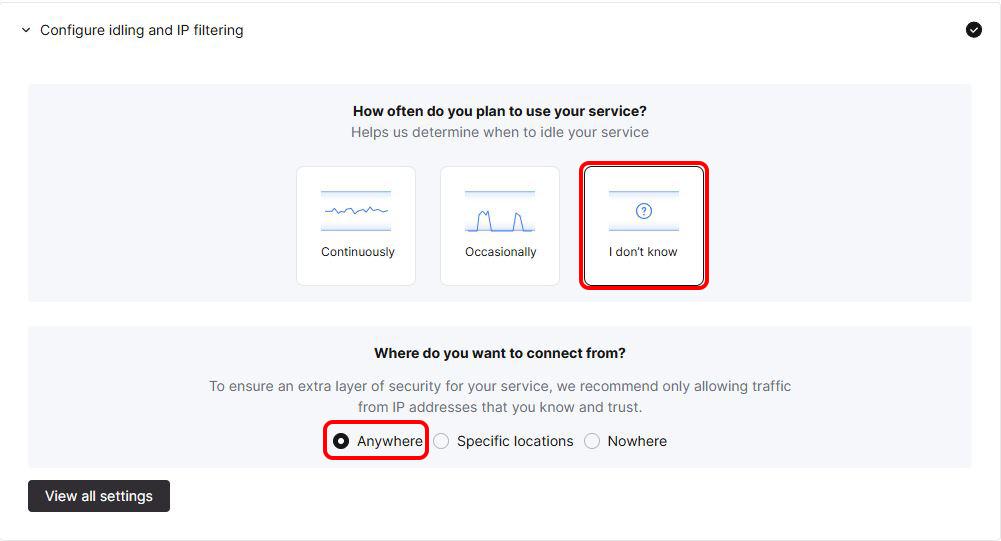
- In the “Configure idling and IP filtering” section, add the Streamkap regional IP address to the access list to ensure reliable connectivity between the ClickHouse warehouse and the StreamKap integration.

- For test projects you could choose the “Anywhere” option, however, we would not recommend this option for production-grade projects.
- Finally, click on “Submit” to proceed.
Step 3: Set up Role & User in ClickHouse for Streamkap Streaming
We would need to run a few essential SQL queries to create role and user.
- Go to the ClickHouse dashboard.
- Navigate to the “SQL Console” on the left-hand side, select “Query”, and choose the “default database”.

- Creating a dedicated user and role for Streamkap to access the ClickHouse database is recommended.
- Execute the following “SQL statements” to create a role, grant the appropriate privileges, provision a user account, and associate the role with the user to enforce role-based access control.
- Make sure to plugin your own password.
- The SQL queries will look like the following in your query editor.

Fetching Credentials from Existing ClickHouse Warehouse
In this step, you will retrieve the following details:
- Hostname - The IP address or URL of your ClickHouse instance.
- Port - (default: 8443)
- Username - “streamkap_user“ or any other applicable username.
- Password - The password for the above username.
- Database - The name of the appropriate database.
- Click on “Connect” on the left-side navigation pane.

- Copy the “hostname” as illustrated below**.**
- Copy the corresponding username and password to a secure location.
- Decide which database should receive data from MongoDB and record the same in the secure location.
Streamkap Set Up
Streamkap is a real-time data streaming and replication solution built to move data efficiently from transactional sources like MongoDB to analytics engines like ClickHouse. It enables smooth, low-latency pipelines that let you process and analyze high-volume data.
Configuring Streamkap Connectors and Pipeline
Step 1: Adding MongoDB as a Source Connector
If the above steps were followed as described, MongoDB, by default, should be Streamkap compatible.
Note: You must have admin or data admin privileges to continue with the following steps.
- Log in to Streamkap.

- On the left side navigation pane
- click on “Connectors”
- click on the “Sources” tab
- click the “+ Add” button as shown below
- Enter “MongoDB” in the search bar and select it from the list of available services, as depicted below.

- Plugin the relevant details to the MongoDB connection string from the section “Fetching MongoDB Connection String for Streamkap”.

- Manually add your MongoDB database name and choose all collections you want to stream. In this demo, we’ve added the `electronic_store` database along with its four collections.

- Once the database and collections are added, click “Save”.
- A new connector will be listed in “Connectors > Sources”.

Step 2: Adding a ClickHouse Connector
- To add ClickHouse as a destination navigate to the “Connectors” tab on the left side pane, click on “Destination” and then click the “+Add” button.
- Search and click on the “ClickHouse” option.

- The settings for ClickHouse are as follows:
Name - Desired name for the destination for Streamkap.
Hostname - URL of your ClickHouse instance. (e.g. r5oq46wstt.us-east-1.aws.ClickHouse.cloud)
Port - default: 8443
Username (case sensitive) - streamkap_user or the username of your choice.
Password - The password for the data warehouse user.
Database - The name of the ClickHouse data warehouse (streamkap_warehouse).
- After plugging in the configuration details, hit “Save” at the bottom right corner to finalize the setup.
- A ClickHouse connector with an `Active` status will appear in the “Connectors > Destinations”.

Step 3: Creating a Streamkap Pipeline
- Navigate to “Pipelines” on the left side and click “Create” to create a pipeline between source and destination.

- Select your MongoDB connector as “Source” and your ClickHouse connector as “Destination” and click on “Next” in the bottom right corner.

- Select the database and the collections that you want to stream. Click “Next”.

- Optionally plugin a tag and hit “Save”.

- Once the pipeline is successfully created, it will appear with its status displayed as “Active”.

Validating the Streamkap Pipeline Integration
To verify the full end-to-end functionality of the pipeline, we will insert a document into the `users` collection in MongoDB, which will then be streamed into the `users` table within the ClickHouse warehouse.
- Insert a new document into the `users` collection.

- The record gets streamed to the `users` table in ClickHouse warehouse in real-time.

What’s Next?
Thank you for reading this guide. If you have other sources and destinations to connect to in near real-time check out the following guides.
For more information on connectors please visit here.
Paul Dudley
LinkedInAuthor Bio
Paul is the CEO and Co-Founder of Streamkap
Published
June 17, 2025
TL;DR
• Stream MongoDB e-commerce data to ClickHouse for real-time customized discounts and order management. • Build a high-performance analytics system that processes large volumes of orders and cart activity with minimal latency. • This guide covers MongoDB configuration, ClickHouse setup, and Streamkap pipeline creation.
Related blog posts
.png)
Why Apache Iceberg? A Guide to Real-Time Data Lakes in 2025
Apache Iceberg brings SQL tables to cloud storage with ACID transactions and time travel. Learn why it's essential for 2025.
AWS RDS PostgreSQL Set Up
AWS RDS PostgreSQL stands out as one of the most widely used production databases. Its global adoption and everyday usage have prompted Amazon to make it exceptionally user-friendly. New users can set up an RDS PostgreSQL instance from scratch in just a few minutes.
Databricks Warehouse Set Up
Getting started with Databricks is a breeze, regardless of your experience level. This guide provides clear instructions on how to create a new account or use your existing credentials, ensuring a smooth and efficient streaming process.