How to Stream DynamoDB to MotherDuck with Streamkap
Paul Dudley
May 1, 2025
TL;DR
• Stream DynamoDB to MotherDuck in minutes for real-time analytics without months of setup time. • This guide covers DynamoDB configuration, S3 bucket creation, MotherDuck setup, and Streamkap pipeline creation. • Enable faster insights by capitalizing on your data with continuous real-time movement and transformation.
Introduction
In today’s fast-paced business environment, having access to accurate data at the right moment is crucial for making informed decisions.
However, traditional data processing methods often fall short, being both slow and overly complex.
That’s where Streamkap revolutionizes the game by enabling you to truly capitalize on your data in real time. With Streamkap, setting up real-time streaming from DynamoDB to MotherDuck isn’t a matter of months—it’s done in mere minutes.
This guide explores how Streamkap simplifies real-time data movement and transformation, empowering both data professionals and business leaders to unlock faster insights.
Are you ready to capitalize on your data? Join us!
Guide Section
| Prerequisites | You’ll need accounts for AWS, Databricks, and Streamkap. |
|---|---|
| Setting up a New AWS Dynamodb from Scratch | This section will guide you through setting up a new Dynamodb in AWS. |
| Configuring an Existing AWS Dynamodb | If you already have a Dynamodb, make sure it is compatible with Streamkap by adjusting the network settings and enabling access. |
| Setting up a New Motherduck Warehouse | Create a new Motherduck warehouse to efficiently store and analyze real-time data originating from Dynamodb. |
| Streamkap Setup | Using Streamkap to create a data pipeline by connecting AWS SQLServer as the source and Databricks as the destination. |
Prerequisites
Make sure you have the following ready so you can follow this guide:
1. Streamkap Account: You must have an active Streamkap account with admin or data admin rights. If you don’t have one yet; signup here
2. MotherDuck Account: Ensure you have an active MotherDuck account with admin privileges. If you don’t have one yet, you can sign up here
3. Amazon AWS Account: To create, set, or update an AWS RDS instance, you need an active Amazon AWS account with networking and core RDS permission. If you don’t already have, join for one here.
DynamoDB Set up for Streamkap Compatibility
AWS DynamoDB is a critical component in modern data architecture, offering unmatched scalability, high availability, and millisecond-level latency that makes it essential for real-time, data-intensive applications. Its robust performance and serverless model allow organizations to manage massive workloads with minimal operational overhead.
Integrating DynamoDB with Streamkap unlocks powerful capabilities—enabling low-latency data capture, efficient pipeline execution, and enhanced system reliability. In this section, we’ll walk through how to configure AWS DynamoDB for seamless compatibility with Streamkap, ensuring your data infrastructure remains fast, scalable, and resilient.
Setting up a New AWS DymanmoDB from Scratch
Note: To create and manage a DynamoDB table compatible with Streamkap, you must have IAM permissions to manage DynamoDB tables, streams, item operations, backups, point-in-time recovery, and S3 exports.
If your permissions are limited, please contact your AWS administrator to request the necessary DynamoDB, S3, and IAM permissions for managing DynamoDB tables and their associated features required for Streamkap integration.
Step 1: Log in to the AWS Management Console
- Log in to your AWS management Console. and type “DynamoDB” on the search bar.
- Click on “DynamoDB” as shown below

Step 2: Create a new DynamoDB TableNote: If you already have existing tables, you can skip this step.
- Once you are in the DynamoDB section navigate to Dashboard orTables on the left side navigation menu.

- Choose the region where you want to host your DyanamoDB, ensuring it aligns with your application’s requirements.
Note: To integrate with Streamkap, ensure that the selected region is one of the following:
Oregon (us-west-2)
North Virginia (us-east-1)
Europe Ireland (eu-west-1)
Asia Pacific - Sydney (ap-southeast-2)

- Once you have selected the region click on the Create Table as shown below.

- In the Table Details field, enter a name of your choice (e.g., MusicCollection). Set the Partition Key (e.g., Artist) and Sort Key (e.g., Song Title) according to your preference, specify their Type as String, and leave the remaining table settings as default. Finally, click Create table.

- After creating the table, wait until its status changes to Active. Once active, click on the MusicCollection table to continue.

Step 3: Configuring Your DynamoDB Table for Streamkap Compatibility
- Click on table that you wish to configure for Streamkap compatibility.
- Once you’ve entered the details of the table, navigate to the Export and Streams section to proceed with next steps.

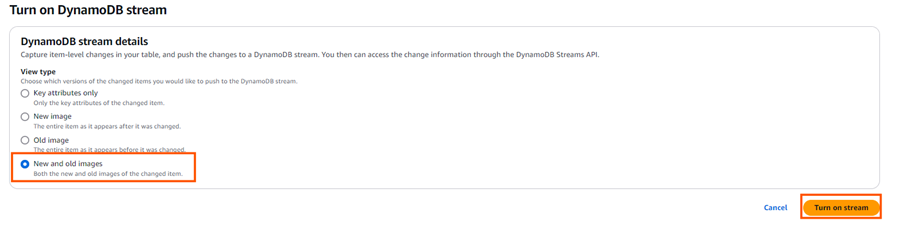
- Turn on the Dynamodb stream details.

- Select New and Old Images on the DynamoDB Streams setting to capture both the updated and previous versions of the items in your table. This ensures that any changes made to the data are fully captured.
- Navigate to the Backups section and click on Point-in-Time Recovery (PITR) Edit button to enable continuous backups for your DynamoDB table. This enables point-in-time recovery to maintain a continuous backup of your table, allowing you to restore data to any moment within the retention window.

- Check Turn on Point-in-Time Recovery and click Save changes to enable the feature for your DynamoDB table.

Note: If you have multiple tables and want all of them to be compatible with Streamkap, you will need to repeat the above process for each table.
Step 4: Create a S3 bucket
- Navigate to your AWS management [Console] {https://aws.amazon.com/console/?utm\_source=blog&utm\_medium=referral&utm\_campaign=how-to-stream-data-from-dynamodb-to-MotherDuck-using-Streamkap}. and type “S3” on the search bar.
- Click on “S3” as shown below.

- While you can use an existing S3 bucket for Streamkap integration, creating a dedicated new bucket is recommended. This approach helps organize and isolate your Streamkap data streams. A separate bucket ensures cleaner configuration and better data management without interfering with other workflows.

- Choose the bucket type as General. Plug in a bucket name (source-dynamodb-bucket).
- Additionally, make sure to disable ACLs (Access Control Lists) under the Object Ownership section. This ensures that the S3 bucket uses the bucket owner’s permissions and simplifies access management.

- Block all public access because it ensures that your S3 bucket and its contents are secure and not accessible to unauthorized users. This security best practice ensures your bucket and its contents remain private and accessible only to authorized users.
- Enable versioning for the S3 bucket to preserve, retrieve, and restore every version of an object in the bucket. This is particularly useful for maintaining historical data, allowing you to recover from accidental deletions or overwrites.

- Select SSE-S3 (Server-Side Encryption with Amazon S3-managed keys) to automatically encrypt your data at rest. This ensures that all objects stored in your S3 bucket are securely encrypted without the need for managing encryption keys.
- Disable the bucket key for SSE-S3, as it is not necessary when using Amazon S3-managed keys. Disabling it simplifies the encryption process while still ensuring your data is securely encrypted.

Step 5: Create IAM User and Policy for Streamkap Compatibility
- Navigate to your AWS management [Console] {https://aws.amazon.com/console/?utm\_source=blog&utm\_medium=referral&utm\_campaign=how-to-stream-data-from-dynamodb-to-MotherDuck-using-Streamkap}. and type “IAM” on the search bar.
- Click on “IAM” as shown below

- After clicking on IAM, navigate to the Policies section.
- Click Create Policy to start creating a new IAM policy for DynamoDB and S3 access.

- To create the IAM policy, use the following configuration. Make sure to replace TableName ,AccountID and Region and S3 bucket name with your actual table name and bucket name.

- Policy Name: source-dynamodb-bucket-policy
- Description: This policy will be used to configure DynamoDB as a source to Streamkap.

- Navigate to Users on the left-hand side menu in the IAM dashboard.
- Click on Create user to start the process of adding a new IAM user.

- Plug in a user name of your choice.
- Leave the option Provide user access to the AWS Management Console unchecked, as the user will only need programmatic access (via access keys) to interact with DynamoDB and S3 for Streamkap integration.

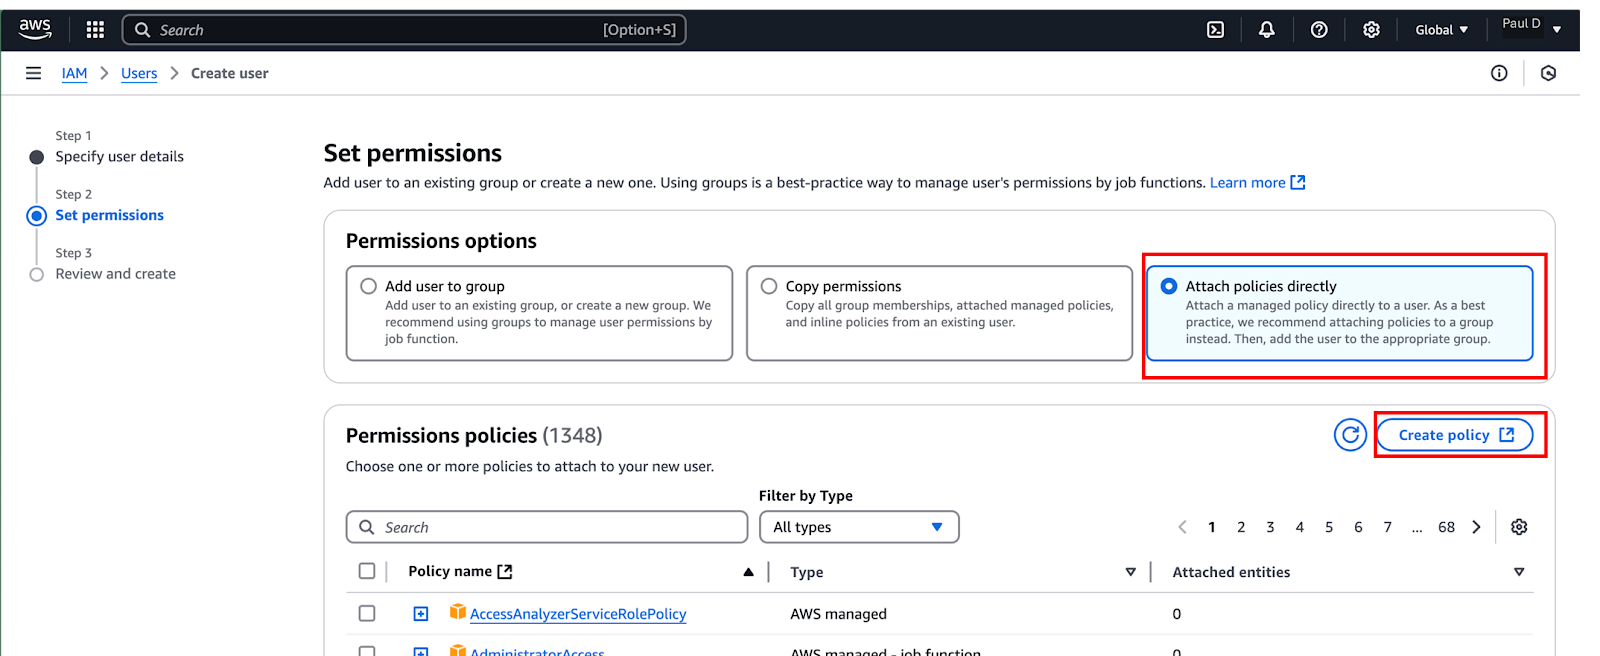
- In the Permissions options, select Attach policies directly.
- From the dropdown, select Customer managed policies.
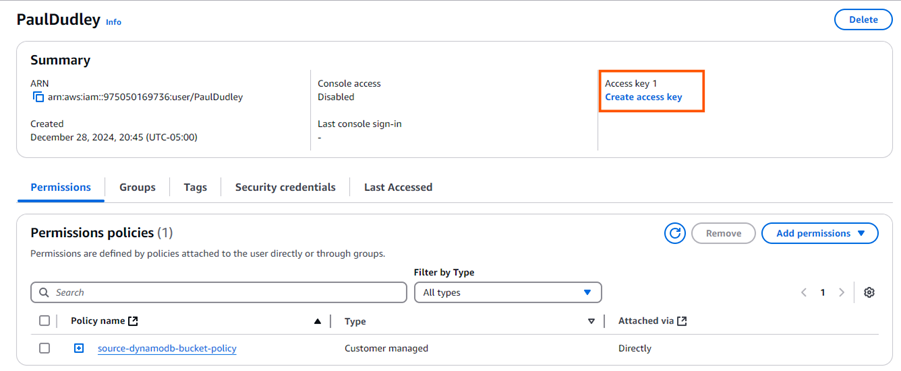
- Find and select the source-dynamodb-bucket-policy policy you created earlier.
- After selecting the policy, click Next to proceed.

- Review the username and attached source-dynamodb-bucket-policy, then click Create user to finalize the process.

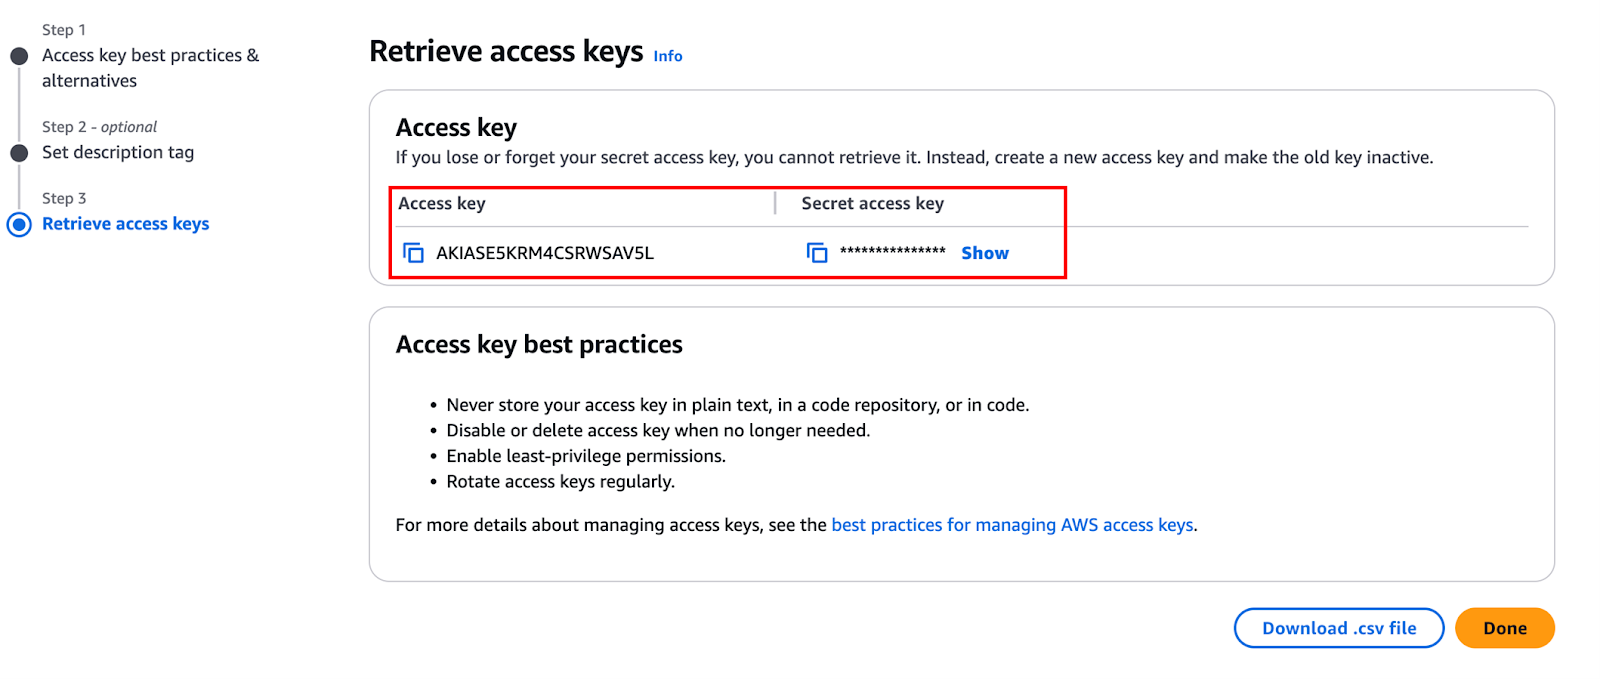
- In the Users section, click on the username that you just created to create access key.

- Click on Create access key.
alt text = ”Create access key”
- Select Third-party-service.
- Click Next.

- Plug in your description

- Download the credentials .csv file for future reference and click on Done to complete the process.

Configuring an Existing AWS DynamoDB for Streamkap Compatibility
Step 1: Configuring Your DynamoDB Table for Streamkap Compatibility
- Click on the table (e.g MusicCollection) you would like to configure for Streamkap compatibility.
- Once you’ve chosen the table, navigate to the Export and Streams section to proceed with next step.

- Turn on the Dynamodb stream details.

- Select New and Old Images on the DynamoDB Streams setting to capture both the updated and previous versions of the items in your table. This ensures that any changes made to the data are fully captured.

- Navigate to the Backups section and click on Point-in-Time Recovery (PITR) Edit button to enable continuous backups for your DynamoDB table. This enables point-in-time recovery to maintain a continuous backup of your table, allowing you to restore data to any moment within the retention window.

alt text = ”Turn on PITR”
- Check Turn on Point-in-Time Recovery and click Save Changes to enable the feature for your DynamoDB table.

Note: If you have multiple tables and want all of them to be compatible with Streamkap, you will need to repeat the above process for each table.
Step 2: Create S3 bucket
- Navigate to your AWS management [Console] {https://aws.amazon.com/console/?utm\_source=blog&utm\_medium=referral&utm\_campaign=how-to-stream-data-from-dynamodb-to-MotherDuck-using-Streamkap}. and type “S3” on the search bar.
- Click on “S3” as shown below.

- While you can use an existing S3 bucket for Streamkap integration, creating a dedicated new bucket is recommended. This approach helps organize and isolate your Streamkap data streams. A separate bucket ensures cleaner configuration and better data management without interfering with other workflows.

- Choose the bucket type as General. Plug in a bucket name (source-dynamodb-bucket).
- Additionally, make sure to disable ACLs (Access Control Lists) under the Object Ownership section. This ensures that the S3 bucket uses the bucket owner’s permissions and simplifies access management.

- Block all public access because it ensures that your S3 bucket and its contents are secure and not accessible to unauthorized users. This security best practice ensures your bucket and its contents remain private and accessible only to authorized users.
- Enable versioning for the S3 bucket to preserve, retrieve, and restore every version of an object in the bucket. This is particularly useful for maintaining historical data, allowing you to recover from accidental deletions or overwrites.

- Select SSE-S3 (Server-Side Encryption with Amazon S3-managed keys) to automatically encrypt your data at rest. This ensures that all objects stored in your S3 bucket are securely encrypted without the need for managing encryption keys.
- Disable the bucket key for SSE-S3, as it is not necessary when using Amazon S3-managed keys. Disabling it simplifies the encryption process while still ensuring your data is securely encrypted.

Step 3: Create IAM User and Policy for Streamkap Compatibility
- Navigate to your AWS management [Console] {https://aws.amazon.com/console/?utm\_source=blog&utm\_medium=referral&utm\_campaign=how-to-stream-data-from-dynamodb-to-motherduck-using-Streamkap}. and type “IAM” on the search bar.
- Click on “IAM” as shown below

- After clicking on IAM, navigate to the Policies section.
- Click Create Policy to start creating a new IAM policy for DynamoDB and S3 access.

To create the IAM policy, use the following configuration. Make sure to replace TableName ,AccountID and Region and S3 bucket name with your actual table name and bucket name.

- Policy Name: source-dynamodb-bucket-policy
- Description: This policy will be used to configure DynamoDB as a source to Streamkap.

- Navigate to Users on the left-hand menu in the IAM dashboard.
- Click on Create user to start the process of adding a new IAM user.

- Plug in a user name of your choice.
- Leave the option Provide user access to the AWS Management Console unchecked, as the user will only need programmatic access (via access keys) to interact with DynamoDB and S3 for Streamkap integration.

- In the Permissions options, select Attach policies directly.
- From the dropdown, select Customer managed policies.
- Find and select the source-dynamodb-bucket-policy policy you created earlier.
- After selecting the policy, click Next to proceed.

- Review the username and attached source-dynamodb-bucket-policy, then click Create user to finalize the process.

- In the Users section, click on the username that you just created to create access key.

- Click on Create access key .

- Select Third-party-service.
- Click Next.

- Plug in your description

- Download the credentials .csv file for future reference and click on Done to complete the process.

MotherDuck Warehouse Set Up For Streamkap Compatibility
MotherDuck is simple and efficient data warehouse platform built on DuckDB. It enables users to manage large volumes of data quickly and effortlessly, thanks to its serverless architecture, which allows for the execution of complex queries without the need for extensive infrastructure.
This guide will provide step-by-step instructions on how to set up your MotherDuck account and integrate it with Streamkap.
Setting up a New S3 Bucket from Scratch
Step 1: Log in to the AWS Management Console
- Log in to your AWS Management Console and select the region you specified in the above section.
Let’s create a bucket now:
- Go to the search bar, type “S3,” and select S3.
- Now click “Create bucket”.


- Give your S3 bucket a unique name that’s easy to identify later.

- Next, click ‘Create bucket’ to proceed with the setup.

Step 2: Generate your AWS credentials
- Type “IAM” in the search bar, then select IAM section.

- In the IAM dashboard’s left sidebar, click Users.
- Click the “Create user” to create a new user.

- In the “User name” field, enter the desired name (eg, s3-access) and click Next to proceed.

- On the “Permissions options”, select ‘Attach policiesdirectly’.
- Click “Create policy” to open the policy editor in a new tab or window.
Note: After you click Create Policy, you’ll be taken to a different page. Once you finish creating your policy, make sure to come back to this page and refresh it. We’ll go over this more later!
- Select the S3 option from the drop-down menu.

In the Policy editor, go to the JSON tab and paste the following policy code.
- Replace ‘motherduck-streamkap-data’ with your S3 bucket name, then click Next.

- Fill in the Policy name and click Create Policy.

As mentioned earlier, you’ll now need to go back to the previous page where you clicked on Create policy.
- Now, click the refresh icon to load your new policy.
- Search for the policy name, check the box next to it, and click Next to continue.

- After clicking Create user, you’ll be redirected to the Users page.
- Click on the username you just created (e.g., s3-access) and click Create access key to generate credentials.

- Select the Third-party service option, add a description if needed, then click Next and Create access key.
- Copy and securely save the Access key ID and Secret access key for connecting Streamkap & MotherDuck.
Connecting MotherDuck to an S3 Bucket
- Log in to your MotherDuck account and open MotherDuck’s SQL editor.
- Head over to Settings > Secrets and add your new secret there.

- Run this command in the MotherDuck’s SQL editor to test if the secret is correctly linked to your S3 URL (replace ‘motherduck-streamkap-data’ with your actual external table name).

Streamkap Set Up
To connect Streamkap to DynamoDB, we need to ensure that the database is configured to accept traffic from Streamkap by safelisting Streamkap’s IP addresses.
Note: If DynamoDB accepts traffic from anywhere from the world you can move on to the Configuring DynamoDB for Streamkap Integration section.
Safelisting Streamkap’s IP Address
Streamkap’s dedicated IP addresses are
| Service | IPs |
|---|---|
| Oregon (us-west-2) | 52.32.238.100 |
| North Virginia (us-east-1) | 44.214.80.49 |
| Europe Ireland (eu-west-1) | 34.242.118.75 |
| Asia Pacific - Sydney (ap-southeast-2) | 52.62.60.121 |
When signing up, Oregon (us-west-2) is set as the default region. If you require a different region, let us know. For more details about our IP addresses, please visit this link .
- To safelist one of our IPs, you need to ensure that the policy assigned to your IAM user or role includes permissions for one of Streamkap’s regions.
Here is an example of a policy that includes access to Streamkap’s safelisted IP address, make sure to replace TableName ,AccountID and Region and S3 bucket name with your actual table name and bucket name.
Configuring AWS DynamoDB for Streamkap Integration
If you followed any of the following sections mentioned above by default your AWS DynamoDB will be Streamkap compatible
- Setting up a New Source Database from Scratch section
- Configuring an Existing Source Database for Streamkap Compatibility
Adding AWS DynamoDB as a Source Connector
Step 1: Log in to Streamkap
- Log in to Streamkap. This will take you to your dashboard.
Note: You must have admin or data admin privileges to continue with the following steps.
Step 2: Set Up a DynamoDB Source Connector
- On the left side navigation pane
- click on “Connectors”
- click on “Sources” tab
- click the “+ Add” button as shown below

- Enter DynamoDB in the search bar and select it from the list of available services, as depicted below.

You’ll be asked to provide the following details:
- Name: Streamkap_source- AWS Region: Enter the region you have configured (e.g., us-east-1).
- AWS Access Key ID: Enter the access key from the file you downloaded.
- AWS Secret Key: Enter the secret key from the file you downloaded.
- S3 Export Bucket Name: Enter the name of your S3 bucket (e.g., source-dynamodb-bucket).
After filling in the details, click Next to proceed.

- After specifying the table names to include, click Save to complete the configuration.

- Once you click Save, wait until the status becomes Active as indicated below.

Adding a MotherDuck Connector
- In order to add MotherDuck as a destination navigate to “Connection” tab on the left side pane , click on “Destination” and click the “+Add” button.

- Search for MotherDuck in the search bar and click on MotherDuck.

- Enter the Access Key and Secret Access Key, select the same region as your S3 bucket, set the file type to Parquet, and Gzip as the compression type.
After filling in the configuration details, hit Save at the bottom right corner to finalize the setup.

- After clicking Save, the system will display an Active status indicator.

Adding a Pipeline
- Navigate to “Pipelines” on the left side and click “+Create” to create pipeline between source and destination.

- Select source and destination and click on “Next” on the bottom right corner.
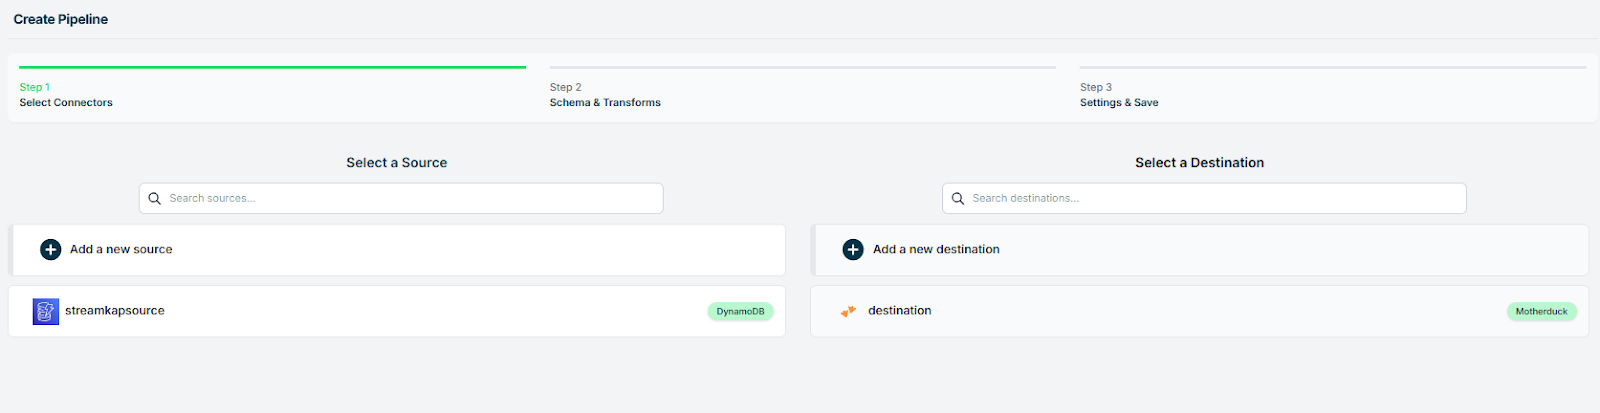
- Select all schema or the Tables that you want to transfer.

- Plug in a pipeline name and Tag and hit “Save”.

Verification of data successfully created pipeline
- Log in to your AWS management Console. and type “DynamoDB” on the search bar.
- Click on “DynamoDB” as shown below

- Go to Explore items on the left pane. Click on the table where you want to add data and click on Create item.

- Add the artist as Taylor Swift and the song title as Love Story, or feel free to choose your own option, then click on Create Item.

- Once we add the above, include multiple data entries as shown below:

- The S3 bucket will be populated with the newly inserted data.

- The record gets streamed to the orders table in MotherDuck warehouse in real-time.

By design Your “Table” in the destination will have the following meta columns apart from the regular columns.
| Column Name | Description |
|---|---|
| _STREAMKAP_SOURCE_TS_MS | Timestamp in milliseconds for the event within the source log |
| _STREAMKAP_TS_MS | Timestamp in milliseconds for the event once Streamkap receives it |
| __DELETED | Indicates whether this event/row has been deleted at source |
| _STREAMKAP_OFFSET | This is an offset value in relation to the logs we process. It can be useful in the debugging of any issues that may arise |
What’s Next?
Thank you for reading this guide. If you have other sources and destinations to connect to in near real-time check out the following guides.
For more information on connectors please visit here.
Paul Dudley
LinkedInAuthor Bio
Paul is the CEO and Co-Founder of Streamkap
Published
May 1, 2025
TL;DR
• Stream DynamoDB to MotherDuck in minutes for real-time analytics without months of setup time. • This guide covers DynamoDB configuration, S3 bucket creation, MotherDuck setup, and Streamkap pipeline creation. • Enable faster insights by capitalizing on your data with continuous real-time movement and transformation.
Related blog posts
.png)
Why Apache Iceberg? A Guide to Real-Time Data Lakes in 2025
Apache Iceberg brings SQL tables to cloud storage with ACID transactions and time travel. Learn why it's essential for 2025.
AWS RDS PostgreSQL Set Up
AWS RDS PostgreSQL stands out as one of the most widely used production databases. Its global adoption and everyday usage have prompted Amazon to make it exceptionally user-friendly. New users can set up an RDS PostgreSQL instance from scratch in just a few minutes.
Databricks Warehouse Set Up
Getting started with Databricks is a breeze, regardless of your experience level. This guide provides clear instructions on how to create a new account or use your existing credentials, ensuring a smooth and efficient streaming process.