How to Stream PostgreSQL to S3 with Streamkap
Ricky Thomas
March 3, 2025
TL;DR
• Stream PostgreSQL to S3 for customer insights, behavior analytics, and scalable data lake storage. • Build pipelines that process purchase history, engagement metrics, and behavior trends for personalized marketing. • This guide covers PostgreSQL setup, S3 bucket configuration, and Streamkap pipeline creation.
Introduction
In today’s ever-changing business climate, immediate access to reliable data is crucial for making sound decisions. However, traditional data processing methods are often too lengthy and slow to meet modern demands. In this guide, we provide an overview of how development teams can implement customer insights and behavior analytics on Amazon S3 by orchestrating continuous data transfers from PostgreSQL databases. By seamlessly migrating user interaction and transactional data from PostgreSQL to S3’s scalable storage, companies can create a robust data pipeline that processes large volumes of customer purchase history, engagement metrics, and behavior trends to drive personalized experiences and targeted marketing strategies.
Guide Sections:
| Prerequisites | You will need Streamkap and Aws accounts |
|---|---|
| Setting up a New RDS PostgreSQL From Scratch | This step will help you to setup Postgresql inside AWS |
| Configuring an Existing RDS PostgreSQL | For existing PostgreSQL DB, you will have to modify its configuration to make it Streamkap-compatible |
| Creating a New S3 Bucket Account | This step will help you to set up S3 |
| Fetching credentials from existing Destination S3 Bucket | For the existing S3 bucket, you will have to modify its permissions to allow Streamkap to write data |
| Streamkap Setup | Adding Postgres as a source, adding S3 as a destination, and finally connecting them using a data pipe |
Are you ready to use the power of your data? Join us today!
Prerequisites
To follow this guide, make sure you have the following things ready:
1. Streamkap Account: Make sure your Streamkap account is active and has admin or data admin rights. If you don’t have access yet, reach out to your administrator or register here.
2. Amazon AWS Account: An active Amazon AWS account with core RDS and S3 permissions is required to create, set up, or configure an AWS RDS instance and an S3 bucket. If you don’t have one, you can register here.
AWS RDS PostgreSQL Set up
AWS RDS PostgreSQL is one of the most popular database services used in production environments worldwide. Its widespread adoption and frequent use have led Amazon to make it highly user-friendly. New users can create an RDS PostgreSQL instance from scratch within minutes. Furthermore, if you already have an existing instance, adding the required configuration for Streamkap streaming is simple and efficient.
In this section, we will discuss different approaches for setting up and configuring AWS RDS PostgreSQL to ensure seamless compatibility with Streamkap.
Setting up a New RDS PostgreSQL From Scratch
Note: To create a new AWS RDS PostgreSQL instance, you must have IAM permissions to manage RDS instances, parameter groups, subnet groups, networking, security settings, monitoring, and optional features like encryption and tagging.
If your permissions are limited, please contact your AWS administrator to request the necessary RDS and networking permissions.
Step 1: Log in to the AWS Management Console
- Log in to your AWS management console and type “RDS” on the search bar.
- Click on “RDS” as shown below

Step 2: Create a new RDS PostgreSQL Instance
- Once you’re on the RDS dashboard, navigate to the “Databases” section in the top-left corner or select “DB Instances” under the Resources section, as shown in the exa mple below. Proceed to initiate the setup for a new PostgreSQL database instance.

- Choose the region where you want to host your RDS instance, ensuring it aligns with your application’s requirements. Once selected, click on “Create database” to begin the setup process, as illustrated in the example below.
Note: To integrate with Streamkap, ensure that the selected region is one of the following:
Oregon (us-west-2)
North Virginia (us-east-1)
Europe Ireland (eu-west-1)
Asia Pacific - Sydney (ap-southeast-2)

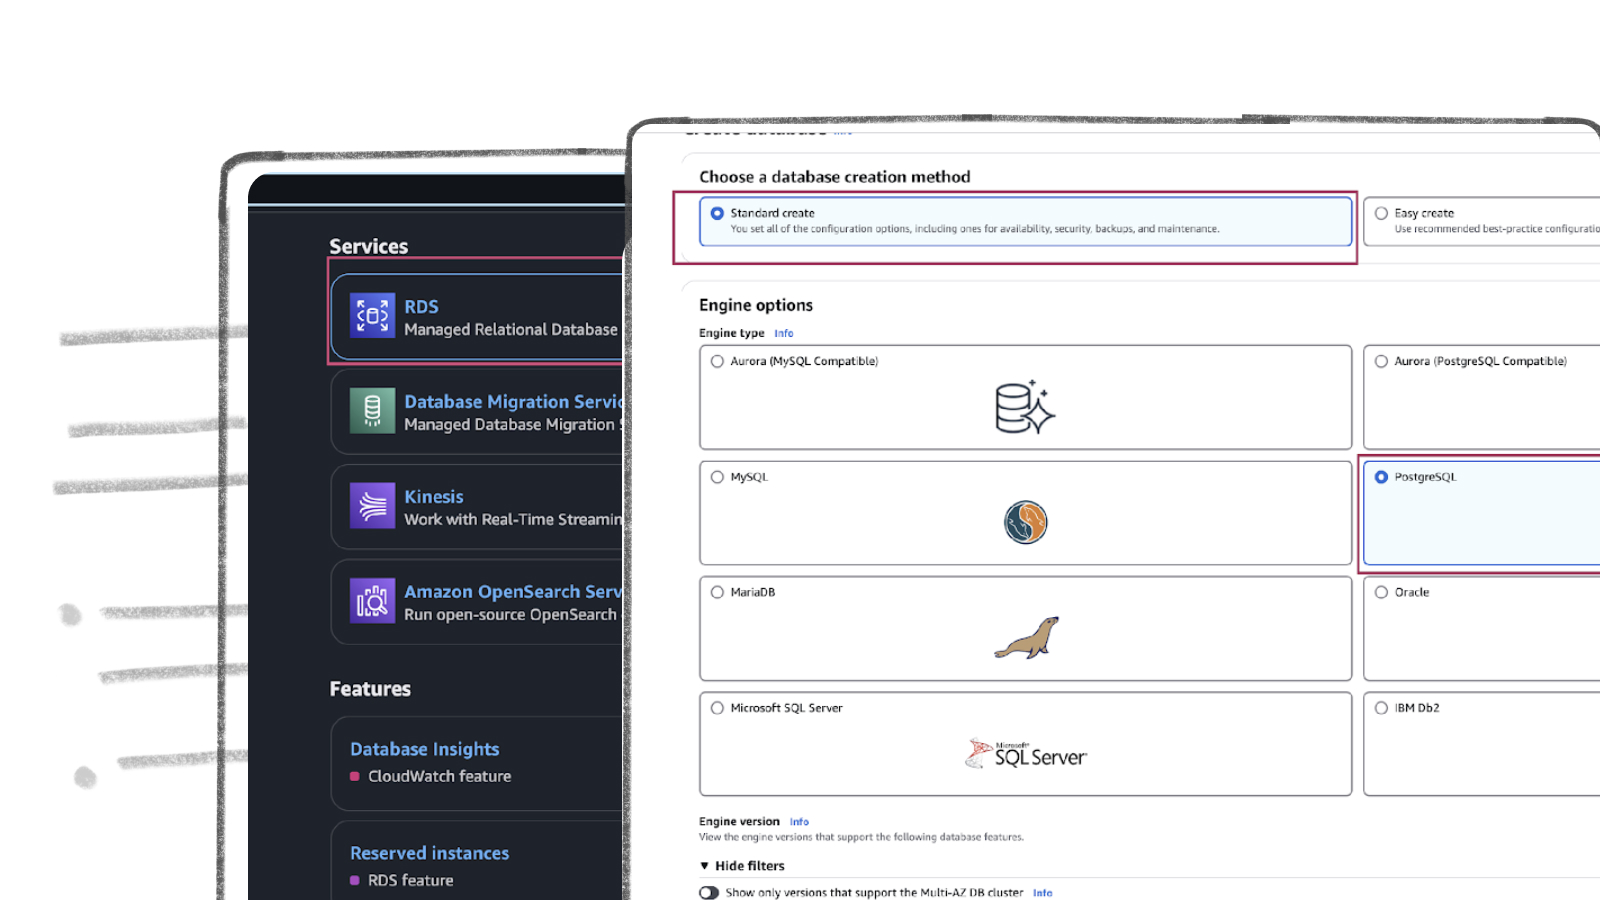
- In the Choose a database creation method section, select the “Standard create” radio button.
- Under the Engine options section, choose the “PostgreSQL” radio button.
- Scroll down to the Engine version dropdown menu and select “PostgreSQL 16.3-R3”, as shown in the example below.

- In the Templates section, select an option that suits your requirement: “Production”, “Dev/Test”, or “Free tier”.
- If this is your first time deploying sub-second latency streaming, we recommend choosing “Free tier” to gain hands-on experience with the process without incurring additional cloud costs, as shown in the example below.

- In the Settings section, provide unique values for the following:
- DB Instance Identifier: A unique name for your database instance.
- Master Username: The primary user for database administration.
- Under the Credentials management section, select the “Self-managed” radio button and input the following:
- Master Password: A secure password for the master user.
- Confirm Master Password: Re-enter the password to confirm it.

- In the Connectivity section, set Public access to “Yes” to allow access from the internet, as shown in the illustration below.

- In the Additional configuration section, enter a value for the Initial database name to specify the name of the first database in your instance.

- Scroll to the bottom of the page and click “Create database”. Then, wait for your DB instance to become available, as shown in the example below.

Step 3: Configuring Your PostgreSQL Instance for Streamkap Compatibility
By default, an AWS RDS PostgreSQL instance is not set up for Change Data Capture (CDC). To enable sub-second latency streaming, you will need to make a few adjustments to the database to ensure CDC compatibility.
In this section, we will:
- Create a new parameter group
- Modify rds.logical_replication = 1
- Modify wal_sender_timeout = 0
- Attach the new parameter group to the PostgreSQL instance
- Restart the PostgreSQL instance to apply the changes
- From your RDS dashboard, click on “Parameter groups” on the left-hand side.
- Then, click “Create parameter group”, as shown in the screenshot below.

- Enter a “Parameter group name” and “Description” for the new parameter group, select “PostgreSQL” as the engine type, choose “postgres16” as the parameter group family, and select “DB Parameter Group” as the type. Finally, click “Create” to create the new parameter group, as shown in the example below.

Once your parameter group is created, click on the parameter group name and then click the “Edit” button in the top-right corner of the screen.
- In the search bar:
- Type “rds.logical_replication” and set its value to “1”.
- Type “wal_sender_timeout” and set its value to “0”, as shown below.


- Click “Save Changes” to save your adjustments.
We have successfully created a parameter group configured for Change Data Capture (CDC). The next step is to attach this parameter group to your PostgreSQL instance to enable CDC compatibility.
- To do this, open your PostgreSQL instance from the RDS dashboard and click “Modify” in the top-right corner, as shown in the illustration below.

- Scroll down to the “Additional configuration” section. Under “DB Parameter Group”, select the newly created parameter group from the list. Then, scroll to the bottom of the screen and click “Continue”.

- On the Modify DB Instance page, ensure that the Change Data Capture-compatible parameter group is displayed as the new value. Under “Schedule modification”, select the “Apply immediately” radio button. Finally, click on “Modify DB instance” to apply the changes.

Step 4: Validate Change Data Capture (CDC) and Streamkap Compatibility for Your PostgreSQL Instance
Ensuring that changes in your PostgreSQL instance are accurately captured is essential. To verify this, connect to your RDS PostgreSQL instance using tools such as DBeaver and execute the following commands to confirm that CDC functionality operates as intended.

Note: If you encounter a timeout error while accessing your AWS PostgreSQL instance from your local machine, it may be due to the security group not allowing inbound traffic from your local machine. To resolve this, update the inbound rules of your security group to allow access from your local machine to the PostgreSQL instance.
Additionally, if your instance is hosted within a private VPC or subnet, this configuration can also cause connectivity issues. In such cases, you may need to set up a VPN, bastion host, AWS PrivateLink, or create a public subnet and a public VPC to establish a secure connection.
Configuring an Existing RDS PostgreSQL for Streamkap Compatibility
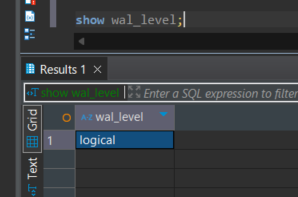
If you already have an existing AWS RDS PostgreSQL instance, it may not inherently support change data capture (CDC). To verify compatibility, you need to conduct two specific tests. Both tests must pass to confirm the instance is CDC-compatible.
To perform these tests, connect to your RDS PostgreSQL instance using tools such as DBeaver and execute the provided commands to validate that CDC functionality operates as required.


For the RDS instance to be CDC-compatible, both tests must return the expected results: wal_level = logical and wal_sender_timeout = 0. If either of these tests fails, adjustments to the RDS parameter group will be necessary.
In cases where the tests do not yield the expected values, you must update the existing custom RDS parameter group or create a new one with the required configurations to enable CDC compatibility. Specifically, ensure the following parameters are properly set.
If you already have a custom RDS parameter group configured, you can proceed directly to Step 2.
Step 1: Create a Customer RDS Parameter Group
- From your RDS dashboard, click on “Parameter groups” on the left-hand side.
- Then, click “Create parameter group”, as shown in the screenshot below.
- Enter a “Parameter group name” and “Description” for the new parameter group, select “PostgreSQL” as the engine type, choose ” {your Postgres engine version} ” as the parameter group family, and select “DB Parameter Group” as the type. Finally, click “Create” to create the new parameter group, as shown in the example below.
Once your parameter group is created, click on the parameter group name and then click the “Edit” button in the top-right corner of the screen.
- In the search bar:
- Type “rds.logical_replication” and set its value to “1”.
- Type “wal_sender_timeout” and set its value to “0”, as shown below.
- Click “Save Changes” to save your adjustments.
We have successfully created a parameter group configured for Change Data Capture (CDC). The next step is to attach this parameter group to your PostgreSQL instance to enable CDC compatibility.
Step 2: Attaching Parameter Group to RDS PostgreSQL Instance
- To do this, open your PostgreSQL instance from the RDS dashboard and click “Modify” in the top-right corner, as shown in the illustration below.
- Scroll down to the “Additional configuration” section. Under “DB Parameter Group”, select the newly created parameter group from the list. Then, scroll to the bottom of the screen and click “Continue”.
- On the Modify DB Instance page, ensure that the Change Data Capture-compatible parameter group is displayed as the new value. Under “Schedule modification”, select the “Apply immediately” radio button. Finally, click on “Modify DB instance” to apply the changes.
- Ensuring that changes in your PostgreSQL instance are accurately captured is essential. To verify this, connect to your RDS PostgreSQL instance using tools such as DBeaver and execute the following commands to confirm that CDC functionality operates as intended.
Destination Bucket Set-Up
AWS S3 (Simple Storage Service) is a widely used and easy-to-set-up object storage service. It allows users to quickly create storage buckets for storing files, backups, or streaming data. S3 is known for its scalability and reliability, making it a popular choice for many cloud applications.
In this section, we will explore how to set up and configure AWS S3 for Streamkap streaming, ensuring smooth integration and efficient data management.
Creating a New S3 Bucket Account
Step 1: Log into AWS Management Console
- Log in to your AWS management console and type “S3” on the search bar.
- Click on “S3” as shown below

Step 2: Create a new S3 Bucket- Region Selection: Choose the same region you selected for your RDS setup, which in this case is **N. Virginia (us-east-**1). This configuration is important for when you connect to RDS via Streamkap.

- Bucket Type: Select “General Purpose” as the bucket type and provide a globally unique name following the convention “streamkap-bucket”.

- Object Ownership: Ensure you disable the ACL option so that the bucket’s objects are only accessible by this account. If you’re in production and need to share the objects with others (like colleagues), you can enable this option.

- Public Access: Uncheck all public access options to avoid giving public permissions. Since the access is via third-party services, it’s better to uncheck these to prevent networking or configuration issues.

- Versioning: Disable versioning if the application does not require maintaining historical versions of objects. This simplifies data management.

- Click “Create bucket”.
Step 3 : Create IAM user and S3 Policy
To enable access to the S3 bucket from Streamkap, you need to create an IAM role with the necessary credentials (Access Key and Secret Key) and a policy to allow interaction with the S3 bucket.
- On your AWS management console and type “IAM” on the search bar.
- Click on “IAM” as shown below.

- Navigate to Policies in the left menu and click Create Policy.
- Search for S3 and select AmazonS3FullAccess as a base policy.

-
Permission Requirement for S3:
- s3:GetObject
- s3:PutObject
- s3:AbortMultipartUpload
- s3:ListMultipartUploadParts
- s3:ListBucketMultipartUploads
-
It will first display the visual format of the policy. You can either select the policy you want or toggle to the JSON format and paste the following policy for S3.

- Click “Next”.
- Plug in Policy Name as streamkap_bucket_policy (or any name of your choice)
- Plug in Description as This policy will be used to put data into S3.

- Click on “Create Policy” which can be found in the bottom right corner.

- On the left side navigate to “Users” and click on the “Create user” on the top right corner.

- Provide a username and leave the option for console access unchecked, as it’s best practice not to give console access.

- In this step, to set the permission, select the attached policy that you created in the previous step.
- Choose “Customer managed” from the dropdown under “Filter by Type,” or if you have multiple policies, simply search for the policy name. Once you find it, choose it and click on “Next.

- Verify that you have attached the correct policy that you created earlier.

- Click “Create user”.
Once we have created the user we have to fetch the access key and a secret key of that user to successfully access S3 from Streamkap. In order to do so follow steps 4 through 7.
Step 4: Navigate to your user
- In the user list, click on your username.

- On the top right side click on the “Create access key”

Step 5: Access Key Best Practices and Alternatives
- Choose the best option according to your requirement. In this case, since we are accessing third-party services, select “Third-party-service.”
- Check the checkbox and click on “Next.”

Step 6: Description Tag
- The description tag is optional but recommended. It is useful for identifying credentials over the long term.
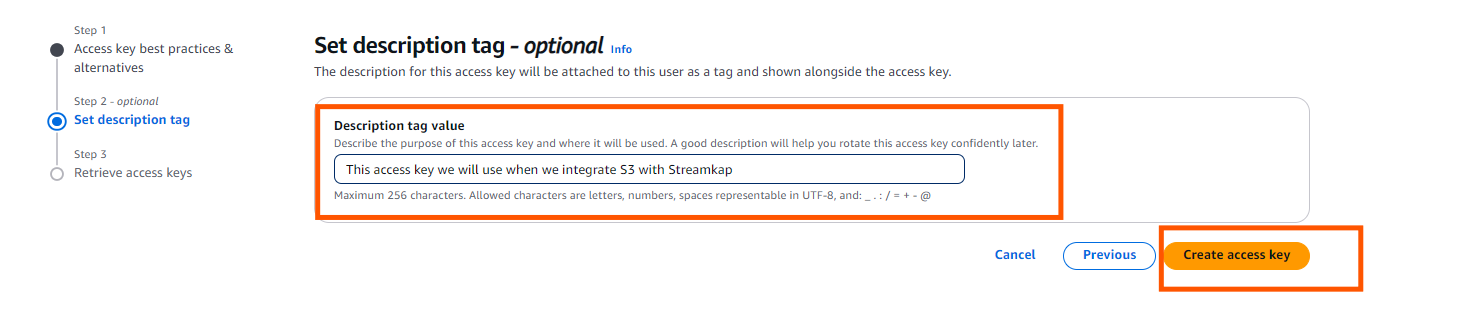
Step 7: Retrieve access key
- Download the .csv file containing the access key and secret key. These will be used when connecting S3 with Streamkap. It is not recommended to copy and store the access key separately.

Fetching credentials from existing Destination S3 Bucket
After generating the credentials, you will receive an access key and a secret key. These credentials are essential for authenticating and authorizing access to your S3 bucket when connecting from Streamkap. Handle these credentials with care, as they provide access to your S3 resources. Store them securely and avoid sharing them publicly. You’ll need these credentials to establish a connection between S3 and Streamkap, enabling seamless data transfer and integration.
Step 1: Navigate to your user
- On your AWS management console and type “IAM” on the search bar.
- Click on “IAM” as shown below.
- In the user list, click on your username.
- On the top right side click on the “Create access key”
Note: The user you choose should have AmazonS3FullAccess as a base policy or a custom policy that satisfies the following requirements
- s3:GetObject
- s3:PutObject
- s3:AbortMultipartUpload
- s3:ListMultipartUploadParts
- s3:ListBucketMultipartUploads
Step 2: Access Key Best Practices and Alternatives
- Choose the best option according to your requirement. In this case, since we are accessing third-party services, select “Third-party-service.”
- Check the checkbox and click on “Next.”
Step 3: Description Tag
- The description tag is optional but recommended. It is useful for identifying credentials over the long term.
Step 4: Retrieve access key
- Download the .csv file containing the access key and secret key. These will be used when connecting S3 with Streamkap. It is not recommended to copy and store the access key separately.
Streamkap Set Up
To connect Streamkap to RDS PostgreSQL, we need to ensure the database is configured to accept traffic from Streamkap by safelisting Streamkap’s IP addresses.
Note: If RDS PostgreSQL accepts traffic from anywhere from the world you can move on to the “Configuring RDS PostgreSQL for Streamkap Integration” section.
Safelisting Streamkap’s IP Address
Streamkap’s dedicated IP addresses are
| Service | IPs |
|---|---|
| Oregon (us-west-2) | 52.32.238.100 |
| North Virginia (us-east-1) | 44.214.80.49 |
| Europe Ireland (eu-west-1) | 34.242.118.75 |
| Asia Pacific - Sydney (ap-southeast-2) | 52.62.60.121 |
When signing up, Oregon (us-west-2) is set as the default region. If you require a different region, let us know. For more details about our IP addresses, please visit this link.
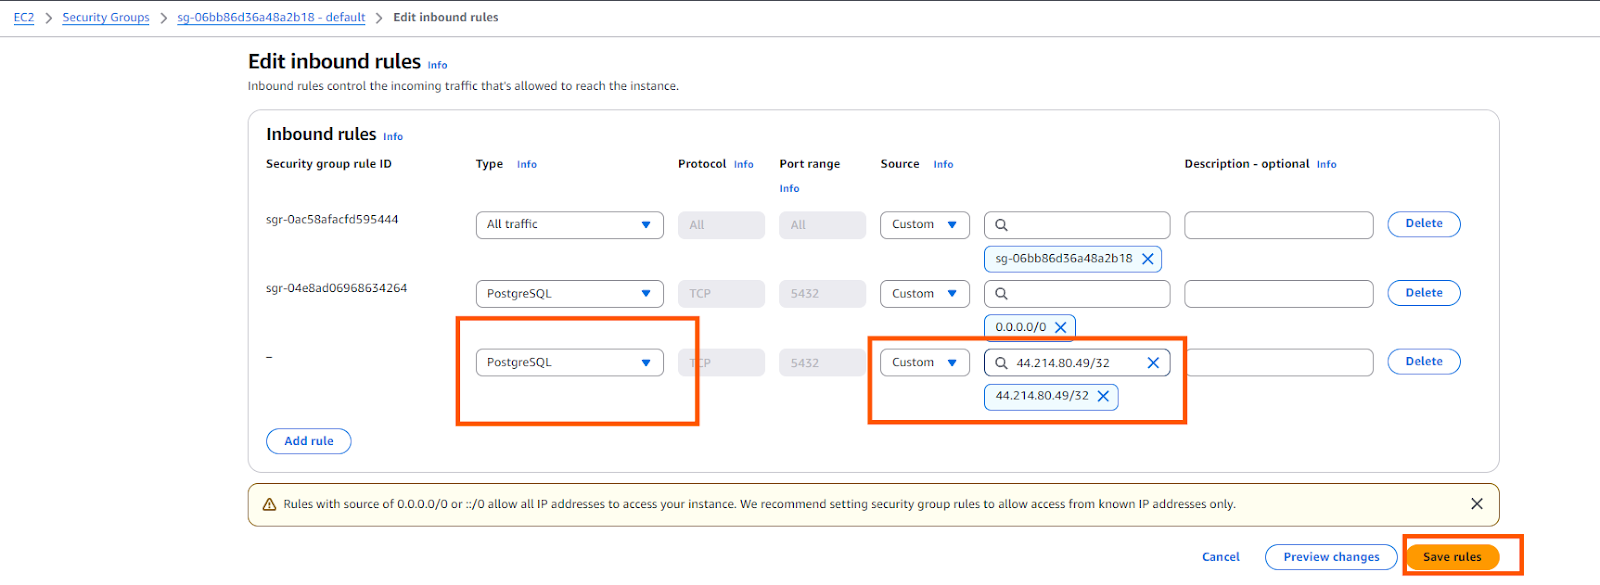
- To safelist one of our IPs, access your RDS PostgreSQL instance’s security group with type “CIDR/IP - Inbound” and select “Edit inbound rules.”
- Click “Add rule,” choose “PostgreSQL” as the type, select “Custom” as the source, and enter any of our relevant IP addresses followed by “/32.” For example, to add an IP address for North Virginia you would enter “44.214.80.49/32” as shown in the image below.
Configuring RDS PostgreSQL Database for Streamkap Integration
Streamkap suggests setting up a separate user and role within your PostgreSQL instance to enable secure and controlled data streaming. This method allows for precise access control and adheres to database security best practices.
To do this, access your PostgreSQL database using a tool like DBeaver and execute the following code.
Step 1: Create a separate user and role for Streamkap
``` sql
Note: You must plug in your own password
Step 2: Attach role to user and grant replication privileges to the role
```sql
Step 3: Grant permissions on the database
```sql
Note: In this guide, the initial database used during configuration was named “source_database”. If your database name differs, make sure to use your own database name instead of the one mentioned here.
Step 4: Grant permissions on schema(s), table(s), and future table(s)
```sql
Note: In this guide, we initially used the “public” schema during configuration. If your schema name differs, replace it with your own schema name as needed.
```sql
Step 5: Enabling Streamkap signal schema and table
Streamkap will use the following schema and table to manage snapshot collections.
```sql
Step 6: Creating sample table
Let’s create a sample table that Streamkap will use to stream data. If you already have an existing table or tables that you wish to stream from, you can skip this step.
```sql
Step 7: Create publication(s), and replication slot
We can create publication(s) for all tables or for only the sample orders table that was created few seconds ago or for a select group of tables.
```sql
```sql
Adding RDS PostgreSQL Database as a S3 Bucket Connector
RDS as a source connector to streamkap
Before proceeding to add RDS PostgreSQL as a source connector, ensure the following:
- IP Address Safelist: Ensure that your IP address is safelisted, or configure your RDS PostgreSQL instance to accept traffic from Streamkap by default. This will allow Streamkap to connect and interact with your RDS instance securely.
- SQL Configuration: Make sure you have successfully executed all the SQL code mentioned in the “Configuring AWS RDS PostgreSQL Database for Streamkap Integration” section. This ensures the proper setup of users, roles, permissions, and replication configurations within your PostgreSQL instance.
The two points mentioned above are essential to successfully connect your AWS RDS PostgreSQL as a source with Streamkap.
Note: If you’re using PostgreSQL 16, you can link your clone to Streamkap, and it will work as intended. However, for PostgreSQL 15 or earlier, a direct connection is required.
Step 1: Log in to Streamkap
- Go to the Streamkap sign-in link and log in. This will take you to your dashboard.
Note: You must have admin or data admin privileges to continue with the following steps.
Step 2: Set Up a PostgreSQL Source Connector
- On the left sidebar, click on “Connectors,” then select the “Sources” tab. After that, click the “+ Add” button, as shown below.

- Scroll down and select “PostgreSQL.” This will take you to the new connector setup page.
- You’ll be asked to provide the following details:
- Name: Choose a name for the PostgreSQL source in Streamkap.
- Hostname: Copy the Endpoint from the “Connectivity & Security” tab of your RDS PostgreSQL instance.
- Port: The default port is 5432. If you’ve changed the port, update it accordingly.
- Username: Use “Streamkap_user,” which was created earlier.
- Password: Enter the password for the user.
- Database: Use “source_database” if you followed the guide or enter your own database name.
- **Signal Table Schema: Enter “Streamkap_signal” if you followed the previous step or provide your own schema name.
- Note: By default, you’ll see “public” as the Signal Table Schema. Be sure to change it if necessary. - Heartbeat: Enable the toggle and set the value to “Streamkap_signal” if you followed the guide, or provide your own schema name.
- Replication Slot Name: Use “Streamkap_pgoutput_slot” if you followed the previous step, or enter your custom replication slot name.
- Publication Name: Use “Streamkap_pub” if you followed the guide, or enter your own publication name.

If you choose not to use an SSH Tunnel, click “Next” and proceed to step 3.
If you opt to connect to your AWS RDS PostgreSQL through an SSH Tunnel, ensure the following:
- Your bastion host / SSH Tunnel server is connected to your PostgreSQL instance.
- Your bastion host / SSH Tunnel server allows traffic from any source or has the Streamkap IP Address safelisted
Log in to your Linux SSH Tunnel host and execute the following commands. If you are using a Windows server, refer to our SSH Tunnel [guide] for Windows.
After running the above commands, fetch the SSH Public Key from Streamkap’s PostgreSQL source as depicted below.

Replace with the SSH Public key copied from earlier and run the following code
After your SSH Tunnel server is restarted plug in your SSH Tunnel server’s public IP address as SSH Host in Streamkap and press “Next”. You will land on the schema and table selection page like the following.
Step 3: Plugging in Schema and Table Names

If you followed the guide, your PostgreSQL database should now contain an “services” table within the “public” schema. If you’re using a different schema, make sure to update the appropriate schema and table names before clicking “Save.”
Once all the steps are completed correctly, you should be able to successfully set up a PostgreSQL source connector, as illustrated below.

If you encounter any fatal errors, they could be due to one of the following reasons:
- The IP addresses were not added to the safelist.
- The credentials provided are incorrect.
- The database, schema, or table name is incorrect.
- There are insufficient permissions to access or query the table.
If you encounter a 400 connection error while connecting via SSH tunnel
- Ensure you have correctly added the inbound rule and it matches with Streamkap IP
Adding a S3 Bucket Connector
In order to add S3 as a destination navigate to “Connection” on the left side , then click on “Destination” and press the “+Add” button.

- Search for S3 in the search bar and click on S3.

You will see the configuration page below. The settings for S3 are as follows:
- Name: Desired name for destination for Streamkap.
- AWS Access key and AWS Secrete Access key : These will in be the .csv file we obtain while creating credentials.
- Region: Region of S3 bucket that you selected while configuring S3.
- Bucket Name: your S3 bucket name.
- Format : according to your need.
- CSV: Best for simple tabular data, human-readable but not efficient for large datasets.
- JSON Lines: Suitable for semi-structured data; each line is a JSON object, ideal for streaming.
- JSON Array: Works for small datasets; stores all rows in a single JSON array, less efficient for large files.
- Parquet: Optimized for large structured datasets; great for analytics with tools like Athena and Glue.
- Filename Template: You can change as per your need
- Compression Type:
- Gzip for JSON Array, CSV.
- Snappy for JSON Lines, Parquet.
- Zstd for Parquet, CSV.
- Output Fields: You can choose from max 5 fields according to need.
Click on “Save” on the bottom right corner.

If everything is set up correctly, your S3 destination will be created successfully, with its status displayed as “Active,” as shown below.

Adding a Pipeline
- Navigate to “Pipelines” on the left side and then press “+Create” in order to create pipeline between source and destination.

- Select source and destination and click on “Next” on the bottom right corner.

- Select all schema or the schema that you want to transfer.

- Plug in a pipeline name as you want and hit the “Save”.

- After successfully creating the pipeline, it should appear similar to the screenshot below, with its status showing as “Active.”

- Go to your S3 Bucket and download “services-0-0”.

- After downloading the file you can view the data shown as below.

By design Your “Services” in the destination will have the following meta columns apart from the regular columns.
| Column Name | Description |
|---|---|
| _STREAMKAP_SOURCE_TS_MS | Timestamp in milliseconds for the event within the source log |
| _STREAMKAP_TS_MS | Timestamp in milliseconds for the event once Streamkap receives it |
| __DELETED | Indicates whether this event/row has been deleted at source |
| _STREAMKAP_OFFSET | This is an offset value in relation to the logs we process. It can be useful in the debugging of any issues that may arise |
What’s Next?
Thank you for reading this guide. If you have other sources and destinations to connect in near real-time check out the following guides.
For more information on connectors please visit here
Ricky Thomas
LinkedInAuthor Bio
Ricky has 20+ years experience in data, devops, databases and startups.
Published
March 3, 2025
TL;DR
• Stream PostgreSQL to S3 for customer insights, behavior analytics, and scalable data lake storage. • Build pipelines that process purchase history, engagement metrics, and behavior trends for personalized marketing. • This guide covers PostgreSQL setup, S3 bucket configuration, and Streamkap pipeline creation.
Related blog posts
.png)
Why Apache Iceberg? A Guide to Real-Time Data Lakes in 2025
Apache Iceberg brings SQL tables to cloud storage with ACID transactions and time travel. Learn why it's essential for 2025.
AWS RDS PostgreSQL Set Up
AWS RDS PostgreSQL stands out as one of the most widely used production databases. Its global adoption and everyday usage have prompted Amazon to make it exceptionally user-friendly. New users can set up an RDS PostgreSQL instance from scratch in just a few minutes.
Databricks Warehouse Set Up
Getting started with Databricks is a breeze, regardless of your experience level. This guide provides clear instructions on how to create a new account or use your existing credentials, ensuring a smooth and efficient streaming process.