How to Stream Oracle to Snowflake with Streamkap
Ricky Thomas
April 10, 2025
TL;DR
• Stream Oracle data to Snowflake in minutes using Streamkap's real-time CDC platform. • Enable supply chain enhancement and inventory prediction by synchronizing operational records to Snowflake's analytics environment. • This guide walks through AWS Oracle setup, Snowflake configuration, and creating your data pipeline step-by-step.
Introduction
In a World Where Speed is King, Don’t Let Your Data Fall Behind
When decisions can’t wait, neither should your data. Outdated processes are slowing you down—but they don’t have to anymore.
Enter Streamkap, the ultimate game-changer for real-time data streaming from AWS Oracle to Snowflake. Say goodbye to complex setups and drawn-out timelines. With Streamkap, your data pipeline is up and running in minutes—not months.
With this approach, development teams can enable supply chain enhancement and inventory prediction on Snowflake by facilitating real-time data synchronization from Oracle systems. By efficiently migrating operational records from Oracle databases to Snowflake’s analytical environment, businesses can build a high-efficiency data pipeline that swiftly analyzes extensive transaction logs, supplier efficiency metrics, and shifting demand trends.
Guide Sections:
| Prerequisites | You will need Streamkap and Aws accounts |
|---|---|
| Setting up a New RDS Oracle From Scratch | This step will help you to set up Oracle DB inside AWS |
| Configuring an Existing RDS Oracle | For existing Oracle DB, you will have to modify its configuration to make it Streamkap-compatible |
| Creating a New Snowflake Account | This step will help you set up a Snowflake account |
| Fetching credentials from existing Snowflake account | For an existing Snowflake account, you will have to modify its permissions to allow Streamkap to write data |
| Streamkap Setup | Adding SQL Server as a source, adding Snowflake as a destination, and finally connecting them using a data pipe |
Ready to move as fast as your business does? It’s time to Streamkap-italize!
Prerequisites
Before You Dive In: Here’s What you’ll Need
-
Streamkap Account: First things first, you’ll need an active Streamkap account with admin or data admin privileges. Don’t have one yet? No problem! Sign up in seconds here or ask your admin to grant you access.
-
Amazon AWS Account: You’ll need an active Amazon AWS account with core RDS permissions to set up, and manage an AWS RDS instance. Don’t have an AWS account? Create one using this [link
-
Snowflake Account: Make sure you have an active Snowflake account with data warehouse admin privileges. This is essential for managing databases and setting up data integrations. Not signed up yet? Get started using this link
OracleDB Set Up
AWS RDS Oracle is a robust and widely used database for enterprise-grade applications, trusted by organizations globally for its reliability and performance. Amazon has optimized RDS Oracle to be user-friendly, allowing new users to set up an Oracle instance from scratch within minutes. Moreover, for existing Oracle instances, configuring the necessary settings for StreamKap streaming is a seamless process.
In this section, we will explore different methods to set up and configure AWS RDS Oracle to ensure full compatibility with StreamKap.
Setting up an Oracle Database from Scratch
Note: To set up a new AWS RDS Oracle instance, you’ll need IAM permissions for creating and managing RDS instances, parameter groups, subnet groups, networking, security, monitoring, and optional encryption and tagging.
Don’t have the necessary access? Reach out to your AWS administrator to get those RDS and networking permissions sorted.
Step 1: Access the AWS Management Console
- Log in to your AWS management Console and type “RDS” on the search bar.
- Click on “RDS” as shown below.

Step 2: Create a new RDS Oracle Instance
- On the RDS dashboard, select the region where you want to host your RDS instance. Be sure it aligns with your application’s requirements.
Note: To integrate with Streamkap, ensure that the selected region is one of the following:
Oregon (us-west-2)
North Virginia (us-east-1)
Europe Ireland (eu-west-1)
Asia Pacific - Sydney (ap-southeast-2)

- Navigate to the “Databases” section or select “DB Instances” under the “Resources” section.

- Click on “Create database” to kickoff the setup process.

- In the “Choose a database creation method” section, choose “Standard create” option.
- Under the “Engine options” section, select “Oracle” as the database engine.
- In the “Database management type” section, select “Amazon RDS” for a fully managed RDS service.

- Uncheck “Oracle Multitenant Architecture”: We can support multi-tenant, but only on self-hosted options.
- Choose “Oracle Enterprise Edition”: This edition offers robust capabilities, top-tier performance, and exceptional scalability—perfect for powering your data pipelines.
- Pick the Right Engine Version: Select Oracle19c or newer to ensure compatibility and optimal performance.
- Licensing: Go with “Bring Your Own License” to use your existing Oracle license seamlessly.
- First-Time Setup? Choose “Dev/Test”: If this is your first run, opt for the Dev/Test environment. It’s cost-effective and perfect for getting hands-on experience before scaling up.

- Use “source-database” as your database name to stick with standard naming conventions for clarity and consistency. Want something more personalized? Go ahead and pick a name that fits your style.
- Choose a master username that’s easy for you to remember and works best for your setup.
- Opt for a Self-managed password, enter a strong, secure password, and be sure to save it in a safe location—you’ll need it later.

- If you’re new to this, it’s a great idea to get some hands-on experience before going live. Choose “Burstable Classes (T classes)” and select “db.t3.small” as your instance type. It’s cost-effective and perfect for testing the waters.
- Opt for “General Purpose SSD” for a solid balance of performance and cost. Have unique requirements? Feel free to select a storage option that better suits your specific needs.

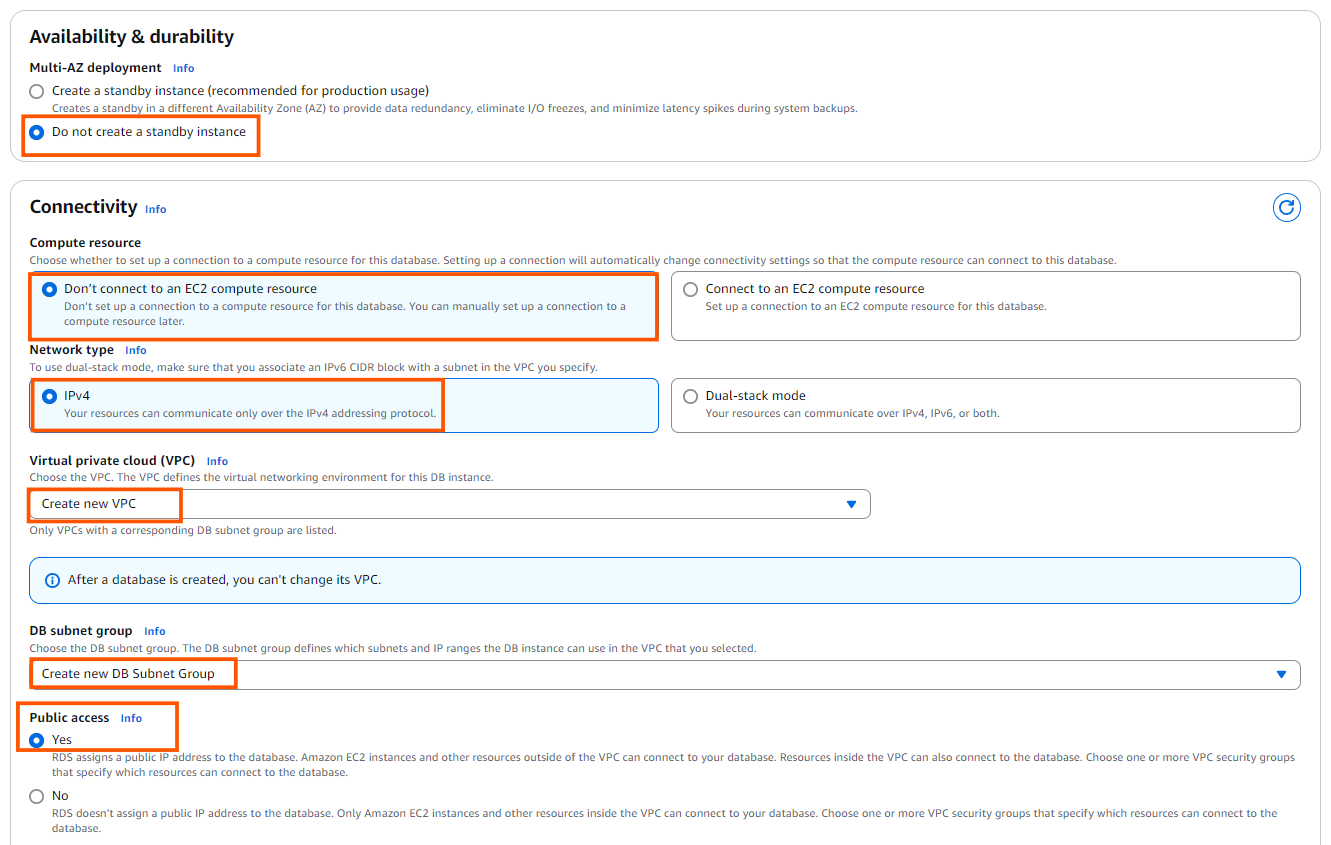
- In the Availability section, select “Do not create a standby instance”—perfect for keeping things straightforward while maintaining high availability.
- Choose “Don’t connect EC2” to simplify your setup and focus solely on your database instance.
- Select “Create new VPC”, then set up a new subnet using the dropdown menu for streamlined connectivity in the VPC Settings section.
- Enable local access by clicking “Yes” for public access in the Connectivity section—ideal for easy management and access.
- Head to the VPC settings section, choose “Choose existing VPC,” and go with the “default VPC” for an easy, no-hassle configuration.
- Set the Certificate Authority to “default”—it’s the straightforward option that ensures seamless compatibility.

- Opt for “Password authentication” when setting up your database authentication—it’s simple, secure, and gets you up and running in no time.
- If you don’t need it for your setup, be sure to deselect “Performance Insights”—no sense in enabling features you won’t use.

- Use “source” for the initial database name, or pick one that works for you—just make sure it’s 8 characters or less.
- Leave the rest of the configuration settings as they are—no need to change anything unless necessary.

- Click “Create Database” after verifying all the details.

- Wait until the status changes to “Available”, as shown below.

Step 3: Configuring Your Oracle Instance for Streamkap Compatibility
By default, an AWS RDS Oracle instance doesn’t support Change Data Capture (CDC). To unlock sub-second latency streaming, you’ll need to tweak a few settings to ensure CDC compatibility.
In this guide, we’ll walk you through:
- Enabling Archive Logs
- Enabling LogMiner
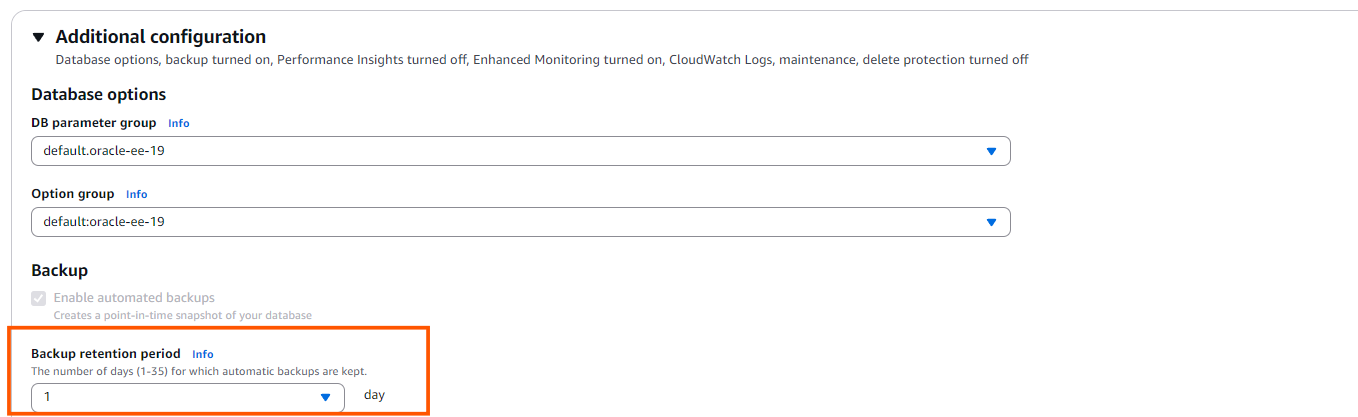
- On your RDS dashboard, click “Modify”—but make sure the instance status is “Available” before proceeding.

- In the Additional Configuration section, set the Backup Retention Period to “at least 1”.
-
Review the changes. The image shows that the master password has been updated—this happens because the system may ask you to confirm the password when updating the backup retention.
-
Select “Apply Immediately” and click “Modify DB Instance” to apply your changes.

Note: The queries can be executed locally using Oracle SQL Developer or DBeaver.
- To verify the changes were applied correctly, run the query below. The results should match the example shown in the image.
```sql

- To configure the log retention for 72 hours, run the query below:
```sql
- To enable supplemental logging, which is crucial for Change Data Capture (CDC) functionality, run the queries below:
```sql
- In order to verify the changes, run the query below. It should return “YES”.```sql

- By default, an Amazon RDS Oracle instance starts with four “online redo log files”, each 128MB. This size is often too small, so for production databases, it’s recommended to resize the logs to “1024MB” or larger.
- Before making any changes, run the query below to check the current log sizes
```sql

- Now, add 8 new, larger redo log files that will eventually replace the smaller logs.
```sql
- To confirm the size of the log files, run the query below. It should return a log size of “1024 MB” for the newly created logs, along with the existing ones:
```sql

- To remove the inactive log groups, run the query below. Just make sure to replace “group_number” with the specific group numbers you want to drop:
```sql
- To switch the current log, run the query below. The output should resemble the one shown in the image.
```sql

- If the log we want to drop is ACTIVE, you’ll need to issue a checkpoint to make it INACTIVE.
```sql

```sql
- To drop the inactive log groups, run the query below. Just remember to replace “group_number” with the specific group numbers you want to remove:

Configuring an Existing Source Database for Streamkap Compatibility
If you already have an existing AWS RDS Oracle instance, it might not be CDC-compatible. To check its compatibility, we’ll run two tests. Both must pass to confirm that the instance supports Change Data Capture (CDC).
You’ll need to verify if Archive Log and Log Miner are enabled.
- By default, Archive Log may already be enabled. To verify, run the query below. It should return LOG_MODE as ARCHIVELOG.
```sql
-
If the query doesn’t return the expected result, move on to Step 1 else feel free to skip this step.
-
Check if the log size is 1024 mb
```sql
Step 1: Enabling Archive Logs
- On your RDS dashboard, click “Modify”, but first, make sure the instance status is “Available”.
- In the Additional Configuration section, set the Backup Retention Period to “at least 1”.
- Review the changes. In the image, you’ll notice the master password has been updated—this happens because the system might prompt you to confirm the password when updating the backup retention.
- Select “Apply Immediately” and click “Modify DB Instance” to apply the changes.
- Archive logs should be retained for at least 24 hours, though it’s recommended to keep them for a longer period if possible. A shorter retention period increases the risk of missing changes that need to be captured and processed.
- To configure a 72-hour log retention period, execute the query below:
```sql
Step 2: Enable LogMiner
- To enable “supplemental logging”, which is required for Change Data Capture (CDC) functionality, run the queries below:
```sql
- To verify the changes, run the query below. It should return “YES”.
```sql
- By default, an Amazon RDS Oracle instance starts with four “online redo log files”, each 128MB. This size is often too small, and for production databases, it’s recommended to resize the logs to “1024MB” or larger.
- Before making any changes, run the query below to check the current log sizes:
```sql
- Now, add 8 new, larger redo log files that will eventually replace the smaller logs.
```sql
- To verify the size of the new log files, run the query below. It should return a log size of “1024 MB” for the newly created logs, alongside the existing ones.
```sql
- To remove the inactive log groups, run the query below. Make sure to replace “group_number” with the specific group numbers you want to drop:
```sql
- To switch the current log, run the query below. The output should resemble the one shown in the image.
```sql
- If the log we want to drop is ACTIVE, you”ll need to issue a checkpoint to make it INACTIVE first.
```sql
- To remove the inactive log groups, run the query below. Make sure to replace “group_number” with the specific numbers of the groups you want to drop.
```sql
- Verify that all configurations have been applied by running the query shown in the image.
Snowflake Warehouse Set Up
Getting started with Snowflake is a breeze, no matter if you’re a newbie or a seasoned pro. This guide will walk you through the steps to either create a new account or log in with your existing credentials, making your data integration process smooth and hassle-free.
Creating a New Snowflake account
Step 1: Sign up and create a Snowflake account
Head over to Snowflake’s website.
- You’ll receive a login email. Just follow the instructions inside, and you’ll be prompted to enter your username and password to complete the login process.

- Once your account is activated, you’ll get an email with a URL. Be sure to save this URL—it’s essential for connecting with Streamkap.

Step 2: Access Your Snowflake Warehouse
- After logging in, you’ll land on the Snowflake dashboard, where you can manage your account, access data, and run queries.
- To get started with your queries, simply click on “+Create” on the left-hand navigation bar and select “SQL Worksheet.” This will open up a new workspace where you can start running your queries.

- In the SQL Worksheet, ensure you’re in the “Database” section**,** as shown below**.** This is where you’ll need to run your query, so make sure you’re in the right spot!

Step 3: Ensuring Snowflake Compatibility with Streamkap
- To get Snowflake ready for integration with Streamkap, you’ll need to execute the following script.
Note: Follow the comments for each query to ensure you’re executing the steps correctly before running the script.
```sql
- Once you’ve written the script, hit “Run All” from the top right corner to execute it. This will ensure all your queries run smoothly.

- If your network access is restricted to third-party connections, make sure to add StreamKap’s IP addresses to your network policy. This will ensure a smooth connection between your Snowflake instance and StreamKap.
| Service | IPs |
|---|---|
| Oregon (us-west-2) | 52.32.238.100 |
| North Virginia (us-east-1) | 44.214.80.49 |
| Europe Ireland (eu-west-1) | 34.242.118.75 |
| Asia Pacific - Sydney (ap-southeast-2) | 52.62.60.121 |
```sql
-
Generate an encrypted RSA private key in your machine for secure communication and authentication between Streamkap and your systems. Here’s the command to create your private key:
-
Generate your public key: The public key is created from your private key and is used for encryption, allowing secure data exchange with Streamkap. Run the following command to generate your public key:
-
To copy the key, run the following command, making sure to replace “copy command” with the correct clipboard command for your operating system:
-
For macOS: Use “pbcopy” to copy the contents of the key file to the clipboard.
-
For Windows: Use “clip” to copy the contents of the key file to the clipboard.
For Linux: Use “xclip” or “xsel” to copy the key to the clipboard.
- To add attach it to the “STREAMKAP_USER” run the below SQL queries
```sql
Fetching credentials from the existing Snowflake warehouse
To successfully connect Snowflake with Streamkap and enable smooth data transfer and integration, you’ll need to gather the following credentials:
- Username- Snowflake URL- Private Key- Private Key Phrase- Warehouse Name- Database Name- Schema Name- Snowflake Role
Ensure that you have access to all of these details to complete the integration seamlessly.
- To get started with your Snowflake setup, navigate to the login page
- Once logged in, to create a new SQL Worksheet, click on “+Create” in the left navigation bar, then select “SQL Worksheet” to begin running your queries.
- Make sure you’re in the “Database” section in your SQL Worksheet.
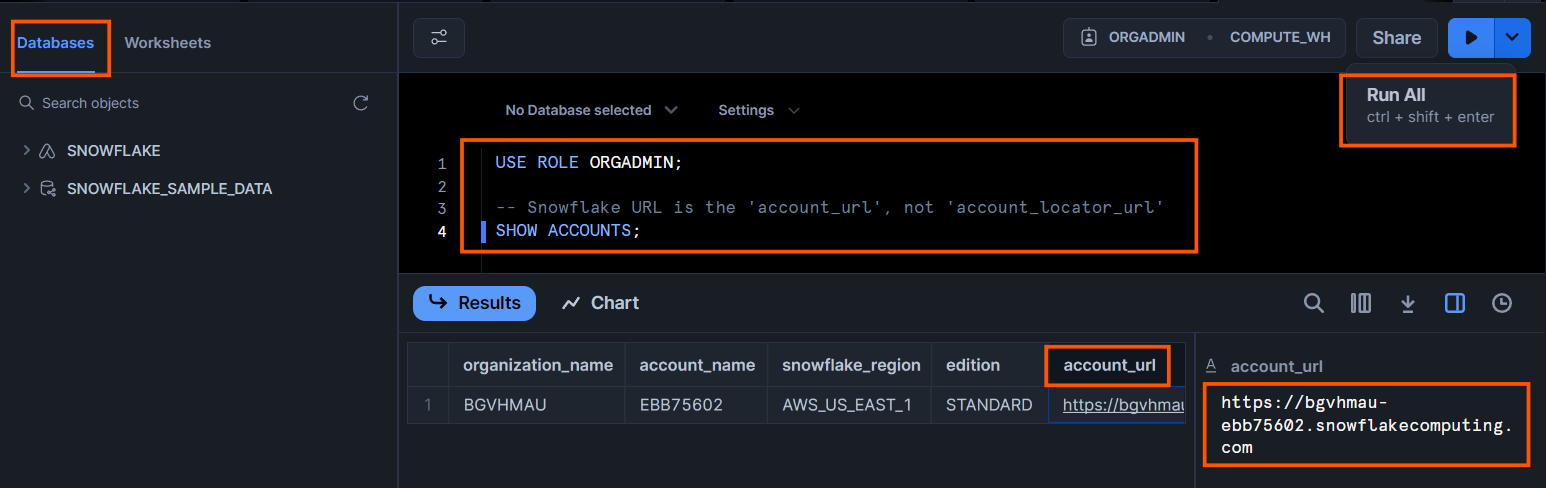
- Enter the SQL query and click on “Run All.”
```sql
- Once the query has executed, check the results for the “account_url” field.
- Click on the “account_url” to copy the URL.
- Username: The username will be STREAMKAP_USER, or whatever username you assigned to Streamkap.
```sql
-
Generate an encrypted RSA private key on your local machine for secure communication and authentication between Streamkap and your systems. Here’s the command to create your private key:
-
Generate your public key: The public key is created from your private key and is used for encryption, allowing secure data exchange with Streamkap. Run the following command to generate your public key:
-
Private Key: Grab your private key by running the command below (just swap out the copy command with the one that fits your system):
-
Private Key Phrase: This is the passphrase you set when creating your encrypted private key.
-
Warehouse Name: The warehouse name is usually STREAMKAP_DATAWAREHOUSE, or whatever name you assigned to it.
```sql- Database Name: The database name is STREAMKAPDB, or whatever name you assigned to it.
```sql- Schema Name: The schema name is STREAMKAP, or whatever name you assigned to it.
```sql- Snowflake Role: The role is STREAMKAP_ROLE, or whatever role name you assigned to it.
```sql
Streamkap Set Up
To connect Streamkap to OracleDB, you’ll need to configure the database to accept traffic from Streamkap by safelisting Streamkap’s IP addresses.
Note: If OracleDB allows traffic from anywhere globally, you can skip this step and proceed to the “Configuring OracleDB for Streamkap Integration” section.
Safelisting Streamkap’s IP Address
Streamkap’s dedicated IP addresses are
| Service | IPs |
|---|---|
| Oregon (us-west-2) | 52.32.238.100 |
| North Virginia (us-east-1) | 44.214.80.49 |
| Europe Ireland (eu-west-1) | 34.242.118.75 |
| Asia Pacific - Sydney (ap-southeast-2) | 52.62.60.121 |
When signing up, Oregon (us-west-2) is set as the default region. If you require a different region, let us know. For more details about our IP addresses, please visit this link.
- To safelist one of our IPs, access your RDS Oracle instance’s security group with type “CIDR/IP - Inbound” and select “Edit inbound rules.”
- Click “Add rule,” choose “Oracle-RDS” as the type, select “Custom” as the source, and enter any of our relevant IP addresses followed by “/32.” For example, to add an IP address for North Virginia you would enter “44.214.80.49/32” as shown in the image below.

Configuring Oracle Database for Streamkap Integration
To do this, access your Oracle RDS database using a tool like Oracle SQL Developer, and execute the following code:
- This script will create a new database user with the necessary privileges for the Connector.
- The new user will have the appropriate access and permissions to interact with the database for streaming or integration tasks.
```sql
- By executing the query below, a new schema will be created. This schema will be used for verifying that the data has been properly transformed:
Note: In Oracle RDS, you must create a user to establish a new schema, as creating a user automatically creates a schema with the same name. This user-schema pairing allows for immediate creation and management of database objects within the newly created schema.
```sql
- For Streamkap user role to discover schemas and tables use the query below.
```sql
- To backfill your data, the Connector needs the ability to perform “Snapshots”. To enable this process, a specific table must be created for the Connector to use.
- Use the query below to create the table:
Note: Make sure to create the signal table with the exact name “STREAMKAP_SIGNAL.” Any other name won’t be recognized by the system.
```sql
Oracle Database as a Source Connector
Before you add “Oracle RDS” as a source connector, make sure to check the following:
- IP Address Safelist: Ensure your IP address is safelisted, or set up your Oracle RDS instance to accept traffic from Streamkap by default. This is crucial for secure connectivity between Streamkap and your RDS instance.
- SQL Configuration: Double-check that you’ve executed all the SQL code from the “Configuring AWS RDS Oracle Database for Streamkap Integration” section. This ensures your Oracle instance is properly set up with users, roles, permissions, and replication configurations.
Both of these steps are key to seamlessly connecting your AWS RDS Oracle database as a source with Streamkap.
Note: If you’re using Oracle 12c or later, you can link your clone to Streamkap, and it will function properly. For older Oracle versions, a direct connection is required.
Step 1: Log in to Streamkap
- Go to the Streamkap sign-in link and log in. This will direct you to your dashboard.
Note: You need admin or data admin privileges to proceed with the steps below.
Step 2: Set Up a Oracle Source Connector
- On the left sidebar, click on “Connectors,” then select the “Sources” tab.
- Click the “+ Add” button to begin setting up your Oracle source connector.

- Enter “Oracle” in the search bar and select “Oracle RDS” from the list of available services.
- This will take you to the new connector setup page.

- You’ll be asked to provide the following details:
- Name: Choose a name for the OracleRDS source in Streamkap.
- Hostname: Copy the Endpoint from the “Connectivity & Security” tab of your OracleRDS instance.
- Port: The default port is 1521. If you’ve changed the port, update it accordingly.
- Username: Use “STREAMKAP_USER” which was created earlier.
- Password: Enter the password for the user.
- Database: Use “source” (or specify a custom database name if necessary).
- Signal Table Schema: Enter “STREAMKAP” if you followed the previous step or provide your own schema name.
- Heartbeat: Enable the toggle to activate heartbeat checks for maintaining a stable connection.

If you choose not to use an SSH Tunnel, click “Next” and proceed to step 3.
If you opt to connect to your AWS RDS Oracle through an SSH Tunnel, ensure the following:
- Your bastion host / SSH Tunnel server is connected to your OracleRDS instance.
- Your bastion host /SSH Tunnel allow traffic from any source or has the Streamkap IP Address safelisted
Log in to your Linux SSH Tunnel host and execute the commands below. If you are using a Windows server, refer to our SSH Tunnel guide for Windows.
- After running the commands above, fetch the “SSH Public Key” from Streamkap’s Oracle source as shown below.

- Replace with the SSH Public key copied from earlier and run the code below.
After your SSH Tunnel server is restarted, enter the public IP address of your SSH Tunnel server as the SSH Host in Streamkap and click Next. You’ll then be directed to the schema and table selection page, like the one below.
Step 3: Plug in Schema and Table Names
If you’ve followed the guide, your Oracle RDS database should now have a “CUSTOMERS” table within the “SALES” schema.
- If you’re using a different schema, simply update the schema and table names as necessary.
- Once you’ve updated the names, click Save to proceed.

- Once all the steps are completed correctly, you should be able to successfully create an Oracle RDS source connector as shown below.

In case you encounter any fatal errors, they could be caused by one of the following:
- Our IP addresses were not safelisted.
- Incorrect credentials.
- Incorrect database, schema, or table name.
- Insufficient permissions to query the table.
Adding a Snowflake Connector
- In order to add Snowflake as a destination navigate to “Connection” on the left side , then click on “Destination” and press the “+Add” button.

- Search for snowflake in the search bar and click on “Snowflake”.

You will see the configuration page below. The settings for Snowflake are as follows:
- Name: Enter a unique and memorable name for the destination (e.g., Streamkap_Snowflake).
- Snowflake URL: The URL provided by Snowflake after your account activation.
- Username: Your Streamkap user name (e.g., STREAMKAP_USER).
- Private Key: The private key generated from the .p8 file using your bash/terminal.
- Private Key Passphrase: Required only if your private key is encrypted. Otherwise, leave it blank.
- Warehouse Name: The name of your Snowflake warehouse (e.g., STREAMKAP_DATAWAREHOUSE).
- Database Name: The name of your Snowflake database (e.g., STREAMKAPDB).
- Schema Name: The name of your database schema (e.g., STREAMKAP).
- Snowflake Role: The specific role assigned to Streamkap (e.g., STREAMKAP_ROLE).
- Ingestion Mode:- Append Mode: Choose this if you’re adding new, unique data each time and don’t need to update or deduplicate existing records.
- Upsert Mode: Choose this if you need to update existing records or handle potential conflicts between new and existing data (e.g., updating customer information).
- **Dynamic Tables (Optional):- Use Dynamic Tables:**If you need to manage real-time data (e.g., frequent updates to customer information), dynamic tables ensure you’re always working with the latest records in Snowflake.
- Skip Dynamic Tables: If real-time updates and automatic deduplication are not required for your use case, you can skip creating dynamic tables.
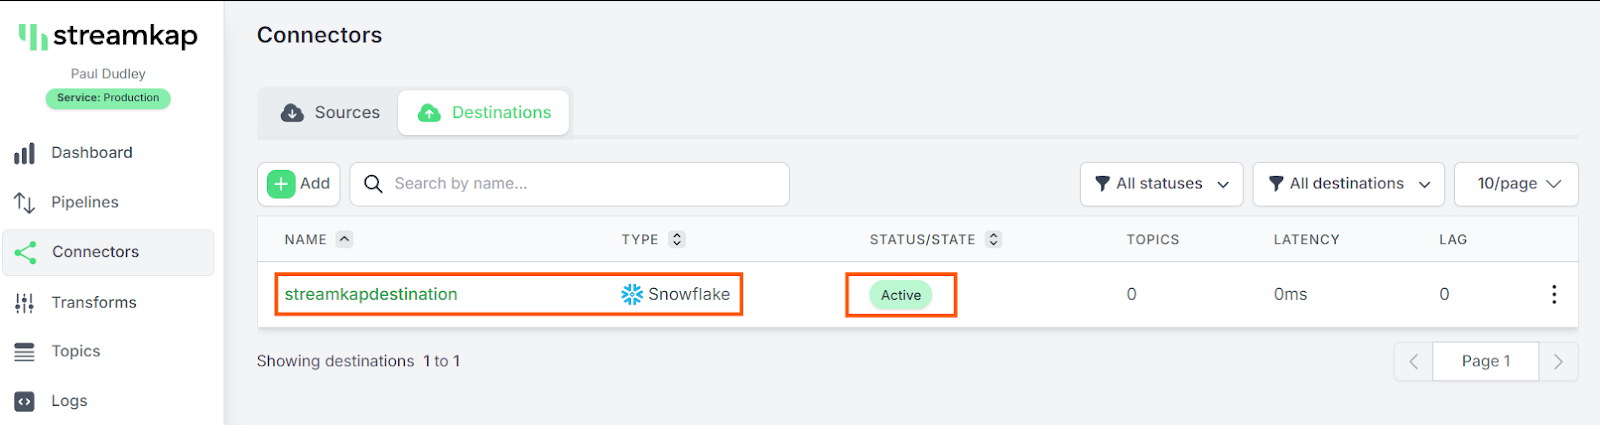
- Click “Save” and wait until the status becomes active

If everything is set up correctly, your Snowflake destination will be created successfully, and its status will be displayed as “Active,” as shown below. This means that Streamkap has successfully connected to your Snowflake instance and is ready to start streaming data from your Oracle RDS source.
Adding a Pipeline
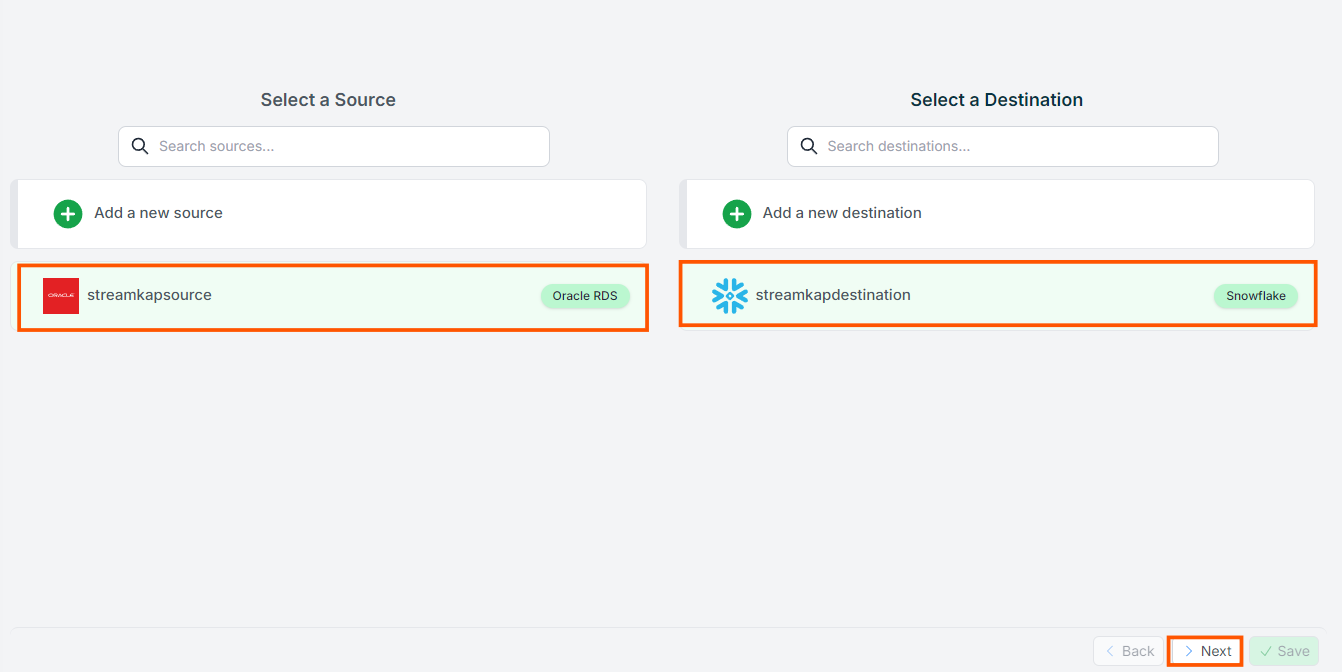
- Navigate to “Pipelines” on the left side and then press “+Create” in order to create a pipeline between source and destination.

- Select source and destination and click on “Next” on the bottom right corner.
- Select all schema or the schema that you want to transfer.
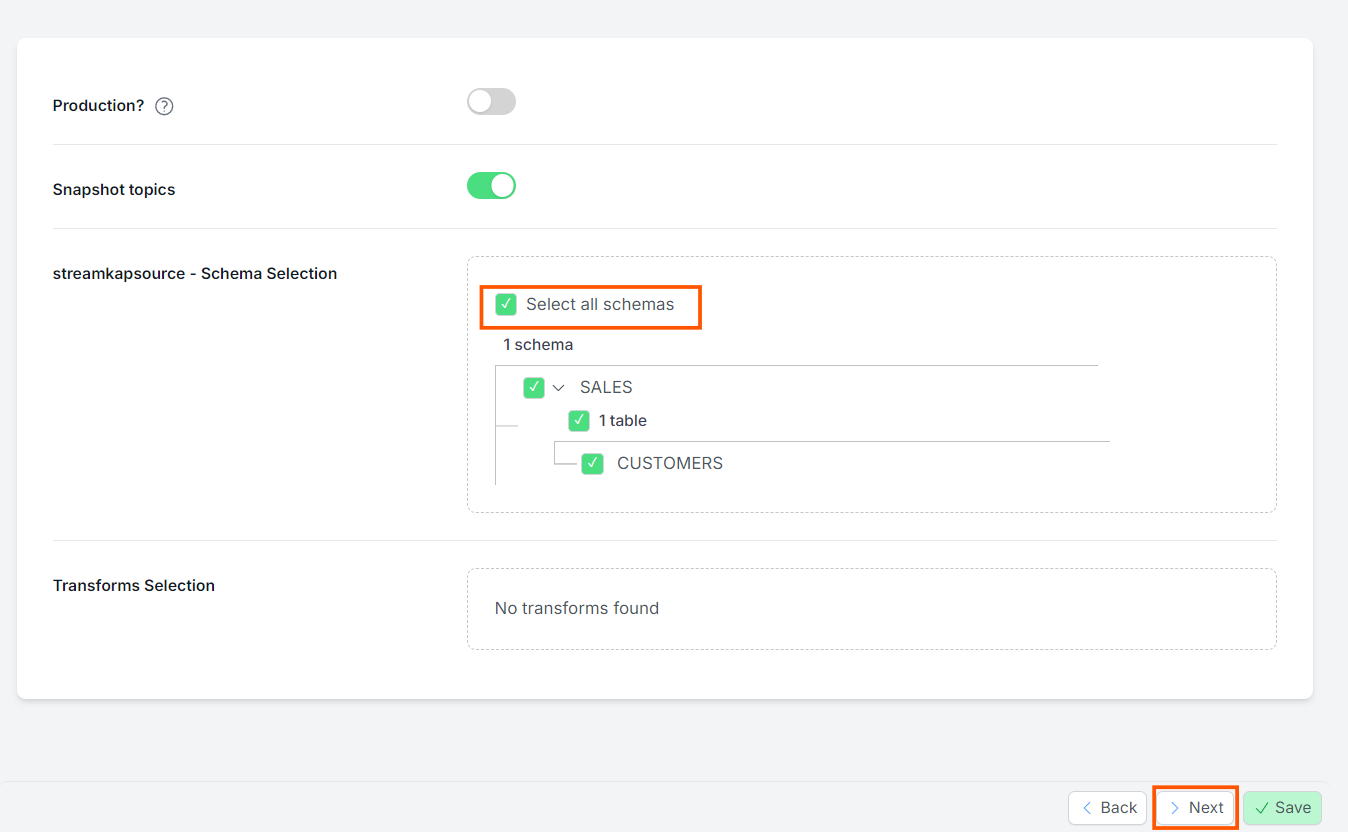
- Plug in a pipeline name and click the “Save”.

- After successfully creating the pipeline, it should appear similar to the screenshot below, with its status showing as “Active.”

- Go to “Snowflake” and navigate to “SQL Querysheet”. Run the query as shown below in order to verify the transferred data.
```sql

By design Your “Table” in the destination will have the following meta columns apart from the regular columns.
| Column Name | Description |
|---|---|
| _STREAMKAP_SOURCE_TS_MS | Timestamp in milliseconds for the event within the source log |
| _STREAMKAP_TS_MS | Timestamp in milliseconds for the event once Streamkap receives it |
| __DELETED | Indicates whether this event/row has been deleted at source |
| _STREAMKAP_OFFSET | This is an offset value in relation to the logs we process. It can be useful in the debugging of any issues that may arise |
What’s Next?
Thank you for reading this guide. If you have other sources and destinations to connect in near real-time check out the following guides.
For more information on connectors please visit here
Ricky Thomas
LinkedInAuthor Bio
Ricky has 20+ years experience in data, devops, databases and startups.
Published
April 10, 2025
TL;DR
• Stream Oracle data to Snowflake in minutes using Streamkap's real-time CDC platform. • Enable supply chain enhancement and inventory prediction by synchronizing operational records to Snowflake's analytics environment. • This guide walks through AWS Oracle setup, Snowflake configuration, and creating your data pipeline step-by-step.
Related blog posts
.png)
Why Apache Iceberg? A Guide to Real-Time Data Lakes in 2025
Apache Iceberg brings SQL tables to cloud storage with ACID transactions and time travel. Learn why it's essential for 2025.
AWS RDS PostgreSQL Set Up
AWS RDS PostgreSQL stands out as one of the most widely used production databases. Its global adoption and everyday usage have prompted Amazon to make it exceptionally user-friendly. New users can set up an RDS PostgreSQL instance from scratch in just a few minutes.
Databricks Warehouse Set Up
Getting started with Databricks is a breeze, regardless of your experience level. This guide provides clear instructions on how to create a new account or use your existing credentials, ensuring a smooth and efficient streaming process.