How to Stream SQL Server to Databricks with Streamkap
Paul Dudley
April 22, 2025
TL;DR
• Stream SQL Server to Databricks in real-time for live dashboards, ML models, and business metrics monitoring. • Eliminate batch delays and complex ETL workflows by keeping your analytical environment continuously synchronized. • This guide covers SQL Server setup, Databricks configuration, and Streamkap pipeline creation.
Introduction
Modern data teams often face the challenge of making operational data from systems like AWS-hosted SQLServer available in analytics platforms like Databricks with minimal delay. Whether for powering live dashboards, enabling real-time machine learning, or monitoring key business metrics, the need for low-latency, reliable data movement is growing.
This guide demonstrates how to use Streamkap, a high-performance CDC (Change Data Capture) solution, to stream data in real-time from AWS SQLServer to Databricks. We’ll walk through the configuration and setup required to build a robust, scalable pipeline that keeps your analytical environment continuously in sync with your production database without complex ETL workflows or batch delays.
| Prerequisites | You’ll need accounts for AWS, Databricks, and Streamkap. |
|---|---|
| Setting Up AWS RDS SQLServer for Steramkap Compatibility | This section will guide you through setting up a new SQLServer database in AWS RDS. |
| Configuring an Existing AWS SQLServer | If you already have a SQLServer database, make sure it is compatible with Streamkap by adjusting the network settings and enabling access. |
| Setting up a New Databricks Account from scratch | Create a new Databricks workspace to efficiently store and analyze real-time data originating from AWS SQLServer. |
| Fetching Credentials from Existing Databricks | If you already have a SQLServer database, adjust the network settings and enable access to ensure it is compatible with Streamkap. |
| Streamkap Setup | Using Streamkap to create a data pipeline by connecting AWS SQLServer as the source and Databricks as the destination. |
Looking for real-time insights right at your fingertips? Start streaming today!
Prerequisites
To follow along with this guide, ensure you have the following in place:
- Streamkap Account: To get started, you’ll need an active Streamkap account with admin or data admin privileges. If you don’t have one yet, no worries—you can sign up here or ask your admin to grant you access.
- Databricks Account: An active Databricks account is required with data warehouse administrative privileges. If you don’t have one yet, sign up here.
- Amazon AWS Account: An active Amazon AWS account with core RDS and networking permissions to create, configure or modify an AWS RDS instance. If you don’t have one yet, sign up here.
Setting Up AWS RDS SQLServer for Streamkap Compatibility
Amazon RDS for SQL Server provides a fully managed, scalable, and high-performance database platform tailored for enterprise-grade applications. It simplifies the complexities of database administration such as backups, patching, and monitoring, allowing organizations to focus on development and innovation. With just a few clicks, users can quickly launch and configure SQL Server instances, making deployment efficient and straightforward.
The following sections will guide you through the process of launching a new RDS SQL Server instance and configuring an existing one for integration with Streamkap.
Setting up a New RDS SQL Server from Scratch
Note: To set up a new AWS RDS SQL Server instance, you’ll need IAM permissions for creating and managing RDS instances, parameter groups, subnet groups, networking, security, monitoring, and optional encryption and tagging.
Step 1: Access the AWS Management Console
- Log in to your AWS management Console and type “RDS” on the search bar.
- Click on “RDS” as shown below.

Step 2: Create a new RDS SQL Server Instance
- On the RDS dashboard, select one of the following regions to create your database instance in, note that these are the AWS regions which Streamkap is available in:
Oregon (us-west-2)
North Virginia (us-east-1)
Europe Ireland (eu-west-1)
Asia Pacific - Sydney (ap-southeast-2)

- Navigate to the “Databases” section or select “DB Instances” under the “Resources” section.

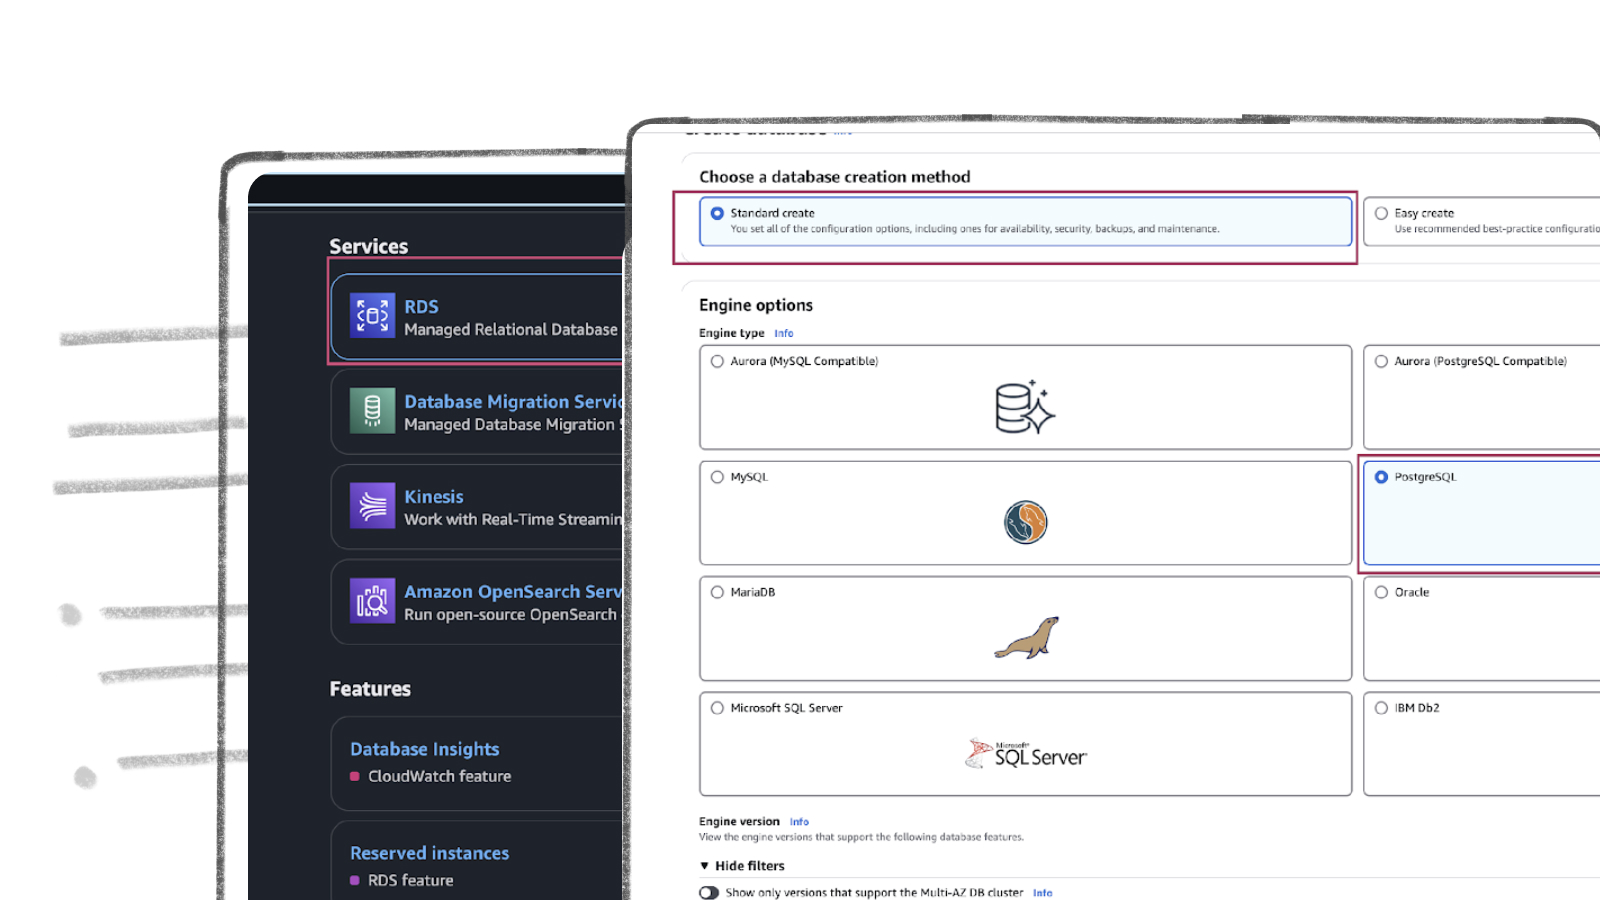
- Click on “Create database” to start the setup process.

- In the “Choose a database creation method” section, choose “Standard create” option.
- Under the “Engine options” section, select “SQL Server” as the database engine.
- In the “Database management type” section, select “Amazon RDS” for a fully managed RDS service.

- Choose the “Standard Edition” for cost-effective, small-to-medium workloads with essential features, or opt for the “Enterprise Edition” for high scalability, advanced security, and complex workloads that require features like advanced analytics and high availability.
- Select “SQL Server version 2016 or higher” to ensure compatibility and optimal performance.
- If you are setting up for the first time, opt for a “Dev/Test environment” to ensure proper configuration.

- Use “source-database-instance” as your database identifier name to follow standard naming conventions for clarity and consistency. If you’d like something more personalized, feel free to choose a name that suits your style.
- Pick a “master username” that’s easy for you to remember and aligns with your setup.
- Opt for a “Self-managed password”, enter a strong, secure password, and make sure to save it in a safe place-you’ll need it later.

- If you’re just getting started, it’s a good idea to gain some hands-on experience before going live. Choose “memory optimized classes (r and x classes)” and select “db.r5.large” for a cost-effective and suitable instance type for testing.
- Select “General Purpose SSD” for a balanced performance-to-cost ratio. If you have specific needs, you can choose a different storage option that best fits your requirements.

- In “Availability and Durability”, select No for redundancy if you don’t need high availability or failover capabilities at this stage.
- Choose “Don’t connect EC2” to simplify your setup and focus only on the database instance.
- Select “Create new VPC,” then set up a new subnet using the dropdown menu in the VPC Settings section for streamlined connectivity.
- Enable local access by clicking “Yes” for public access in the Connectivity section, which is ideal for easy management and access.

- Head to the VPC settings section, select “Choose existing VPC,” and use the “default VPC” for a simple and hassle-free configuration.

- Uncheck “Performance Insights”—to reduce complexity.
- Once you’ve reviewed all the settings and configurations, take a final look at everything, and then click on “Create Database” to initiate the creation process.

- Wait for the status to change to “Available,” as displayed below.

Step 3: Configuring Your SQL Server Instance for Streamkap CompatibilityNote: This query can be executed using a local client like DBeaver or SQL Server Management Studio.
-
To adhere to naming conventions, create the database with the name “source-database” using the following query:
-
Verify if the database has been created by running the query shown below. It will display the name of the database if it has been created successfully.
-
To enable Change Data Capture (CDC) on the “source-database”, allowing you to track and capture changes for further analysis or replication purposes, run the following query:
-
To verify whether CDC has been enabled or not, run the following query:
-
It should return an output that matches the one shown in the picture, indicating the status of CDC for the database.

Configuring an Existing RDS SQL Server
If you already have an existing AWS RDS SQL Server instance, it might not be CDC-compatible. To check its compatibility, we’ll run a verification query. You need to verify if Change Data Capture (CDC) is enabled on the instance.
To check if CDC is enabled on your database, execute the query below:
Note: Make sure to replace “your-database-name” with the actual name of your database for all queries.
If CDC is already enabled, you’ll see “1” and can skip this section and proceed with your setup.
Enable CDC on database
-
To enable Change Data Capture (CDC) on the your database, allowing you to track and capture changes for further analysis or replication purposes, run the following query:
-
To verify whether CDC has been enabled or not, run the following query:
-
It should return an output that matches the one shown in the picture, indicating the status of CDC for the database.
Databricks Set Up
Getting started with Databricks is straightforward, regardless of your level of experience. This guide offers clear instructions for creating a new account or utilizing your existing credentials, ensuring a seamless and efficient streaming process.
Setting up a New Databricks Account from Scratch
Step 1: Sign up and create a Databricks account
- Visit Databricks’ website and click on Try Databricks.

- Fill in the requested details and create a Databricks account.

- When you log in to the account created a few seconds ago you will land on the Account console page that looks like the following.

Step 2: Create a new Databricks Workspace
The onboarding process in Databricks differs between the trial version and the paid version. Based on your payment plan with Databricks, please follow either step 2a or 2b.
Step 2a: Databricks Trail Version Flow
In the trial version you will land in the following page. Please click on ‘+ New’ -> ‘More’->’SQL warehouse’.

You will land on a page that looks like the following.

Please skip to Step 3: Create a new SQL Data Warehouse in order to create a new data warehouse for Streamkap streaming.
Step 2b: Databricks Paid Version Flow
If you have the Databricks paid version, please follow the steps shown below.
- Click on Workspaces.

- Then click on Create workspace on the top right corner of the screen. A page like the one presented below should appear

- Choose Quickstart (Recommended) and click next. Fill the workspace name. Choose your desired region and click Start Quickstart.

- Databricks will take you to your AWS console. Scroll down and Click Create stack.

- After a few minutes, return to your Databricks Workspaces and it will be ready, as illustrated below. On your Databricks workspace page click on Open and you will be taken to your new data warehouse.
Step 3: Create a new SQL Data warehouse
- On your new data warehouse click on + New and then on SQL warehouses as highlighted in below image.
- Click on Create SQL warehouse
-
Plug your new SQL warehouse details. For this guide we recommend you use the minimum available cluster size, which is 2X-Small, to reduce cost.
-
Click Create and within seconds your new data warehouse will be up and running.

Step 4: Fetch credentials from your new data warehouse
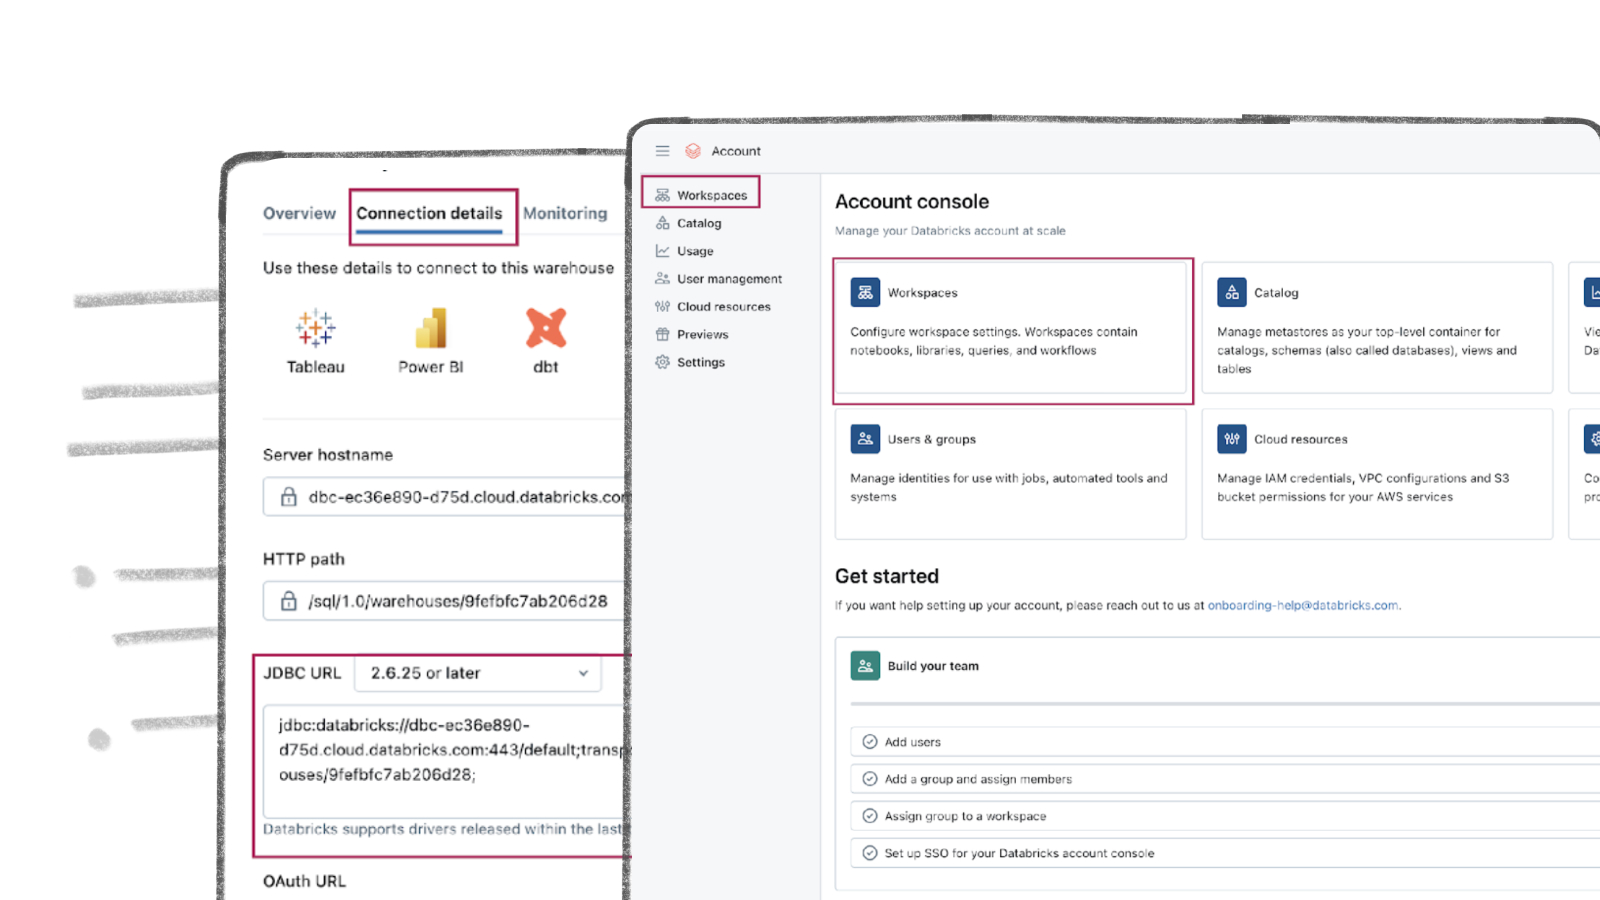
- On your new data warehouse click on the Connection details tab as presented in the following illustration.

- Copy the JDBC URL into a secure place.
- Create apersonal access token from the top right corner of the screen and store it in a secure place.
- We will need the JDBC URL and personal access token to connect Databricks to Streamkap as a destination connector.
Fetching Credentials from Existing Databricks
Step 1: Log in to Your Databricks Account
- Navigate to the Databricks login page.
- Plug in your email and hit “Continue”. A six digit verification code will be sent you your email.
- Plug in the six digit verification code and you will land in the “Account console” page that looks like the following

Step 2: Navigate to your Databricks Warehouse
- Click on Workspaces and then click on Open button next to the corresponding workspace as illustrated below.
- Once you land on your desired workspace, click on SQL Warehouses. This will list your SQL warehouses as outlined below.

Step 3: Fetch Credentials from your Existing Data Warehouse
- Choose the data warehouse you wish to fetch credentials from. Click on the Connection details tab as presented in the following illustration.

- Copy the JDBC URL into a secure place.
- Create a personal access token from the top right corner of the screen and store it in a secure place.
- We will need the JDBC URL and personal access token to connect Databricks to Streamkap as a destination connector.

Note: If you cannot access the data warehouse or create a personal access token, you may have insufficient permissions. Please contact your administrator to request the necessary access.
Streamkap Set Up
Streamkap creates fast, reliable data pipelines for real-time analysis and response to large data volumes. This allows your team to make quick, informed decisions, keeping you competitive. For optimizing operations, enhancing business intelligence, or improving customer experiences, ensuring efficient and secure data flow is essential.
Adding RDS SQL Server Database as a Source Connector
Before adding SQL Server RDS as a source connector, ensure the following:
- IP Address Safe listing: Ensure that your IP address is added to the safelist or configure your SQL Server RDS instance to allow traffic from Streamkap by default. This step is essential for establishing a secure connection between Streamkap and your RDS instance.
- SQL Configuration: Verify that you have executed all required SQL commands from the “Configuring AWS RDS SQL Server for Streamkap Integration” section. This includes setting up users, roles, permissions, and enabling Change Data Capture (CDC) on the required tables.
Both steps are critical for establishing a seamless connection between AWS RDS SQL Server and Streamkap.
Note: If you’re using SQL Server 2016 or later, you can integrate with Streamkap using CDC. For older versions, additional configuration may be required.
Step 1: Log in to Streamkap
- Sign into the Streamkap. This will direct you to your dashboard.
Note: You need admin or data admin privileges to proceed with the steps below.
Step 2: Set Up a SQL Server Source Connector
- On the left sidebar, click on “Connectors,” then select the “Sources” tab.
- Click the “+ Add” button to begin setting up your SQL Server source connector.

- Enter “SQL Server” in the search bar and select “SQL Server RDS.”
- This will take you to the new connector setup page.

- You’ll be asked to provide the following details:
- Name: Choose a name for the SQL Server source in Streamkap.
- Endpoint: Copy the Endpoint from the “Connectivity & Security” tab of your SQL Server RDS instance.
- Port: The default port is 1433, If you’ve changed the port, update it accordingly.
- Signal Table Schema: Enter “STREAMKAP” if you followed the previous step or provide your own schema name.
- Username: Use “STREAMKAP_USER” which was created earlier.
- Password: Enter the password for the user.
- Source Database: Use “source-database” (or specify a custom database name if necessary).

If you choose not to use an SSH Tunnel, click “Next” and proceed to step 3.
If you opt to connect to your AWS RDS SQL Server through an SSH Tunnel, ensure the following:
- Your bastion host / SSH Tunnel server is connected to your SQL Server RDS instance.
- Your bastion host /SSH Tunnel allow traffic from any source or has the Streamkap IP Address safelisted
Log in to your Linux SSH Tunnel host and execute the commands below. If you are using a Windows server, refer to our SSH Tunnel guide for Windows.
- After running the commands above, fetch the “SSH Public Key” from Streamkap’s SQL Server source as shown below.

- Replace with the SSH Public key copied from earlier and run the code below.
After your SSH Tunnel server is restarted, enter the public IP address of your SSH Tunnel server as the SSH Host in Streamkap and click Next. You’ll then be directed to the schema and table selection page, like the one below.
Step 3: Plug in Schema and Table Names
If you’ve followed the guide, your SQL server should now have a “hr” schema within the “employees” table.
- If you’re using a different schema, plug in your own details.
- Once you’ve updated, click Save to proceed.

- Once all the steps are completed correctly, you should be able to successfully create a SQL Server source connector as shown below.

In case you encounter any fatal errors, they could be caused by one of the following:
- Our IP addresses were not safe listed.
- Incorrect credentials.
- Incorrect database, schema, or table name.
- Insufficient permissions to query the table.
Adding a Destination Connector
- To add Databricks as a destination connector click on Connectors on the left side, then click on Destinations and press the + Add button
- You will land in the Databricks destination connection configuration page as shown below.

Plug in your desired
- Name
- Choose append or Insert as ingestion mode
- Paste the personal access token and JDBC url retrieved from Databricks warehouse Set Up section of this guide
- Key in the destination schema of your choice
Press Save on the right-side bottom of the screen.
If all goes well your Databricks destination will be created with status as Active as shown below.

Adding a Pipeline
Navigate to “Pipelines” on the left side and then press “+Create” to create a pipeline between source and destination.

-
Select source and destination and click on “Next” on the bottom right corner.
-
Select all the schemas or the specific schema you wish to transfer.

- Type in the pipeline name and click “Save”.

- Upon successful creation of the pipeline, it should look similar to the below screenshot with status as Active.

- Go to your Databricks warehouse and query the employees table to see sub-second latency streaming in action as shown below.

By design Your employees in the destination will have the following meta columns apart from the regular columns.
| Column Name | Description |
|---|---|
| _STREAMKAP_SOURCE_TS_MS | Timestamp in milliseconds for the event within the source log |
| _STREAMKAP_TS_MS | Timestamp in milliseconds for the event once Streamkap receives it |
| __DELETED | Indicates whether this event/row has been deleted at source |
| _STREAMKAP_OFFSET | This is an offset value in relation to the logs we process. It can be useful in the debugging of any issues that may arise |
What’s Next?
Thank you for reading this guide. If you have other sources and destinations to connect to in near real-time check out the following guides.
For more information on connectors please visit here.
Paul Dudley
LinkedInAuthor Bio
Paul is the CEO and Co-Founder of Streamkap
Published
April 22, 2025
TL;DR
• Stream SQL Server to Databricks in real-time for live dashboards, ML models, and business metrics monitoring. • Eliminate batch delays and complex ETL workflows by keeping your analytical environment continuously synchronized. • This guide covers SQL Server setup, Databricks configuration, and Streamkap pipeline creation.
Related blog posts
.png)
Why Apache Iceberg? A Guide to Real-Time Data Lakes in 2025
Apache Iceberg brings SQL tables to cloud storage with ACID transactions and time travel. Learn why it's essential for 2025.
AWS RDS PostgreSQL Set Up
AWS RDS PostgreSQL stands out as one of the most widely used production databases. Its global adoption and everyday usage have prompted Amazon to make it exceptionally user-friendly. New users can set up an RDS PostgreSQL instance from scratch in just a few minutes.
Databricks Warehouse Set Up
Getting started with Databricks is a breeze, regardless of your experience level. This guide provides clear instructions on how to create a new account or use your existing credentials, ensuring a smooth and efficient streaming process.