How to Stream AWS MySQL Data to Iceberg on AWS with Streamkap
Paul Dudley
August 15, 2025
TL;DR
• Stream MySQL changes to Iceberg on S3 for real-time analytics, eliminating hourly or daily batch ETL delays. • Build a scalable lakehouse foundation with ACID transactions and schema evolution capabilities. • Financial services can instantly adjust investments based on live market changes streamed directly from MySQL.
Introduction
Traditional batch ETL processes, with their hourly or daily delays, create a significant gap between business events and actionable insights. In today’s competitive online markets, relying on stale data directly translates to missed opportunities, lost sales, and slow customer responses, making real-time data access critical for survival.
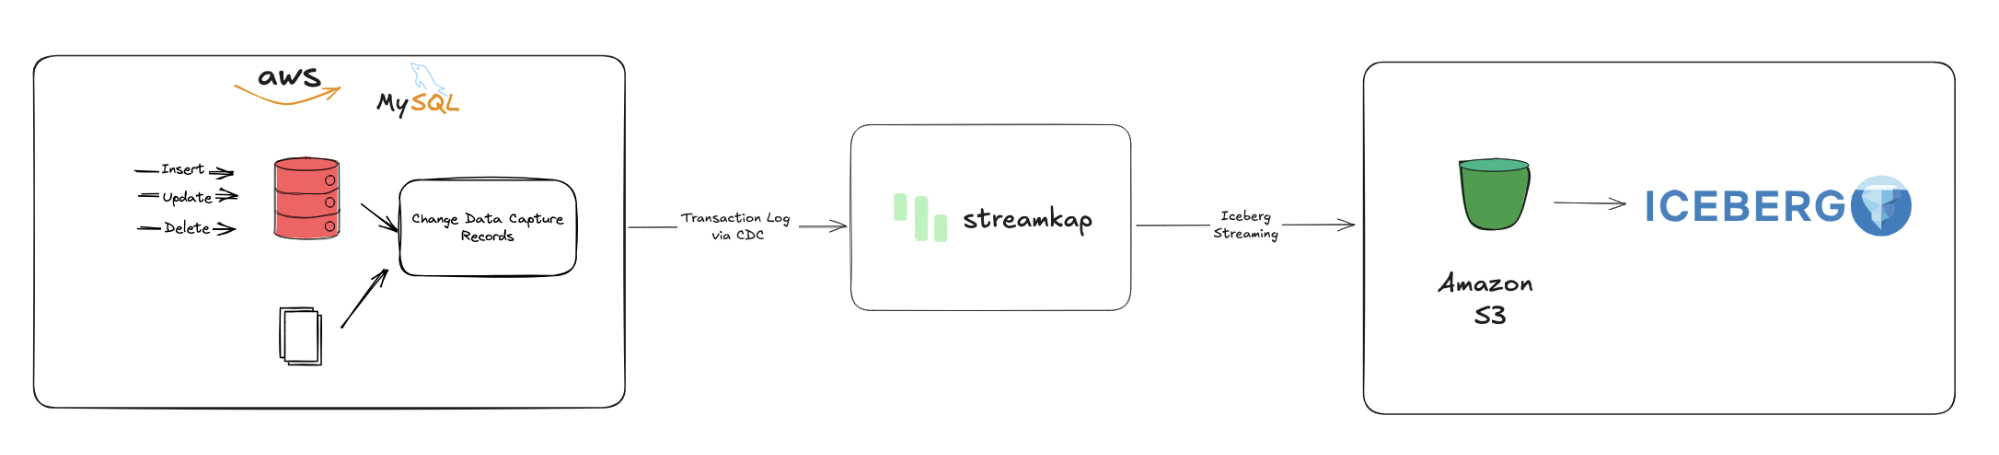
This guide outlines a modern solution: continuously streaming data from your AWS MySQL databases to Iceberg on S3. This architectural shift provides a robust, scalable foundation for real-time analytics, eliminating the lag inherent in legacy systems and empowering your business with immediate, fresh insights.
Imagine a financial services company dynamically adjusting investments based on live market changes. By streaming data directly from AWS MySQL to Iceberg on S3, they gain instantaneous analytical capabilities. This real-time visibility allows for immediate reactions to market shifts, directly impacting profitability and competitive advantage by eliminating the risks and missed opportunities caused by delayed data.
Guide Sections:
You’ll need accounts for AWS, and Streamkap.
Setting Up a New AWS RDS MySQL from scratch
This section will guide you through setting up a new MySQL database instance within AWS RDS.
Configuring an Existing AWS RDS MySQL Database
If you already have an AWS RDS MySQL database, this section will walk you through adjusting its network settings and enabling the necessary access to ensure it’s compatible with Streamkap.
Preparing Your Iceberg on S3 Destination
This section will guide you through preparing your S3 environment and establishing the foundation for your Iceberg tables, which will serve as your real-time data destination.
Configuring Access for an Existing Iceberg on S3 Destination
If you already have an existing Iceberg setup on S3, this section will guide you on configuring the necessary AWS permissions (e.g., S3 bucket policies, IAM roles) to allow Streamkap to write data to your Iceberg tables.
This step covers using Streamkap to create your data pipeline, connecting your AWS MySQL database as the source and configuring Iceberg on S3 as the direct destination.
You’re looking for real-time data at your fingertips? Let’s get you streaming today!
Prerequisites
Before diving in, ensure you have the following in place:
-
Streamkap Account: You’ll need an active Streamkap account with either admin or data admin privileges. If you don’t have one yet, signing up is quick and easy.
-
Iceberg on S3 Destination: You’ll need an AWS environment configured for Iceberg tables on S3. This primarily involves having an S3 bucket ready for data storage and potentially an AWS Glue Data Catalog for metadata management, along with the necessary permissions.
-
AWS (Amazon Web Services) Account: To stream data from MySQL, you must have an active AWS account. This account requires permissions to access RDS (Relational Database Service) for your MySQL instance, and permissions for Amazon S3 to create and manage buckets/objects for your Iceberg data. If you’re new to AWS, you can sign up to get started.
- Note: Setting up your AWS account requires a valid credit or debit card for verification.
AWS RDS MySQL Set-Up
Setting Up AWS RDS MySQL for Streamkap
AWS RDS MySQL is a widely adopted database solution, popular among businesses for its ease of use. Amazon has streamlined the process, enabling even those new to the platform to set up an RDS MySQL instance quickly. Furthermore, integrating Streamkap’s necessary configurations into an existing MySQL instance is a straightforward task.
In this section, we’ll guide you through the various methods to set up and configure your AWS RDS MySQL instance, ensuring seamless compatibility with Streamkap’s streaming capabilities.
Setting up a New Source Database from Scratch
Step 1: Log in to the AWS Management Console
-
Log in to your AWS Management Console.
-
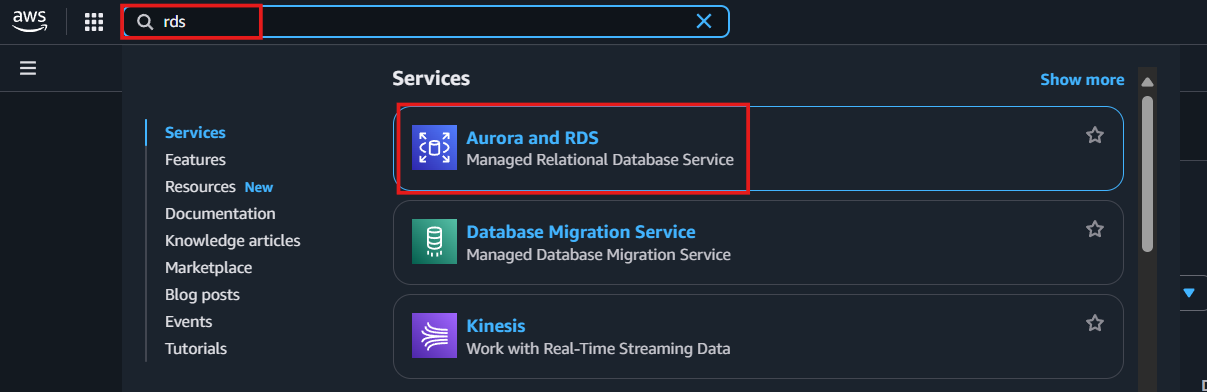
Type “RDS” in the search bar and click on “RDS” from the results.
Step 2. Create an RDS instance for the source database
- From the RDS dashboard, navigate to the “Databases” tab on the left, then select “DB Instances” within the “Resources” section.

- In the RDS Databases section, select the Create database option.
Note: To integrate with Streamkap, ensure that the selected region is one of the following:
-
Oregon (us-west-2)
-
North Virginia (us-east-1)
-
Europe Ireland (eu-west-1)
-
Asia Pacific - Sydney (ap-southeast-2)

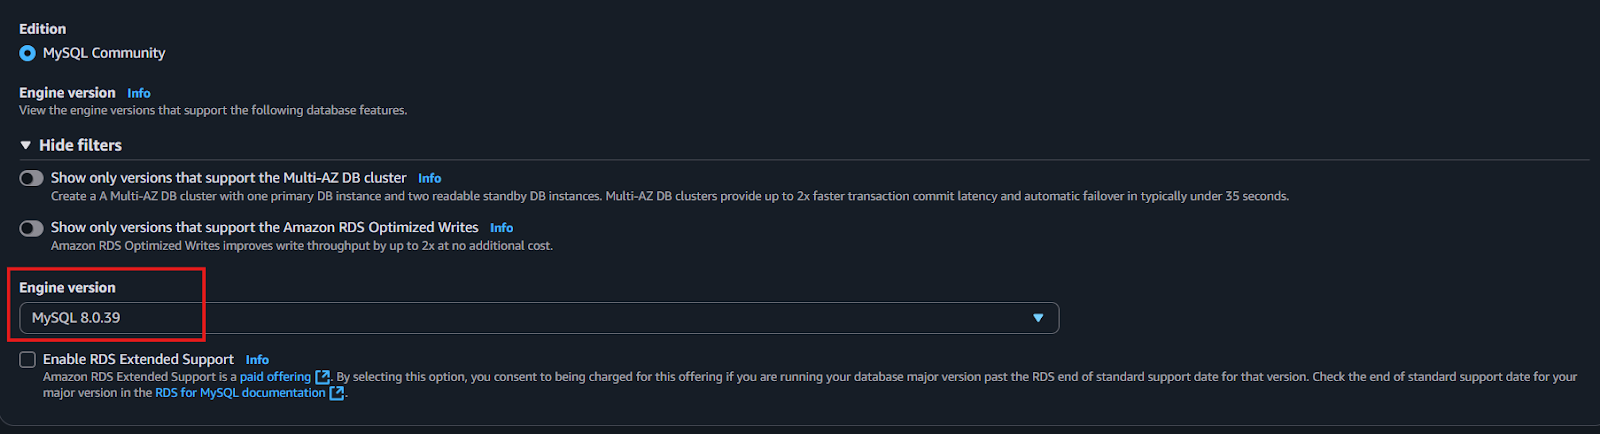
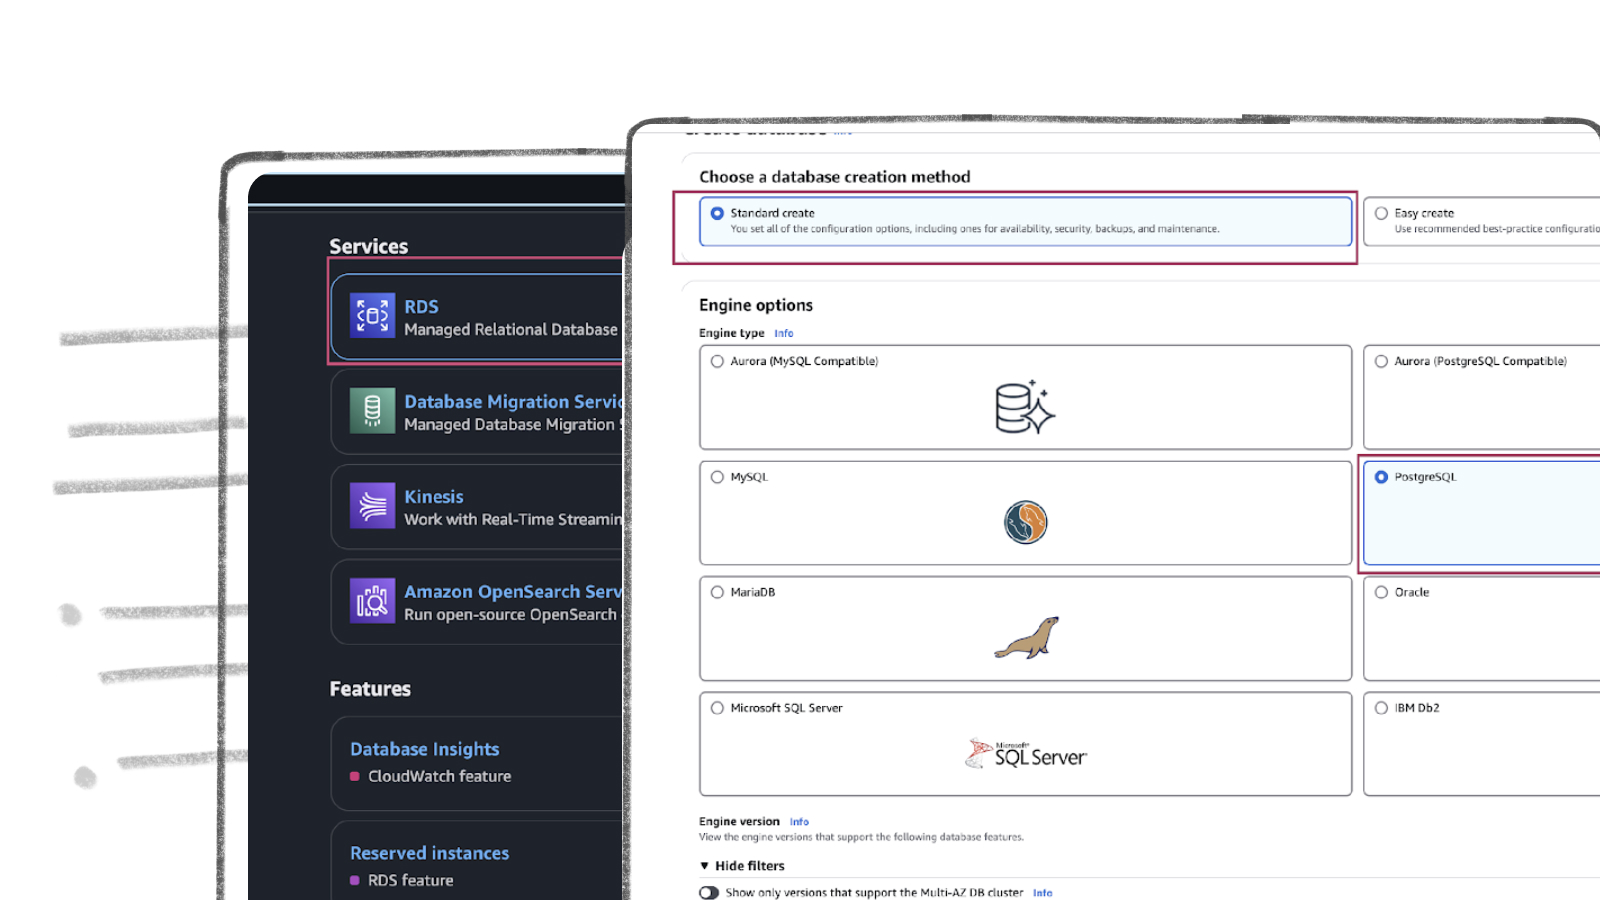
- Choose “Standard create” and select “MySQL” under “Engine options.”

- Scroll down and verify that the Engine version is below 8.4.
- Under “Templates,” select “Production,” “Dev/Test,” or “Free tier” based on your requirements.
Note: For first-time setups aiming for sub-second latency streaming, the “Free tier” is recommended. This allows you to gain hands-on experience without incurring additional cloud costs.

-
Ater Clicking “Free Tier”, enter a DB instance identifier, for example sourcedatabase.
-
Under Credentials Settings, select Self-managed and enter a password for the database.

- Enable public access for your instance. For the VPC security group, select “Create new” and enter a name in the “VPC security group name” field.

- Under “Additional configuration,” enter the Initial database name.

- Click “Create database” to begin the process, and wait for its status to become “Available.”

Step 3. Create a Parameter group for Streamkap compatibility.
To optimize your AWS RDS MySQL instance for Streamkap and achieve sub-second streaming latency, you must implement several mandatory parameter adjustments.
We will create a new parameter group and apply the following essential changes:
-
Set `gtid-mode` to ON
-
Set `enforce_gtid_consistency` to ON
-
Change `binlog_format` to ROW
-
Set `binlog_row_image` to full
-
Attach the new parameter group to our MySQL instance.
-
First, on your RDS dashboard click on “Parameter groups” on the left side as shown in the following screenshot.

- Open the Parameter groups section in AWS RDS and click Create parameter group.

- Provide a name (e.g., source-database) and an optional description for your parameter group. Select “MySQL Community” as the Engine type and “mysql8.0” as the Parameter group family.

- Click “Create” and confirm that your new parameter group appears in the list.

- Open the newly created parameter group and click “Edit.”

- Type “gtid-mode” and add “ON” as value as shown below.

- Type “enforce_gtid_consistency” and add “ON” as value as shown below.

- Type “binlog_format” and add “ROW” as value as shown below.

-
Click Save changes.
-
Back in your RDS instance, click Modify.

- Return to your RDS instance, click “Modify,” scroll down to “Additional Configuration,” and select your new parameter group.

- Choose to apply your changes immediately and click Modify DB instance.

Step 4: Test Your MySQL Instance for Streamkap Compatibility
It’s crucial to verify that the parameter modifications have been correctly applied to your MySQL instance. Connect to your RDS MySQL instance using a tool like DBeaver and execute the following command:
```sql
SELECT @@global.gtid_mode, @@global.enforce_gtid_consistency, @@global.binlog_format, @@global.binlog_row_image;
```

Note:
If you run into a timeout error while trying to access your AWS MySQL instance from your local computer, it might be due to your security group not letting your computer connect. To fix this, you’ll need to change the inbound rules of your security group to make sure it allows access from your local machine to your cloud MySQL instances.
Step 5 : Create a table in MySQL
-
Since we are setting up the MySQL source from scratch, it is important to first create the Music table in the AWS MySQL (RDS) database. This table will be added during the Streamkap configuration process to ensure it is included in the data pipeline.
-
Once the pipeline setup is complete, we will insert a new record into the Music table. This will allow us to verify that the data is successfully captured from MySQL and reflected in the corresponding Iceberg table, confirming that the pipeline is working as expected end to end.
Create the table
CREATE TABLE Music (
artist_band VARCHAR(100),
song VARCHAR(150)
);
Configuring an Existing Source Database for Streamkap Compatibility
If you have an AWS RDS MySQL instance, check its compatibility with Streamkap by running a quick test. This step is necessary to confirm if your instance will work with Streamkap.
Here’s how to run the test:
-
Connect to your RDS MySQL instance using a tool like DBeaver.
-
Run the command below to ensure everything is working correctly. This verifies that your system is ready for integration with Streamkap.
```sql
SELECT @@global.gtid_mode, @@global.enforce_gtid_consistency, @@global.binlog_format, @@global.binlog_row_image;
```
To ensure your RDS instance is compatible with Streamkap, you’ll need to check that it returns the following settings:
- gtid_mode:Should be ON. This setting is vital for managing transactions and smooth replication.
- enforce_gtid_consistency: Must also be ON, ensuring database consistency with Global Transaction Identifiers (GTIDs).
- binlog_format: Should be ROW. This format logs changes at the row level, which is crucial for accurate replication.
- binlog_row_image: Needs to be FULL, ensuring all data related to each change is logged for Streamkap to function correctly.
If your test results do not match these values, you will need to modify your RDS parameter group. You can either adjust an existing custom RDS parameter group or create a new one, incorporating the settings outlined in Step 3: Create a Parameter Group for Streamkap Compatibility. Applying these adjustments will enable Streamkap compatibility and ensure smooth data streaming from your MySQL database.
We will now create a Custom RDS Parameter Group.
Step 1: Create a Custom RDS Parameter Group
- On your RDS dashboard click on “Parameter groups” on the left side and then click on “Create parameter groups” as shown in the following screenshot.

- Give your parameter group a name and optionally a description. Select MySQL Community as the Engine type and mysql8.0 as the Parameter group family.

- Click Create and verify that the parameter group appears in the list.

Step 2: Modify Parameter Group Values
- Open the newly created parameter group and click Edit.

- Type “gtid-mode” and add “ON” as value as shown below.

- Type “enforce_gtid_consistency” and add “ON” as value as shown below.

- Type “binlog_format” and add “ROW” as value as shown below.

-
Click Save changes.
-
Back in your RDS instance, click Modify.

- Scroll down to Additional Configuration and select the new parameter group, then click Continue.

-
Scroll down and click Continue.
-
Click Apply immediately and then Modify DB instance.

With these changes, Streamkap will be able to receive data streams from MySQL and you can use the database as a source.
Iceberg Set Up
This guide will walk you through the essentials to set up Iceberg regardless of your experiecen. From setting up your environment to configuring your storage and catalog, we’ll ensure a smooth and efficient experience as you begin working with Apache Iceberg for reliable, scalable data management.
Preparing your Iceberg on S3 destination
Step 1: Log in to the AWS Management Console
- Log in to your AWS Management Console and select the region you specified in the above section.

Let’s create a bucket now:
-
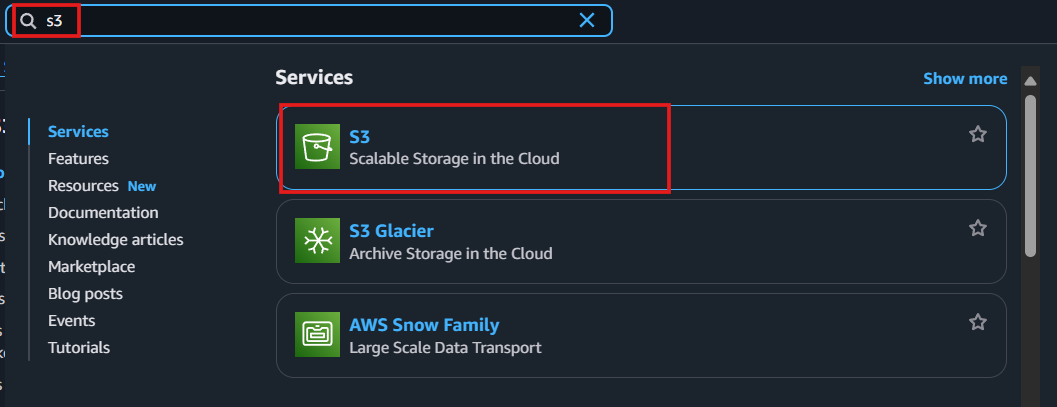
Go to the search bar, type “S3,” and select S3.
-
Now click “Create bucket”.

- Give your S3 bucket a unique name that’s easy to identify later.

- Public Access: Uncheck all public access options to avoid giving public permissions. Since the access is via third-party services, it’s better to uncheck these to prevent networking or configuration issues.

- With default settings and click ‘Create bucket’ to proceed with the setup.

Step 2: Create new AWS Glue database
- Type “Glue” in the search bar and click on “AWS Glue” from the results.

-
Select the same region that we had while creating S3 bucket, in this case we preferred us-west-2.
-
From the left side navigation bar navigate to the database to create database for our data.

- Click on “Add database” as depicted in the picture below.

-
Provide a unique database name and include a clear, descriptive explanation to define its purpose within AWS Glue.
-
Then, click on “Create database” to finalize the creation.

- Once the database is successfully created, it will appear in your list of databases—just like what is shown in the screenshot below.

Step 3: Create new Policy and IAM role for Streamkap connection
- Type “IAM” in the search bar, then select IAM section.

-
Navigate to Policies in the left menu and click Create Policy.
-
Search for S3 and select AmazonS3FullAccess as a base policy.

-
Permission Requirement for S3 and Glue:
-
“s3:GetObject”,
-
“s3:PutObject”,
-
“s3:DeleteObject”,
-
“s3:ListBucket”
-
“glue:GetDatabase”,
-
“glue:GetDatabases”,
-
“glue:CreateTable”,
-
“glue:GetTable”,
-
“glue:GetTables”,
-
“glue:UpdateTable”,
-
“glue:DeleteTable”,
-
“glue:CreatePartition”,
-
“glue:GetPartition”,
-
“glue:GetPartitions”,
-
“glue:BatchCreatePartition”,
-
“glue:UpdatePartition”,
-
“glue:DeletePartition”,
-
“glue:BatchDeletePartition”
-
-
It will first display the visual format of the policy. You can either select the policy you want or toggle to the JSON format and paste the following policy for S3 and AWS Glue.

-
Click “Next”.
-
Plug in Policy Name as Steramkap_warehouse_policy (or any name of your choice)
-
Plug in Description as This policy will be used to put data into S3

- Click on “Create Policy” which can be found in the bottom right corner.

- On the left side navigate to “Roles**”** and click on the “Create role” on the top right corner.

- Select Custom Trust policy and enter policy as shown below for Streamkap to allow the Streamkap production tenant access to your AWS Glue instance.

- Next, under Filter by type choose the Custom Managed Policy option. Then, select the policy you just created and click Next to proceed.

- Provide a meaningful name and a detailed description for the role to help identify its purpose easily in the future. After carefully reviewing all the policy settings to ensure they meet your requirements, click on the “Create role” button to finalize the role creation process.

- After the role is created, it will appear as shown in the picture below, confirming that the setup was successful and the role is ready for use.

Navigate to the IAM role and copy its Role ARN. We’ll use this ARN when setting up the connection with Streamkap.

Step 4 : Add role to AWS glue
- Type “Glue” in the search bar and click on “AWS Glue” from the results.
- Click on “Set up roles and users” to grant AWS Glue access and assign a default IAM role for your account.

- Select the role you created earlier and click Next to continue.

- Choose the specific S3 bucket you want AWS Glue to access, grant it read-only permissions, and then click Next to proceed.

Select the role you created earlier to set it as the default IAM role, then click Next to continue.

- Review all the changes carefully, then click on Apply changes to finalize the configuration.

Configuring Access for an Existing Iceberg on S3 Destination
Step 1: Create new Policy and IAM role for Streamkap connection
- Type “IAM” in the search bar, then select IAM section.

-
Navigate to Policies in the left menu and click Create Policy.
-
Search for S3 and select AmazonS3FullAccess as a base policy.

-
Permission Requirement for S3 and Glue:
-
“s3:GetObject”,
-
“s3:PutObject”,
-
“s3:DeleteObject”,
-
“s3:ListBucket”
-
“glue:GetDatabase”,
-
“glue:GetDatabases”,
-
“glue:CreateTable”,
-
“glue:GetTable”,
-
“glue:GetTables”,
-
“glue:UpdateTable”,
-
“glue:DeleteTable”,
-
“glue:CreatePartition”,
-
“glue:GetPartition”,
-
“glue:GetPartitions”,
-
“glue:BatchCreatePartition”,
-
“glue:UpdatePartition”,
-
“glue:DeletePartition”,
-
“glue:BatchDeletePartition”
-
-
It will first display the visual format of the policy. You can either select the policy you want or toggle to the JSON format and paste the following policy for S3 and AWS Glue.

-
Click “Next”.
-
Plug in Policy Name as Steramkap_warehouse_policy (or any name of your choice)
-
Plug in Description as This policy will be used to put data into S3

- Click on “Create Policy” which can be found in the bottom right corner.

- On the left side navigate to “Roles**”** and click on “Create role” on the top right corner.

- Select Custom Trust policy and enter policy as shown below for Streamkap to allows the Streamkap production tenant access to your AWS Glue instance.

- Next, under Filter by type choose the Custom Managed Policy option. Then, select the policy you just created and click Next to proceed.

- Provide a meaningful name and a detailed description for the role to help identify its purpose easily in the future. After carefully reviewing all the policy settings to ensure they meet your requirements, click on the “Create role” button to finalize the role creation process.

- After the role is created, it will appear as shown in the picture below, confirming that the setup was successful and the role is ready for use.

Navigate to the IAM role and copy its Role ARN. We’ll use this ARN when setting up the connection with Streamkap.

Step 2: Add role to AWS glue
- Type “Glue” in the search bar and click on “AWS Glue” from the results.

- Click on “Set up roles and users” to grant AWS Glue access and assign a default IAM role for your account.

- Select the role you created earlier and click Next to continue.

- Choose the specific S3 bucket you want AWS Glue to access, grant it read-only permissions, and then click Next to proceed.

Select the role you created earlier to set it as the default IAM role, then click Next to continue.

- Review all the changes carefully, then click on Apply changes to finalize the configuration.

Streamkap Setup
Step 1: Adding MySQL as a Source Connector
If the above steps were followed as described, your AWS MySQL instance should be Streamkap compatible.
Note: You must have admin or data admin privileges to continue with the following steps.
- Log in to Streamkap.

On the left side navigation pane
-
Click on Connectors
-
Click on the Sources tab
-
click the + Add button
-
Enter MySQL in the search bar and select it from the list of available services, as depicted below.

- Populate the MySQL connection with the name, hostname, username, and password provided in your database dashboard.

-
Manually add your MySQL database name and also all tables you want to stream.
-
In this demo, we’ve added the `source-database` database along with the table `music`.

-
Once the database and tables are added, click “Save”.
-
A new connector will be listed in “Connectors > Sources”.

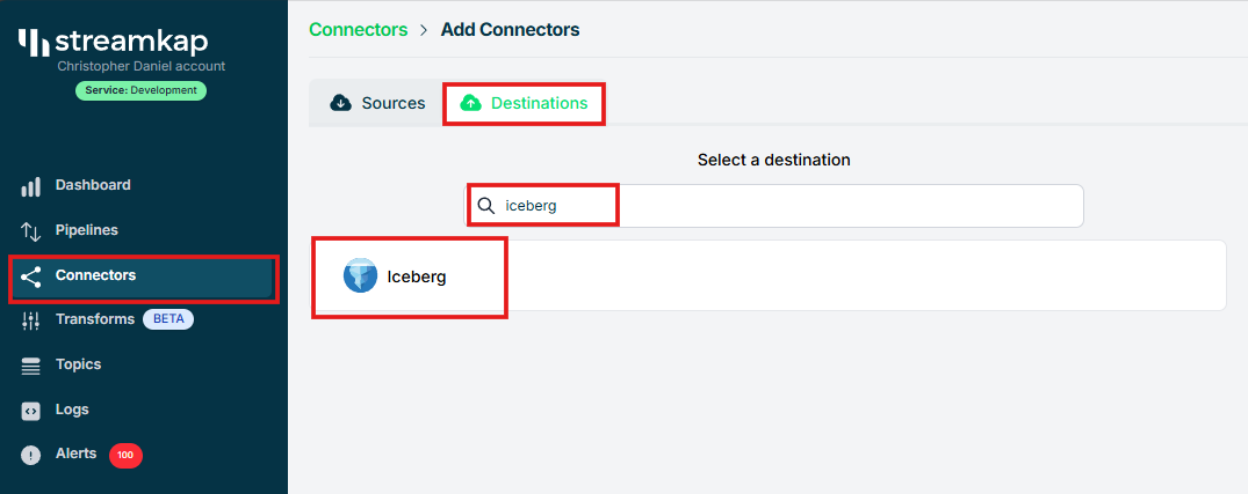
Step 2: Adding Iceberg as a destination Connector
- From the side navigation bar, go to Connectors, then switch to the Destinations tab. Search for Iceberg in the list and select it to begin the setup process.
-
Enter streamkap_datawarehouse as the name of the destination if you’ve followed the naming conventions from this guide.
-
Select glue as the catalog type to match the setup we’ve configured earlier.
-
Paste the IAM Role ARN (arn:aws:iam::…:role/streamkap_role) that you created in the previous steps.
-
Choose us-west-2 as the region — assuming you’re using the same region as outlined in this guide.
-
Enter s3a://streamkapatawarehouse as the S3 bucket path used in the earlier setup.
-
Set the schema name to streamkap_warehouse, which corresponds to the Glue database we created.
-
Select insert as the insert mode to define how records will be written into Iceberg.
-
Click “Save” to complete the destination setup.

- Once the configuration has been completed successfully, proceed to verify that the active status is properly reflected and functioning as expected.

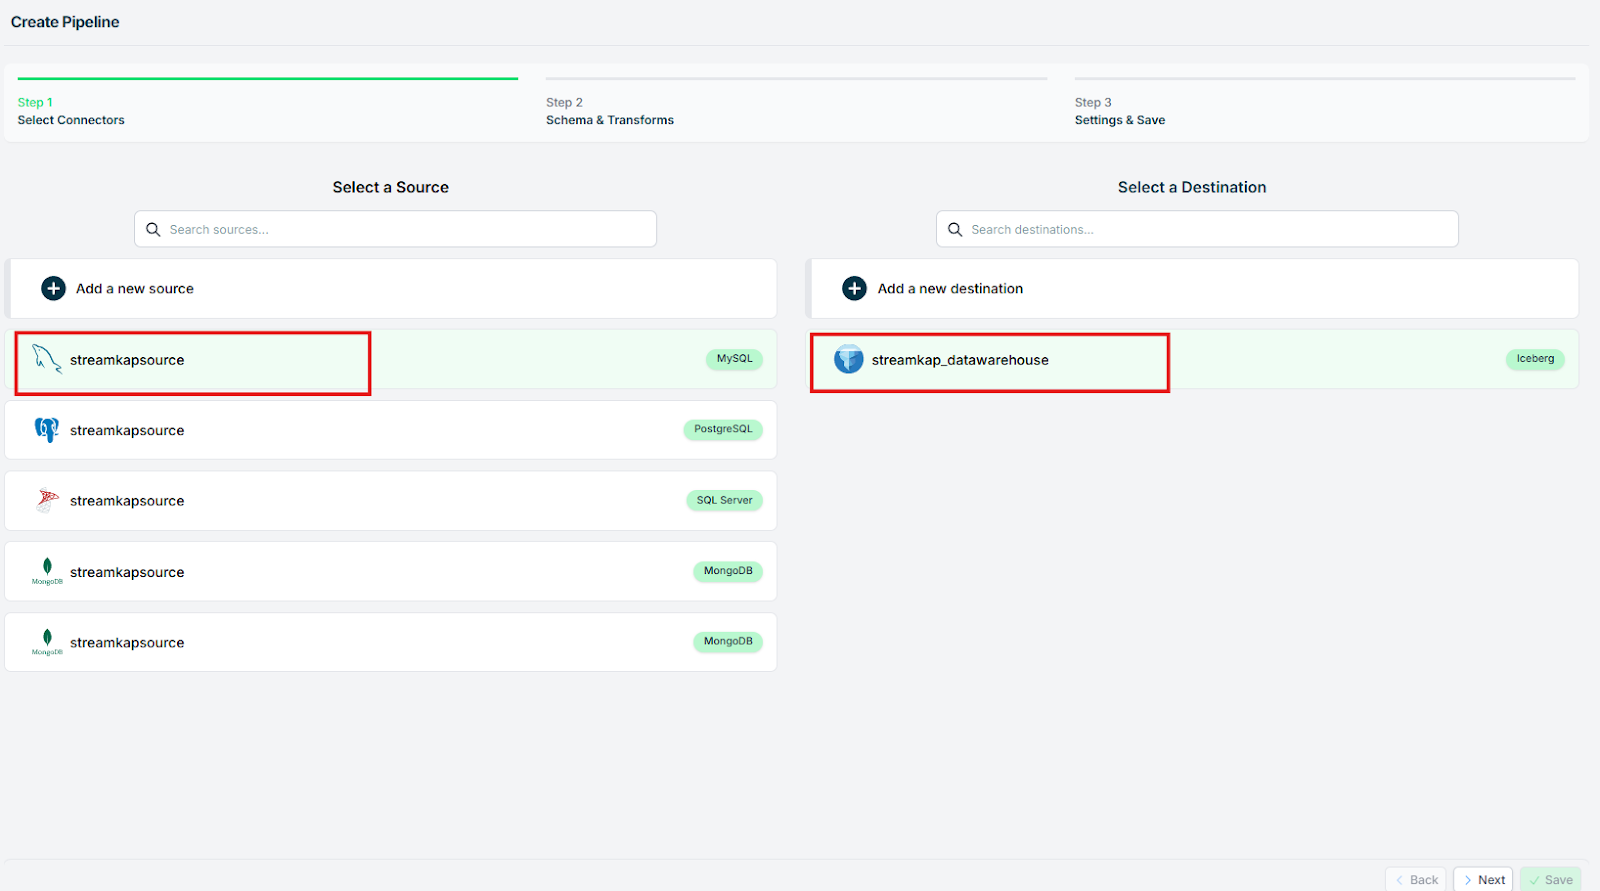
Step 3 : Creating Streamkap Pipeline
- Navigate to Pipelines on the left side and click Create to create a pipeline between the source and destination.

- Select your MySQL connector as Source and your Iceberg connector as Destination, and click on Next in the bottom right corner.
- Select the database and the collections that you want to stream. Click Next.

- Optionally add a tag, then click Save.

- After clicking ‘Save’, ensure the pipeline is successfully activated by verifying its status reflects as ‘Active’.

Validating the Streamkap Pipeline Integration
To validate that the entire data pipeline is functioning correctly from end to end, we’ll insert a new record into the Music table in our AWS MySQL (RDS) database. This entry should be captured by the pipeline and reflected in the corresponding Music table in Iceberg, confirming that data flows smoothly from source to destination.
- To initiate the data flow, add a new record to the Music table using a database client such as DBeaver, connected to your RDS MySQL instance.

- Download the files from the S3 bucket, convert the data into a CSV or table format, and then verify the accuracy of the resulting data.

What’s Next?
Thank you for reading this guide. If you have other sources and destinations to connect to in near real-time check out the following guides.
-
[Postgres to Databricks
](https://streamkap.com/blog/stream-data-from-aws-postgresql-to-databricks-using-streamkap)
For more information on connectors please visit here.
Paul Dudley
LinkedInAuthor Bio
Paul is the CEO and Co-Founder of Streamkap
Published
August 15, 2025
TL;DR
• Stream MySQL changes to Iceberg on S3 for real-time analytics, eliminating hourly or daily batch ETL delays. • Build a scalable lakehouse foundation with ACID transactions and schema evolution capabilities. • Financial services can instantly adjust investments based on live market changes streamed directly from MySQL.
Related blog posts
.png)
Why Apache Iceberg? A Guide to Real-Time Data Lakes in 2025
Apache Iceberg brings SQL tables to cloud storage with ACID transactions and time travel. Learn why it's essential for 2025.
AWS RDS PostgreSQL Set Up
AWS RDS PostgreSQL stands out as one of the most widely used production databases. Its global adoption and everyday usage have prompted Amazon to make it exceptionally user-friendly. New users can set up an RDS PostgreSQL instance from scratch in just a few minutes.
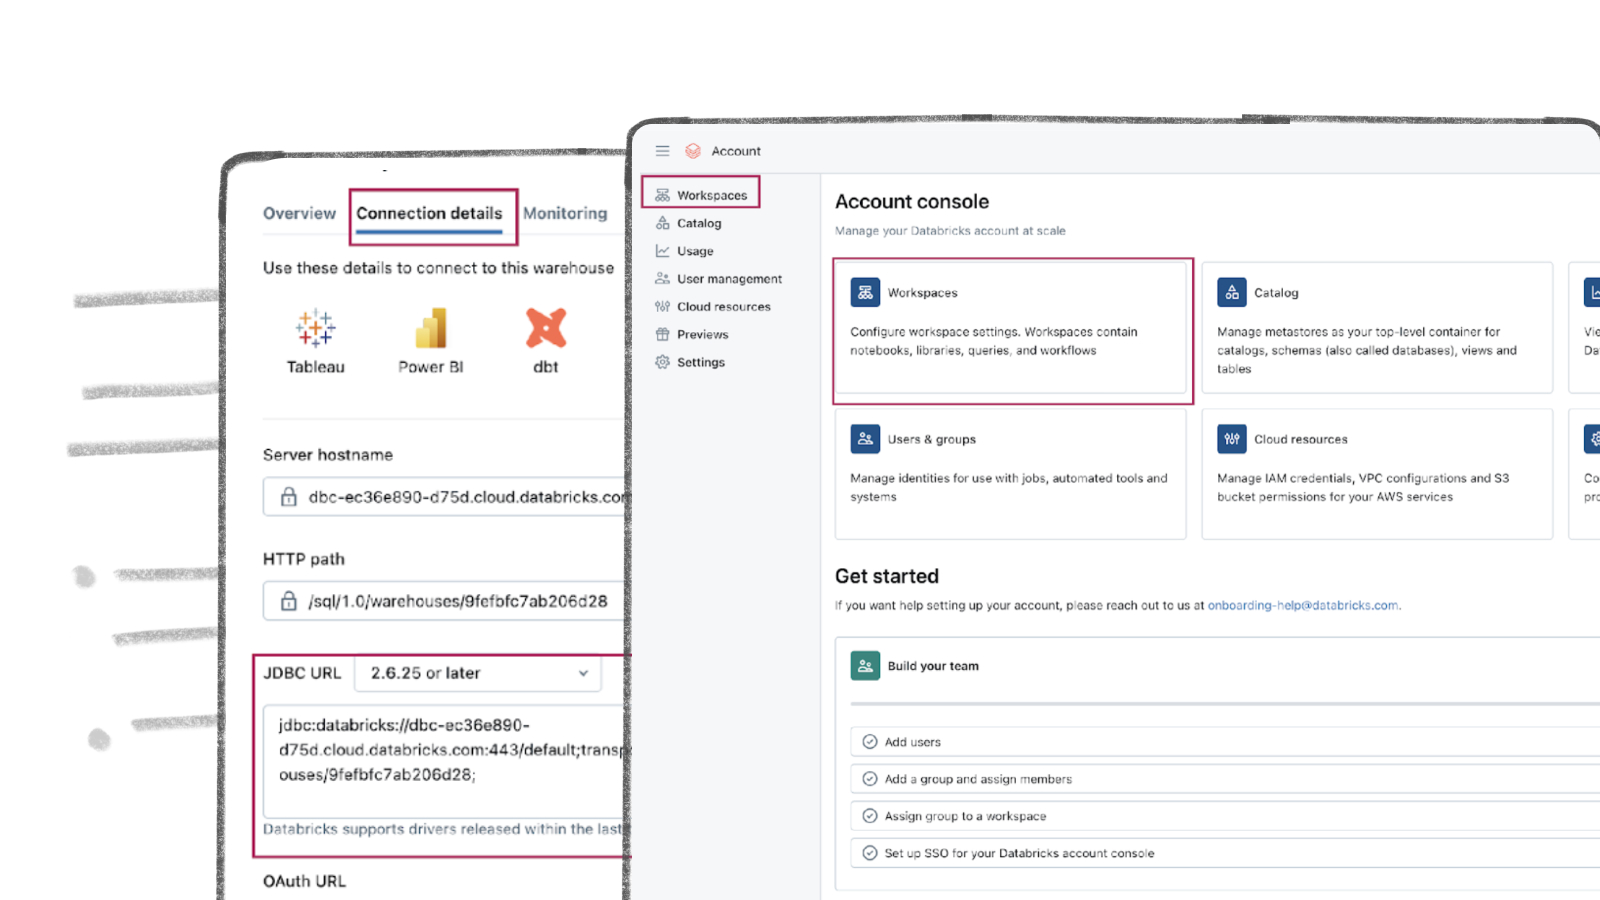
Databricks Warehouse Set Up
Getting started with Databricks is a breeze, regardless of your experience level. This guide provides clear instructions on how to create a new account or use your existing credentials, ensuring a smooth and efficient streaming process.