How to Stream MySQL to Databricks with Streamkap
Introduction
Modern data teams often face the challenge of making operational data from systems like AWS-hosted MySQL available in analytics platforms like Databricks with minimal delay. Whether for powering live dashboards, enabling real-time machine learning, or monitoring key business metrics, the need for low-latency, reliable data movement is growing.
This blog demonstrates how to use Streamkap, a high-performance CDC (Change Data Capture) solution, to stream data in real-time from AWS MySQL to Databricks. We’ll walk through the configuration and setup required to build a robust, scalable pipeline that keeps your analytical environment continuously in sync with your production database without complex ETL workflows or batch delays.
| Prerequisites | You’ll need accounts for AWS, Databricks, and Streamkap. |
|---|---|
| Setting up a New AWS MySQL from Scratch | This section will guide you through setting up a new MySQL database in AWS RDS. |
| Configuring an Existing AWS MySQL | If you already have a MySQL database, make sure it is compatible with Streamkap by adjusting the network settings and enabling access. |
| Setting up a New Databricks Workspace | Create a new Databricks workspace to efficiently store and analyze real-time data originating from AWS MySQL. |
| Configuring Databricks to Accept Data | If you already have a MySQL database, adjust the network settings and enable access to ensure it is compatible with Streamkap. |
| Streamkap Setup | Using Streamkap to create a data pipeline by connecting AWS MySQL as the source and Databricks as the destination. |
Looking for real-time insights right at your fingertips? Start streaming today!
Prerequisites
To follow along with this guide, ensure you have the following in place:
- Streamkap Account: To get started, you’ll need an active Streamkap account with admin or data admin privileges. If you don’t have one yet, no worries—you can sign up here or ask your admin to grant you access.
- Databricks Account: An active Databricks account is required with data warehouse administrative privileges. If you don’t have one yet, sign up here.
- Amazon AWS Account: An active Amazon AWS account with core RDS and networking permissions to create, configure or modify an AWS RDS instance. If you don’t have one yet, sign up here.
Setting Up AWS RDS MySQL for Streamkap Compatibility
AWS RDS MySQL stands out as one of the most widely used production databases. Its global adoption and everyday usage have made Amazon exceptionally user-friendly. New users can set up an RDS MySQL instance from scratch in just a few minutes. Additionally, if you already have an existing instance, adding the configuration for Streamkap streaming is straightforward.
In this section, we will explore various methods for setting up and configuring AWS RDS MySQL to ensure compatibility with Streamkap.
Setting up a New AWS MySQL from Scratch
Step 1: Log in to the AWS Management Console
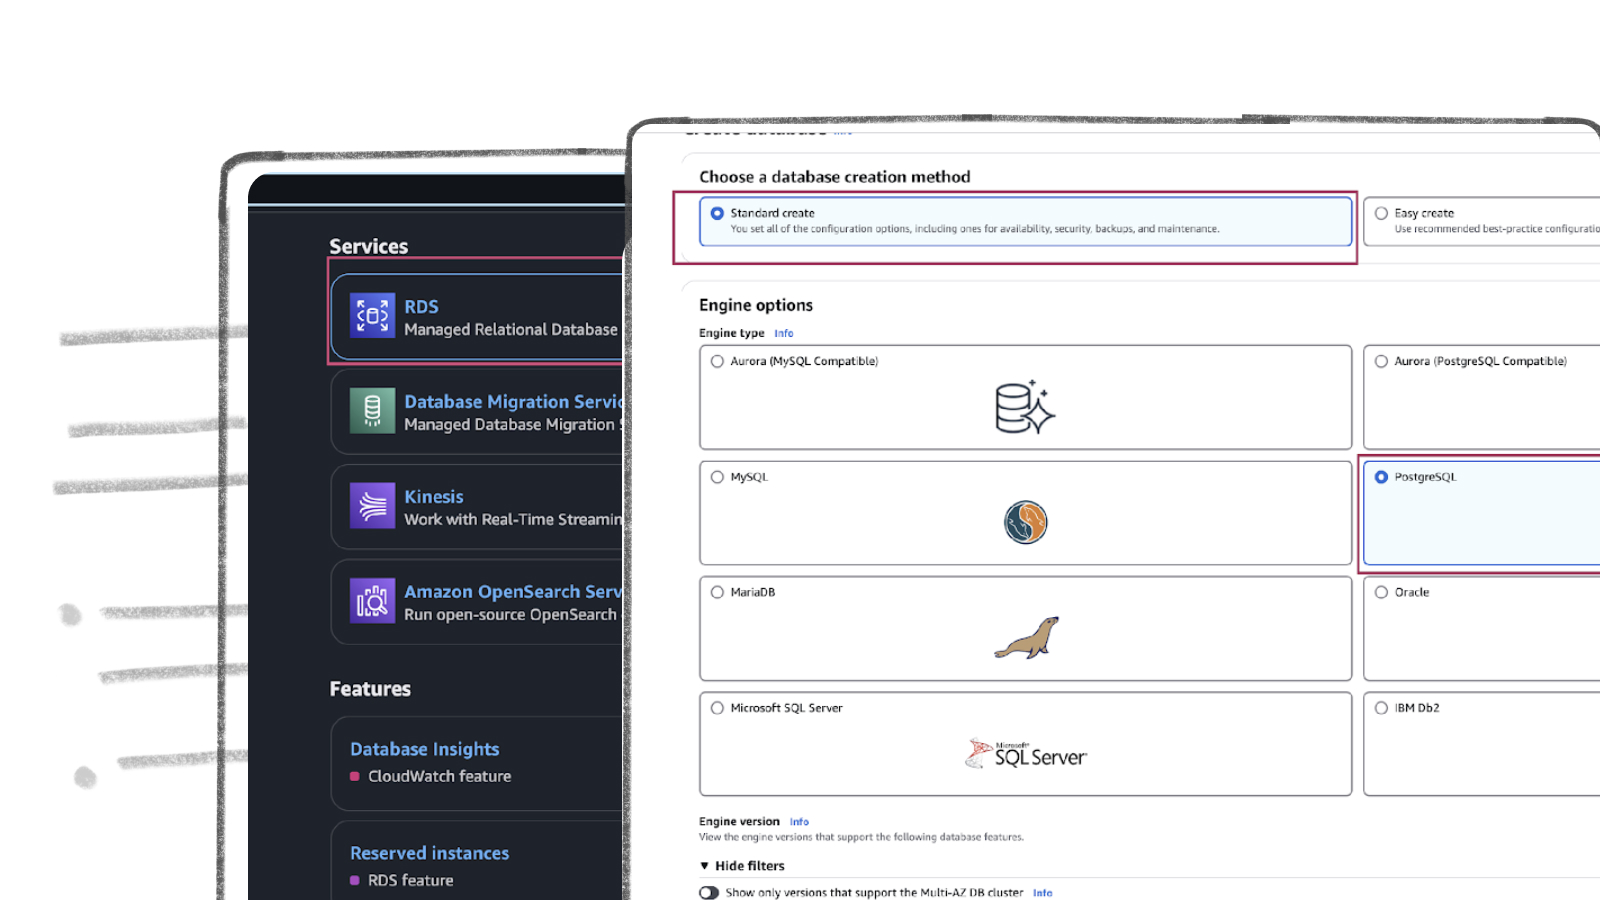
- Log in to your AWS Management Console and type RDS on the search bar.
- Click on RDS as shown below

Step 2. Create an RDS instance for the source database
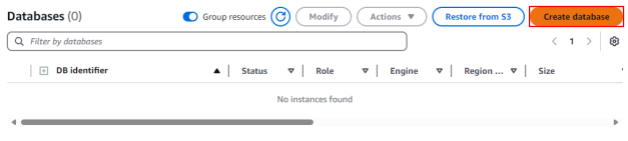
- Upon accessing the RDS dashboard, locate the Databases tab on the left side of the interface. Click on this tab and subsequently select DB Instances within the Resources section.

- In the RDS Databases section, select the Create database option.
Note: To integrate with Streamkap, ensure that the selected region is one of the following:
- Oregon (us-west-2)
- North Virginia (us-east-1)
- Europe Ireland (eu-west-1)
- Asia Pacific - Sydney (ap-southeast-2)
- Select Standard create and MySQL from the Engine options.
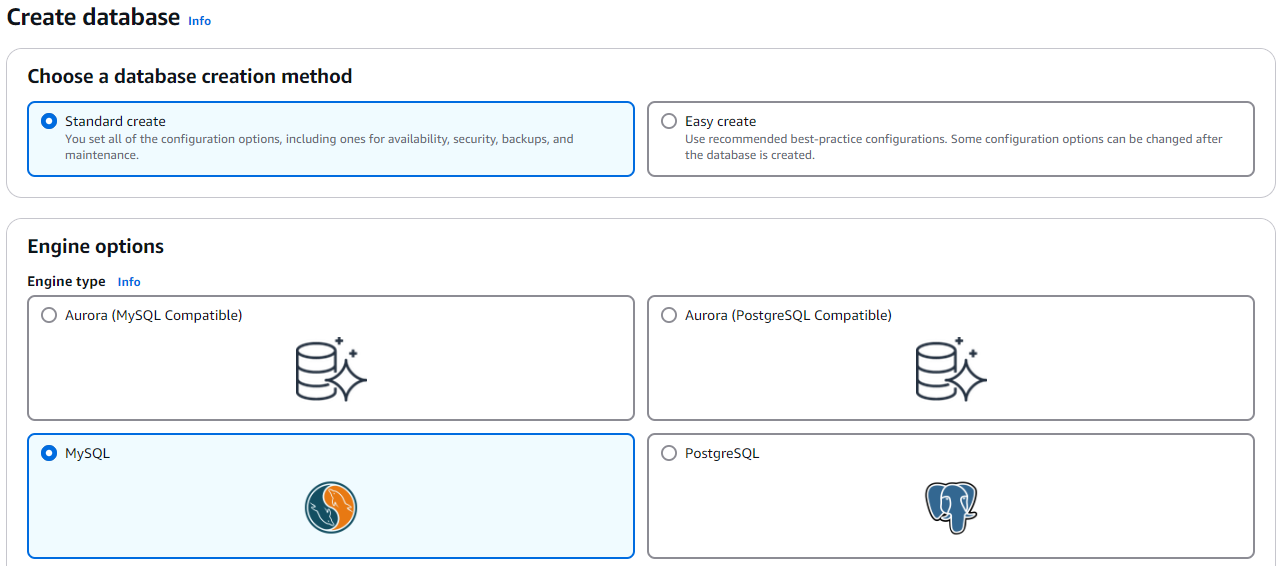
- Scroll down and ensure the Engine version is below 8.4.

- Under the Templates section choose between “Production”, “Dev/Test”, “Free tier” based on your need.
Note: If you’re setting up sub-second latency streaming for the first time, we suggest you go with the Free tier option. This way, you can get some hands-on experience with the setup process without having to worry about extra cloud costs. Check out the example below for more details.

- Ater Clicking Free Tier, enter a DB instance identifier, for example source-database.
- Under Credentials Settings, select Self-managed and enter a password for the database.
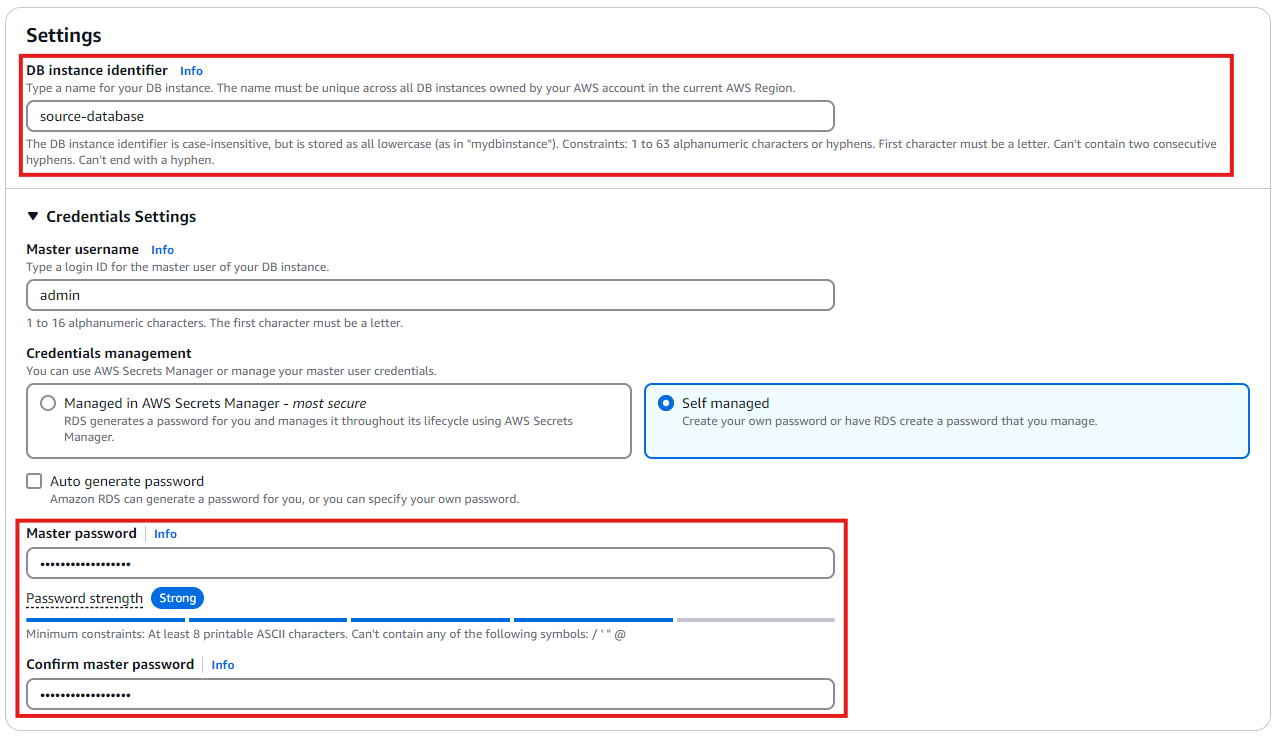
- Enable public access, select Create new for the VPC security group, and enter a name in the VPC security group name field.

- Under Additional configuration, enter the Initial database name.

- Click Create database to start the database creation process.

Step 3. Create a Parameter group for Streamkap compatibility.
Implementing configuration changes is crucial for ensuring compatibility of your AWS RDS MySQL instance with Streamkap. Modifying the default configuration to align with specific database settings will facilitate an optimal streaming experience, achieving a latency of under one second.
We will create a new parameter group and implement the following changes:
- Set `gtid-mode` to ON
- Set `enforce_gtid_consistency` to ON
- Change `binlog_format` to ROW
- Set `binlog_row_image` to full
- Attach the new parameter group to our MySQL instance.
- First, on your RDS dashboard click on Parameter groups on the left side as shown in the following screenshot.

- Open the Parameter groups section in AWS RDS and click Create parameter group.

- Give your parameter group a name and a description (eg: source-database). Select MySQL Community as the Engine type and mysql8.0 as the Parameter group family.

- Click Create and verify that the parameter group appears in the list.

- Open the newly created parameter group and click Edit.

- Type gtid-mode and add ON as value as shown below.

- Type enforce_gtid_consistency and add ON as value as shown below.

- Type binlog_format and add ROW as value as shown below.

- Click Save changes.
- Back in your RDS instance, click Modify.

- Scroll down to Additional Configuration and select the new parameter group, then click Continue.

- Choose to apply your changes immediately and click Modify DB instance.
Step 4: Test Your MySQL Instance for Streamkap Compatibility
It is crucial to ensure that any modifications made to your MySQL instance are accurately reflected in the database. To verify this, connect to your RDS MySQL instance using tools like DBeaver. Once connected, please execute the following commands to confirm that everything is functioning as intended.

Note: If you encounter a timeout error while attempting to access your AWS MySQL instance from your local computer, it may be due to your security group’s configuration. To resolve this issue, you will need to modify the inbound rules of your security group to permit access from your local machine to your cloud-based MySQL instances.
Configuring an Existing AWS MySQL for Streamkap Compatibility
If you have an AWS RDS MySQL instance, check its compatibility with Streamkap by running a quick test. This step is necessary to confirm if your instance will work with Streamkap.
Here’s how to run the test:
- Connect to your RDS MySQL instance using a tool like DBeaver.
- Run the command below to ensure everything is working correctly. This verifies that your system is ready for integration with Streamkap.
To ensure your RDS instance is compatible with Streamkap, you’ll need to check that it returns the following settings:
- gtid_mode: This should be set to ON. This setting helps manage transactions and replication smoothly.
- enforce_gtid_consistency: Also needs to be set to ON. This ensures that your database maintains consistency with its Global Transaction Identifiers (GTIDs).
- binlog_format: This should be set to ROW. This format logs changes at the row level, which is essential for accurate replication.
- binlog_row_image: This one needs to be set to FULL. This ensures that all the data related to each change is logged, which is crucial for Streamkap to work correctly.
To ensure compatibility with Streamkap and facilitate seamless operation, it’s essential that your test returns the specified values. If your results do not meet these requirements, you will need to adjust your RDS parameter group accordingly. You can either modify your existing custom RDS parameter group or create a new one with the necessary settings. Implementing these adjustments is a crucial step toward achieving optimal performance.
We will now create a Custom RDS Parameter Group.
Step 1: Create a Custom RDS Parameter Group
- On your RDS dashboard click on Parameter groups on the left side and then click on Create parameter groups as shown in the following screenshot.
- Give your parameter group a name and optionally a description. Select MySQL Community as the Engine type and mysql8.0 as the Parameter group family.
- Click Create and verify that the parameter group appears in the list.
Step 2: Modify Parameter Group Values
- Open the newly created parameter group and click Edit.
- Type gtid-mode and add ON as value as shown below.
- Type enforce_gtid_consistency and add ON as value as shown below.
- Type binlog_format and add ROW as value as shown below.
- Click Save changes.
- Back in your RDS instance, click Modify.
- Scroll down to Additional Configuration and select the new parameter group, then click Continue.

- Scroll down and click Continue.

- Click Apply immediately and then Modify DB instance.
With these changes, Streamkap will be able to receive data streams from MySQL.
Databricks Set Up
Getting started with Databricks is straightforward, regardless of your level of experience. This guide offers clear instructions for creating a new account or utilizing your existing credentials, ensuring a seamless and efficient streaming process.
Setting up a New Databricks Account from Scratch
Step 1: Sign up and create a Databricks account
- Visit Databricks’ website and click on Try Databricks.

- Fill in the requested details and create a Databricks account.

- When you log in to the account created a few seconds ago you will land on the Account console page that looks like the following.

Step 2: Create a new Databricks Workspace
The onboarding process in Databricks differs between the trial version and the paid version. Based on your payment plan with Databricks, please follow either step 2a or 2b.
Step 2a: Databricks Trail Version Flow
In the trial version you will land in the following page. Please click on ‘+ New’ -> ‘More’->’SQL warehouse’.

You will land on a page that looks like the following.

Please skip to Step 3: Create a new SQL Data Warehouse in order to create a new data warehouse for Streamkap streaming.
Step 2b: Databricks Paid Version Flow
If you have the Databricks paid version, please follow the steps shown below.
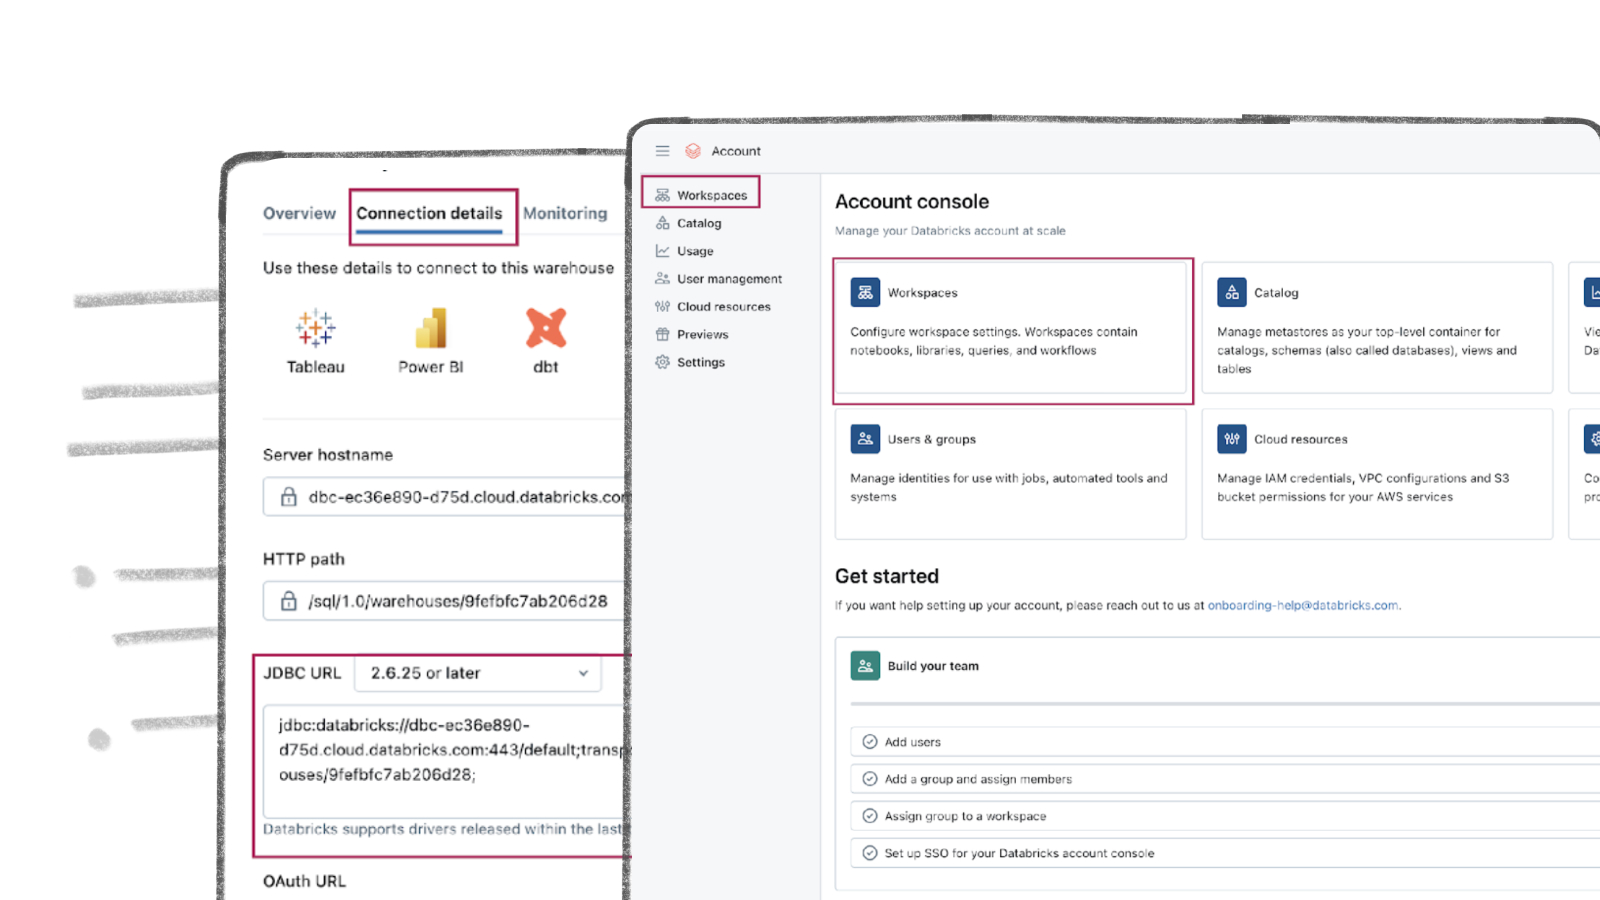
- Click on Workspaces.

- Then click on Create workspace on the top right corner of the screen. A page like the one presented below should appear

- Choose Quickstart (Recommended) and click next. Fill the workspace name. Choose your desired region and click Start Quickstart.

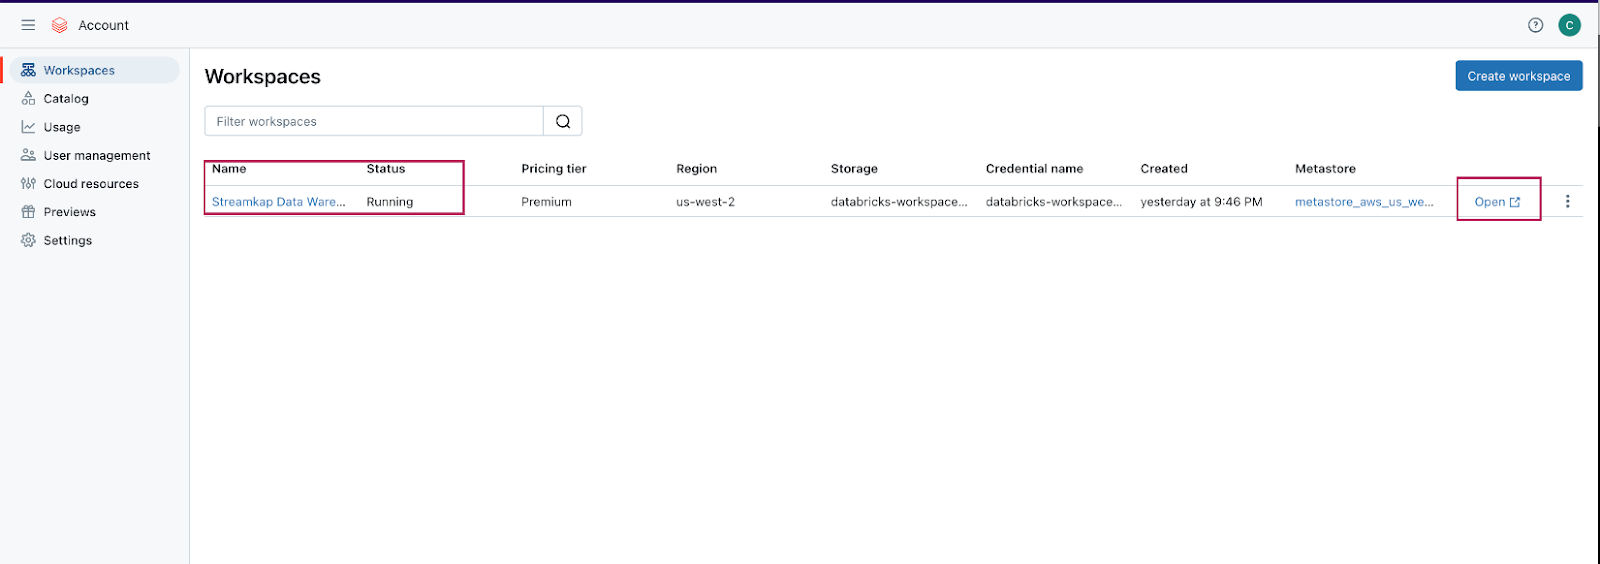
- Databricks will take you to your AWS console. Scroll down and Click Create stack.

- After a few minutes, return to your Databricks Workspaces and it will be ready, as illustrated below. On your Databricks workspace page click on Open and you will be taken to your new data warehouse.

Step 3: Create a new SQL Data warehouse
- On your new data warehouse click on + New and then on SQL warehouses as highlighted in below image.

- Click on Create SQL warehouse
- Plug your new SQL warehouse details. For this guide we recommend you use the minimum available cluster size, which is 2X-Small, to reduce cost.
- Click Create and within seconds your new data warehouse will be up and running.

Step 4: Fetch credentials from your new data warehouse
- On your new data warehouse click on the Connection details tab as presented in the following illustration.

- Copy the JDBC URL into a secure place.
- Create apersonal access token from the top right corner of the screen and store it in a secure place.
- We will need the JDBC URL and personal access token to connect Databricks to Streamkap as a destination connector.
Fetching Credentials from Existing Databricks
Step 1: Log in to Your Databricks Account
- Navigate to the Databricks login page.
- Plug in your email and hit “Continue”. A six digit verification code will be sent you your email.
- Plug in the six digit verification code and you will land in the “Account console” page that looks like the following

Step 2: Navigate to your Databricks Warehouse
- Click on Workspaces and then click on Open button next to the corresponding workspace as illustrated below.
- Once you land on your desired workspace, click on SQL Warehouses. This will list your SQL warehouses as outlined below.

Step 3: Fetch Credentials from your Existing Data Warehouse
- Choose the data warehouse you wish to fetch credentials from. Click on the Connection details tab as presented in the following illustration.

- Copy the JDBC URL into a secure place.
- Create a personal access token from the top right corner of the screen and store it in a secure place.
- We will need the JDBC URL and personal access token to connect Databricks to Streamkap as a destination connector.

Note: If you cannot access the data warehouse or create a personal access token, you may have insufficient permissions. Please contact your administrator to request the necessary access.
Streamkap Set Up
Streamkap creates fast, reliable data pipelines for real-time analysis and response to large data volumes. This allows your team to make quick, informed decisions, keeping you competitive. For optimizing operations, enhancing business intelligence, or improving customer experiences, ensuring efficient and secure data flow is essential.
Adding RDS MySQL as a Source Connector
If the above steps were followed as described, your AWS MySQL instance should be Streamkap compatible.
Note: You must have admin or data admin privileges to continue with the following steps.
- Log in to Streamkap.

On the left side navigation pane
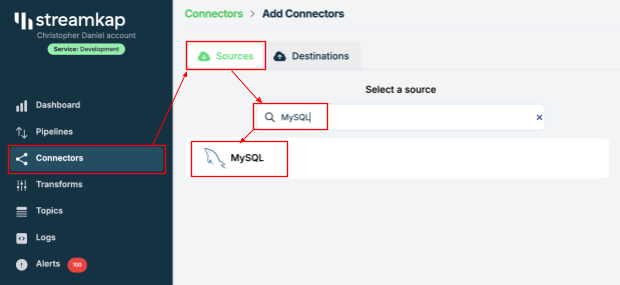
- Click on Connectors
- Click on the Sources tab
- click the + Add button
- Enter MySQL in the search bar and select it from the list of available services, as depicted below.
- Populate the MySQL connection with the name, hostname, username, and password provided in your database dashboard.

- Manually add your MySQL database name and also all tables you want to stream.
- In this demo, we’ve added the `source-database` database along with the table `orders`.

- Once the database and tables are added, click Save.
- A new connector will be listed in Connectors > Sources.

Adding a Destination Connector
- To add Databricks as a destination connector click on Connectors on the left side, then click on Destinations and press the + Add button

- You will land in the Databricks destination connection configuration page as shown below.

Plug in your desired
- Name
- Choose append or insert as ingestion mode
- Paste the personal access token and JDBC url retrieved from Databricks Warehouse Set Up section of this guide
- Key in the destination schema of your choice
Press Save on the right-side bottom of the screen.
If all goes well your Databricks destination will be created with status as Active as shown below.

Adding a Pipeline
- Click on Pipelines on the left side of the screen, then click on + Create.

- Choose your relevant MySQL source from Select a Source and your Databricks destination from Select a Destination, as depicted below:

- Select the Orders table and the Public schema if you followed the guide. Otherwise, make the appropriate selections and click Save.

- Upon successful creation of the pipeline, it should look similar to the below screenshot with status as Active.

- Go to your Databricks warehouse and query the orders table to see sub-second latency streaming in action as shown below.

By design Your Orders in the destination will have the following meta columns apart from the regular columns.
| Column Name | Description |
|---|---|
| _STREAMKAP_SOURCE_TS_MS | Timestamp in milliseconds for the event within the source log |
| _STREAMKAP_TS_MS | Timestamp in milliseconds for the event once Streamkap receives it |
| __DELETED | Indicates whether this event/row has been deleted at source |
| _STREAMKAP_OFFSET | This is an offset value in relation to the logs we process. It can be useful in the debugging of any issues that may arise |
What’s Next?
Thank you for reading this guide. If you have other sources and destinations to connect to in near real-time, check out the following guides.
For more information on connectors please visit here.

PUBLISHED
TL;DR
Related blog posts
.png)